Ultima VII Part Two walkthrough
This is a self-made solution to Ultima VII Part Two. It is separated into chapters, which each chapter divided into the main plot and additional actions. This solution does not include general gameplaying tips.
Useful Links[edit]
Monitor – Courage[edit]
Arrival on Serpent Isle
After your spectacular arrival on the Serpent Isle, start going south. Suddenly a teleport storm will strike, displaces your companions and swaps your equipment with other objects. Well, go on and after passing the docks, you meet the monk Thoxa, who of course first wants the copy protection out of the way. After that is done, she gives you the Hourglass of Fate and you should get all information from her, especially that you have to prevent the "End of the World". However, just then fellow monk Karnax arrives and after some disagreements and blows, both depart.
Go further and Shamino rejoins you, stating a list of displaced items. Right afterwards you find the first of the items. Seeing the red bush, search for the illusionary wall that leads into a cave, where you get all the important equipment (force open or pick the chest) and do not forget the room that can be reached through another illusionary wall. You also find an enlightening scroll on the corpse there.
Afterwards, follow the path in order to reach the eastern gate of Monitor.
Quest for Knighthood
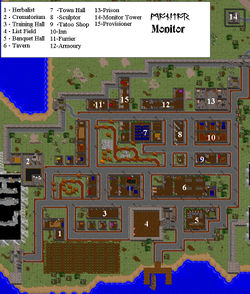
Flicken at the gate makes it clear that even if you are a friend, they don't trust you and calls some pikemen to escort you to the city commander. Go north and you meet a teenage girl named Cantra, who is eager to become a knight and can tell you a lot about the test. Then enter the crematory and go to the crypts, where you find Lord Marsten conducting a funeral. After some back and forth, you are allowed to stay but Iolo accidentally crashed a funeral and is in jail. Unfortunately, only a knight can get him out. However, you should strive to become a knight anyway, since otherwise half of the people in city will not talk to you or are a lot less forthcoming. So ask Marsten for taking the test and he gives you the password.
Right then the pikemen escort Dupre to you and thankfully he can join you without trouble, adding more to the list. You can first visit Iolo in jail, before taking the northern gate to leave Monitor. Take the first way east to find a hut where Shmed, the administrator of the Knight's Test resides. Give him the password and he outfits you with the test gear. Now you are ready to tackle the dungeon for the test. To solve the problem, see Knight's Test solution. After you got the dead wolf and the meat (important, you must have all of it separately!), try to exit and Shmed reveals himself as the one who manipulated the test to kill you. That did not work and his following attack seals his doom.
Afterwards go back to Lord Marsten, who congratulates you and says what is next. Now, give the dead wolf to the furrier Cellia and the wolf meat to the barmaid Lucilla. To save yourself several headaches, wait now 24 hours in order to get the finished cloak, before going to the tattoo artist Lydia in order to get you wolf command tattoo. When ready, you can report to Marsten, who tells you to get to the banquet hall. So go to the banquet hall (careful, due to a bug, only approach it from the east) to be initiated as a knight of Monitor.
However, things do not go according to plan. First, once you reveal during the banquet how dangerous the test was, the people present realize that foul play had been involved. Then Harnna the town healer storms in and reveals that someone kidnapped her daughter Cantra! Everything dissolves into chaos, pretty much ending the banquet.
Search for the Traitors
First things first. Ask Lord Marsten to release Iolo and get him out of prison with the key given. Afterwards start talking around town about the whole issue. Most of the people are quick to say that they suspect Krayg to be the traitor that sells secrets to the goblins, but that does not have to say anything at all. Simon the innkeeper also is not very helpful. (Take a swing of his ale, only to learn that it is quite nasty stuff.) Afterwards confront Krayg. Of course he denies it but mentions that the goblins have a meeting place in the forest north of Knight's Test at a black obelisk.
However, now that time has passed, you realize you are poisoned! Go to Harnna, who can temporarily cure you, but needs Varo Leaves from Fawn for a real cure. She also talks about her kidnapped daughter and asks for your help. Accept and look into her crystal ball. Yep, there is Cantra...and Batlin? They are fighting it out and where did Cantra learn magic? Confused, you accept the task of finding Cantra and Harnna gives you her practice sword for once you have found a good bloodhound. First, make a detour to Fawn to take care of the poison problem, avoiding the Fawn Tower for now. After some discussion at the gate, the guard lets you in and takes the letter from Ruggs (this is a side-quest in the Fawn-section). Go to the healer Delphynia and get the leaves, then return to Monitor to be cured by Harnna.
After the cure, confront Lydia about the poison and she attacks you! Seems she was in league with Batlin! Now go to the goblin forest to find the meeting place at the black obelisk that Krayg told you about. Of course, there are many goblins and your companions spot a suspicious ale bottle. Take it (do not drink it!) and show it to Lucilla to be told it is Simon's. So confront him until he cannot get his story straight and it turns out he is a goblin spy. Dying he will turn traitor and tells you the whereabouts of the goblins village. Take his keys and return to the forest to find the entrance to the goblin caves in the northwest. Thanks to the keys, you can now enter the path to the goblin village.
See Goblin Caves solution to solve the problem and get to the village.
Once in the village, start to slaughter everyone and completely loot it, (beware: some of the chests are trapped) before entering the hut of the goblin king, Pomdirgun. He tells you some interesting stuff about the real traitors, before calling in the guards. Some violence later, you can loot the place and get his keys. The keys unlock the treasure room that, besides loot and the important Helm of Courage, also holds two interesting scrolls that incriminate Lord Marsten and Spektor as the traitors. It seems they wanted to take power and worked with the goblins to weaken the other commands, but were double-crossed.
Go back to Monitor, and show both scrolls to Caladin to get the traitors imprisoned. Thanks to your deeds, you can keep the Helm of Courage as well, and you will need it later on. Now you are done in Monitor and it is time to go to Fawn.
Additional Actions[edit]
Swapped Items
You can get back the following items:
- Iolo's crossbow: Take it from a pedestal in the crypts. Afterwards ask Harnna about the urn you got and give it back to Caladin for 200 Monetari reward.
- Dupre's shield: After becoming a knight, Lucilla tells you that Luther has it. Insult him and then defeat him in a duel on the List Field (halberd works best) during a training session (for which you need three training points). You can keep the Shield of Monitor as well.
- Magic bow: You find it even before reaching Monitor. Just take it and put the bear skull into its place (it belong there).
- Burst arrows: They are found in a crate in Pomdirgun's house in the goblin village. Just take them and ditch the bone hairbrush.
In the Area
- Everything an Avatar knows about Sex
After becoming a knight, there are two optional sexual encounters, both ending with possession of a gwani cloak:
- Male Avatars should go to Lucilla and after some sweet words where she admits she likes strong knights, you can arrange a rendezvous with her. Return to the tavern after it closed at night, talk to her in her bedroom, and let the action roll.
- Female Avatars have Brendann. Agree to come to his place in the night and he can give you a lecture in a completely new kind of art.
- The lost pikeman
After killing Pomdirgun, you can use his keys free the pikeman Johnson, who almost were eaten, from the goblin prison. You can try to escort him back to Monitor, but he dies of a heart attack on the way regardless what you do! Do him a last favor and carry him to the crematory for a proper funeral. BEWARE: For some reason there is a possibility that your party accidentally attack Johnson during combat if he is near you. At that time you should keep him in a distance!
- Harnna's husband
Visit the two imprisoned traitors and they confess that they did something to Harnna's husband in order to hide their dirty dealings. Lucilla in the tavern afterwards gives you a key. Search the mountains near Harnna's house for an illusionary wall and unlock the door behind it to find the powder magazine, lots of loot and the body of Harnna's husband. Take his letter, read it and give Harnna the sad news.
Fawn – Love[edit]
Note that from now on you encounter magic scrolls. Keep one of each spell so that you make life easier for yourself later on.
Getting established in Fawn
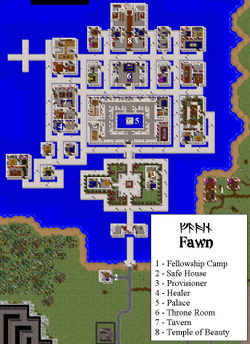
On the way to Fawn, slaughter the goblins in the near guard tower, so that pikemen can reclaim it. Once you enter the town with Iolo (so it could have happened earlier), a teleport storm drops a lute in front of you and Iolo is inspired to sing a moving song that greatly impresses the townspeople. Now, go directly to the chancellor Zulith, who gives you information (in his own way) and promise to arrange an audience with their leader.
Afterwards, start talking to the townspeople with exception of Alyssand to get a feeling for the city. As it seems, great captain Voldin and priestess Kylista are pretty much running the show with the help of the oracle, having Zulith keep Lady Yelinda, the nominal ruler, ignorant of everything. Therefore, finally talk to Alyssand and she pretty much tells you there are some who want to topple this corrupt regime. A little later, you notice Zulith spying on you, so confront him and he leaves in a huff. That done, also talks to the people in the Fellowship Camp before returning into the city.
Eventually, the sailor Kalen attacks you in Batlin's name. Some time after this, the guards tell you that Lady Yelinda has granted an audience. So go into the palace, where you enjoy a good drink... and Dupre accidentally praises Lord British. A beating later, you find yourself in the inn and Dupre behind bars, being called to the temple for the trial.
The Trial against Dupre
Pick up your companions and proceed to the temple to enter the trial. There, Voldin and Kylista leave no chance to make you and Dupre look like complete heretics. Eventually the trial ends and the next day the judgment are expected. So go and find Alyssand, who thinks the oracle that is used to create judgment is manipulated, as it always does as Voldin and Kylista want. She gives you a key for a room in the temple. Come back when it is night, unlock the left room in the temple and enter the basement, where the jail is located. Pull the switch and go up the other stairs to find... Voldin. He had made sure you lose the trial. Once he attacks, either kill him of just use a blue potion (then he will be jailed). Now play with the levers until the oracle is free and tell it to reveal the truth about how the trial is corrupt.
That done, go back to sleep.
Once 24 hours since remiss have passed and it is daylight, go back into the temple. You can call witnesses for kicks to rip Dupre's reputation to shreds, but once the judgment come, the oracle incriminates Voldin and Kylista, while at the same time freeing Dupre of all charges. The traitors are jailed and Lady Yelinda apologizes, giving you the Crystal Rose of Love as compensation for all your troubles.
Additional Actions[edit]
Swapped Items
You can get back the following items:
- Magic gauntlets: Talk to Alyssand and she will return them to you. You keep the ring they were swapped with.
- Magic armour: Kylista has it in her house. It is possible to get it without asking her. Take it from her house and you may keep the breastplate as well, as it is good armour.
- Torches: They are in Alyssand's shop. Just take them if you still want them. You probably no longer have the money it was swapped with.
In the Area
- Fellowship People
You remember the letter that Ruggs gave you? Get it to Delphynia and she writes him a reply, which you in turn should get to Ruggs. Ruggs in turn will tell you that their cartographer Scots has a map of the Serpent Isle ready for you. It is not exactly precise in the northern area, but better than nothing and works with a sextant.
- Portal to Hell
In the ruins a bit northeast of the Fellowship camp, you notice a strange, red portal. Walking into it is going to send you almost literally to hell. Beat the wingless gargoyles there and then search the corpses in the teleport chamber, before using the teleporter to return to the surface.
- Serpent Gate
While you are at it, Fawn's Serpent Gate needs to be unlocked. Take the key from Lady Yelinda's house east of the palace and use it to unlock the door in the southwest corner of the palace to free the way to the gate.
At the Inn of the Sleeping Bull[edit]
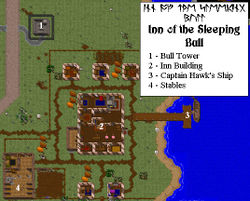
Entering the inn, you should talk with the inhabitants. Devra and her son Argus are running the inn and are a spring of information. Wilfred the other son CAN join your party later on. The other guests are also interesting. Ensorcio is an exiled mage and can tell a lot about Moonshade and its inner politics. Flindo can add to this information, while Kane wants to go to Moonshade for help to find his brother. The bard Byrin can give information about the land. As it seems, the only ship belongs to Captain Hawk, but thanks to Flindo the pikemen of the Bull Tower arrested him and nobody is going anywhere for the time being.
Since you obviously need to go to Moonshade as well, go to Bull Tower and try to bail out Hawk. However, the pikemen are corrupt and greedily always demand more than you have. Return to the inn, where you now meet Selina, who offers a treasure hunt. Take her in the party, but do not dismiss your companions. Now follow the coast north until you find the wrecked Royal Mint of Britannia! Seems it got teleported here. Use a key given by Selina to unlock it. Ignore the teleport traps until you have looted the mint, especially the gold bars. Alas, Selina betrays you for she is working for Batlin. After she has fled, kill the assassins and return to Bull Tower. Drop all gold bars except for one, which you use to bribe the pikemen. Afterwards, free Captain Hawk.
Before you do anything, NOW is a good point to spend all your training points, as you will be away for some time. So go to Monitor and train at the list field.
That done, talk to Captain Hawk and in the end, he agrees to do the job. Make sure that Flindo and Kane are both awake and in the main room of the inn, before approaching the ship, so that everything goes without problem. Although the passage is not exactly smooth, you arrive in one piece on the island where the city of Moonshade is located.
Additional Actions[edit]
Swapped Items
You can get back the following items:
- Swamp boots: Talk to Devra and she recognizes the slippers you have. Exchange the slippers with your swamp boots.
In the Area
- The Powder Mill
On the way to the mint, you encounter the exploded powder mill. Do not double-click any of the ghosts (that creates a bug) and kill them instead, before plundering the building.
- The Basement of the Inn
This is the big haul. Enter the basement of the inn and find the secret door between the beer casks that leads to a hidden room with two chests and a switch. Flip the switch and get a key from the chests, then use the southern door to descend one level deeper. Welcome to Silverpate's caves. First, take the left path until you reach a big room. The northern wall has an invisible chest with some spells, especially False Coin, which you should keep especially safe! On the western wall, the second chest from the bottom holds a treasure map and another key.
Now backtrack and take the right way. Find the secret corridor across form two torches and loot the caves before you find the Serpent Gate in the north, where you find another key -which unlocks the teleporter back to the surface- and a map of the Dark Path.
- Loot
There is a hollow tree just at the southern fence. Besides good loot, it has a key. Then stack crates for stairs to the top of the obelisk at the northern fence at the coast to reach an invisible chest you can unlock with said key to get more loot.
Moonshade – Truth, Part 1[edit]
The Politics of Moonshade
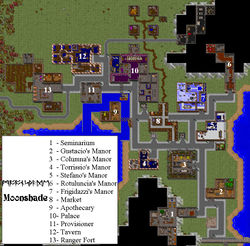
After your arrival, first off go to the swamp in the east, where you find some Blood Moss in the middle of it, which comes to be important later. Then enter Moonshade. Go right away to the Seminarium and first talk to the students, before having a chat with Fedabiblio about a replacement spellbook. You need three FRESH Mandrake Roots, something quite difficult to acquire, so lets save it for later.
You become aware fast, that as long as you don't have a spellbook, the only mage willing to talk to you is the necro-mage Mortegro, whose séances at midnight you should visit to get plot developments. Before anything else, first talk to Flindo. He says he needs time to arrange an audience with the MageLord, so talk to all the other non-magical people in town, until an Automaton arrives with a message from the sorceress Rotoluncia. To make it short, she wants something, but you have to disappoint her for you do not have it. Afterwards talk to Flindo again, and he has actually managed to get you invitations to a banquet of the MageLord, and some minutes later, you are automatically teleported into the palace.
Of course, it does not go according to plan. Rotoluncia openly attacks you with spells, Gustacio defends you, and Frigidazzi is interested in you. During this event, Pothos comes in right and tells the MageLord Filbercio, that the stock of blood moss has dried up, causing Filbercio to end the banquet.
Well, now that Pothos is back, have a chat with him and you get the feeling he is hiding something. So talk with Bucia about him and she tells you how much he looks like the mad mage Erstam. Confront Pothos and he offers a deal: give him blood moss and he in turn for your silence tells you how to reach Erstam, who could be helpful. Since you already have it, finish the deal and Pothos tells you how to call a giant turtle that get you to the island. Again, fate has other plans, when all of a sudden, while you are on the way, Iolo just disappears.
Go to Filberco, who suspects Rotoluncia and allows you to raid her manor. She however is not home and you destroy her automaton guards. The most important item is your first serpent tooth and you read letters that speak of a love hovel. Report to Filberco and he allows you the usage of his boat to reach the hovel. Once there, go into the basement, confront and kill Rotoluncia and free your companion. Now, finally you can ring the bell at the docks north of the city, to call the turtle that brings you to the Isles of the Mad Mage.
The Secret of Teleportation and the Spellbook
Now, entering Erstam's lab you will find him surrounded by body parts. Talking to the man himself does not get much of a result, but he mentions teleportation. So talk to his assistant Vasel and learn about Erstam's Serpent Jawbone. First, have a talk with Boydon, who currently is just a head, before confronting Erstam that you now know. However, Erstam offers a deal: he wants to create a Frankenstein-like person and needs a phoenix egg. Get him one and help in the creation, and in turn, he will give you the jawbone. Accept and get teleport to another island.
The objective is simple. Reach the lava pool with the dead body of Skyrise and pull the lever to set the lava ablaze, reviving her. As thanks, you get the egg. Then find the teleporter back. Report to Erstam of your success, then put the egg, Boydon's head, torso, arms and legs into the combinator to revive him. Erstam is pleased and gives you a serpent tooth and the key to his shed, where you find the jawbone. Talk to Boydon about joining, then to Erstam to get two more teeth and the permission to have Boydon in the party (you have to do this now). Let Boydon join and put all four of your serpent teeth into the jawbone, then enter the Dark Path with the Serpent Gate.
Find the gate to Monk Isle. On the island, there are five different monks to talk to Thoxa (who you have already met), Karnax (ditto), Braccus, Draxta and Miggim. You finally get more information what you have to do, namely preventing the end of the world, although the prophecies (as you can read) are strangely written. Karnax also gives you the Amulet of Balance (if you did not already get it from dying) while Braccus says the tides are not yet right for a mandrake root harvest. So try to get time move by until Braccus says its time, then pick up three roots in the northern swamps.
Now, first enter the Furnace gate. You cannot enter the city yet, but there is good loot. Then return to Moonshade and give Fedabiblio the Mandrake Roots. Some copy protection later, you have your replacement spellbook.
However, wait! You by now should have gathered lots of reagents and spell scrolls. However, only transcribe Unlock Magic. Now is the perfect time to accept the challenge of the Silver Seed. Make sure you have lots of food and potions ready, before using the Amulet of Balance while standing on a Serpent Gate.
Additional Actions[edit]
Swapped Items
You can get back the following items:
- Magic helm: It is found in Frigidazzi's house. Just take it and leave her fur cap behind.
- Dagger: You find your dagger in Erstam's house. Take it if you want and leave the hand behind, where it belongs.
- Erstam takes you lab apparatus, but you get nothing in return for the moment. In addition, while the stockings belong to Moonshade, nothing can be done about it for now, the problem is solved later.
In the Area
- A Letter for Delin
Freli in the Deminarium wishes, he could give a letter to his father Delin in Fawn. Accept to the delivery and once you have returned to the mainland via Furnace, give the letter to Delin.
- Houses in the Forest
There are three houses in the western forest. They hold loot in form of spell scrolls. However, you cannot enter Stefano's house (the southernmost one) until much later. Note that one of them originally belonged to Vasculio.
- Loot
North of the city is a chasm. The one where you fall in the first time you tried to go by it. At the bottom, you find, among other things, a magic bow.
The Silver Seed[edit]
Arrival in Serpent's Fang
After some trouble, you have arrived several centuries in the past. Make sure you are wearing the Amulet of Balance all the time while you are here. Note that until you have solved the problem, you are stuck here.
First thing, go to the main hall and talk to the commander, Isstanar. He is very mistrustful of you, but finally releases the Keyring to you – no more key clutter, so put all your keys onto it. Next, go talk to the healer Surok, who is responsible for identifying magical objects and reviving you if you died. He also can give you lots of information. In the lower level, you find the mage Elissa, who is the only mage trainer and a spell seller as well. Finally yet importantly, you find sub-commander Tsandar in the torture chamber, and besides telling you more about the forces of Order, he is responsible for training (very important later on).
Now that this is done and you have picked the keep dry, lower the drawbridge and accept the challenge.
The Maze
This is by far the easiest of the challenges. After meeting the monk Drusilla at the entrance, put your gear into the hollow tree (otherwise it becomes a mess), then enter the maze.
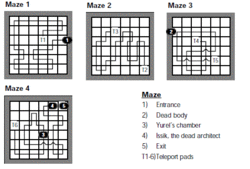
The rules are simple. Entering a room opens or closes the passages and you need to get to the teleporter that leads to the next level, of which there are four. If you are locked in, kill yourself in one of the fires in the corners. As for a solution, follow the path that is marked on the map, and do not forget to take the cheese from the body at 2. On the forth level, you reach Yurel at 3. Give him the cheese and you get the orb. Then follow the path to 4, where you find Issik's dead body, which holds the powerful Helm of Light.
Once you are done, go through the illusionary wall to 5 and exit, get your gear back from the tree.
The Abandoned Outpost
After getting some false advice from the monk Rieya, enter the outpost.
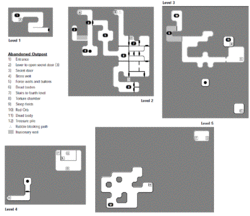
Descend stars A and find the secret passage in the west then flip switch at 2. Follow the new passage east, then at 5 press first the NE button, then the W button and finally the SW button to free the way. At 6 you find the remains of Commander Ardiniss's forces, search them all and especially take the Lightning Whip. Go east through the illusionary doors, then south. Go to the torture chamber at 8 (loot along the way) and take the scroll from Commander Ardiniss's body, then use the right iron maiden to enter the powder magazine and take some powder kegs.
One the way back, Unlock Magic comes in handy. Now, find a key in the room with the green things that opens the path to B, that you have to free with the powder kegs. Take the rope from the body at 11, then go to 7 and put the Lightning Whip on the pedestal. After some back and forth between levels, go through the sleep fields at 9 and then take the orb at 10. Now backtrack to 4 and use the rope on the well. Descend and once you meet force fields, read Ardiniss's scroll to free the way to H, where you find at 12 the guarded Belt of Strength and more loot.
You now can leave the outpost.
Lair of the Fiend
Be warned that The Fiend has trapped his lair thoroughly and the traps do much more damage than enemies, so better have a good stock of healing potions and spells at hand before you enter.
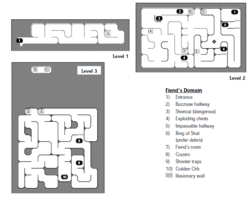
Once inside, make your way through the trapped corridors to the stairs at A. Go to the next level. Important: run through the buzzsaw traps at 2 to reach B, which leads to C. Now follow the path and go through the illusionary walls to reach the Fiend's laboratory at 7. He gives you some hints about the orb and the ring. Of course, you deny him the ring, which causes him to attack. The best method to deal with him is distance weapons, while the Avatar (whom he always attacks) just evades the entire time. Once that is dealt with, backtrack to the exit of A.
Now we have to get the orb and the ring. First the orb. Find the secret wall west of the stairs that lead to the stairs D. In the lower level, follow the path SE to finally find room 10, where you have to be careful to evade all traps and fires to get the orb. Then go to 9 and through the northern illusionary wall to find the stairs E. Then you have to find another illusionary wall that leads to 6, where under some rubble, you finally find what you want.
The Ring of Reagents obsoletes all reagents and your only limit is your mana! However, but you can only really use it once you return to Moonshade. For now, exit the lair.
Aram-Dol's Realm
Aram-Dol has many bodyguards and the advice from Solaria? Fake, so ignore her.
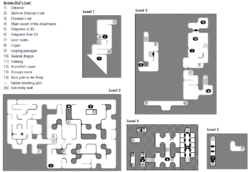
First you can descend B to talk to Draxinar at 3 for an interesting conversation. Then descend A and fight your way to 4 where you descend the stairs E. Down there, you can enter Aram-Dol's lair unless you want to accept his challenge, so enter the teleporter at 5. Find a key hidden behind a pillar to unlock the door blocking the stairs at L. Down there, pull the lever, then ascend again and find the secret passage in the north for another key that opens the door behind K that leads to teleporter O.
Next is a lever puzzle, where you have to pull certain levers in three groups of them. The first involves pulling lever 2. The second you have to pull are 1, 2 and 5. The third you have to pull 1, 2, 3 and 6. Then enter teleporter N. Next, find the secret wall in the east and enter the crypt. Find a hidden key, then go through another illusionary wall in the north, descend P and go through the fake fire for another key. Backtrack to 8 and go through H. After some trouble, go through the fake wall at 10 and enter I. At 11 you have to flip all the switches in the cells, before pulling the brass lever, that frees the way to J.
Finally you meet Aram-Dol. Quickly kill him, then unlock his treasure room at 13, where you find the orb, lots of good loot, Erinon's Axe and the Gauntlets of Quickness. Now take the exit.
The Silver Seed
Now that you have all orbs and let Surok identify your artifacts, find a button in the wall near the stairs east of Elissa (hidden behind a candlestick) that moves the keg near her. Descend the newly revealed stairs and go across the bridge to a room with four pedestals. Find out where to put which orb, until they are all dark and the door opens. Take the Silver Seed, causing Drusilla, Solaria and Rieyna to appear. Turns out, they work for the Guardian! Better kill them quickly, then use their keys to free the way to the surface, where Karnax appears and instructs you to plant the seed. Do so. The Tree of Balance grows quickly.
Now that you are done, you can get the well-deserved praise from Isstanar, Surok, Elissa and Tsandar and can return whenever you want. For now, return to Moonshade.
Moonshade – Truth, Part 2[edit]
An Affair with Consequences
First off, now that you have your spellbook and the Ring of Reagents, transcribe all your spell scrolls into your spellbook. That already should fill up your spell selection nicely. Next, exchange all your money, gold and gems at Bucia's into Guilders. Thanks to the spell False Coin, your finances never run dry. Now the mages of Moonshade are perfectly willing to talk to you. So first off, buy all the spells they offer and you do not have yet, closing many gaps in your spellbook.
Talk to Torrissio, but be sure to not to mention the stockings, or he will not sell you any spells (Not always. He can buy the stockings from you, but will never pay.) Warning: Do not mention it to Melino and Columna as well. Mortegro is willing to let you buy spells from him. (Which you should). Once you got every spell available, the only mage left is Frigidazzi, who is at home now. Talking to her, she offers to "teach" you at midnight.
Return at midnight; wake her up to 'talk'. Your companions leave and though you can resist Frigidazzi at first you always can play along. One way or another, you end up having a great night of lovemaking. Note for female Avatars: Frigidazzi does not discriminate by gender.
Next morning things go bad. Filbercio arrives, sees you and his girlfriend naked together and a trial later you are thrown into the Mountains of Freedom. Follow Solution for the Mountains of Freedom, to get out of that trap.
Gustacio's Experiments
Now you have a defective black sword, Stefano leaves you (tell him to leave his equipment) and you should pick up your stuff from the locker. Now pick up your companions (Boydon at the provisioner, Dupre in the tavern, Shamino in the western forest and Iolo at Gustacio's). Shamino has Frigidazzi's apology, the Chill spell (transcribe!) and Serpent Earrings, which you wear to hear the Great Earth Serpent. As Iolo says, Gustacio wants you help with an experiment, and he says he is studying the teleport storms when Mortegro had vanished. So take his orb to the test platform north of the city and experiment.
After getting the results and getting teleported yourself, fetch your companion and tell Gustacio the results. Go to Fedabiblio, talk to him then look into the crystal ball and talk to him again. Looks like Kane's brother Edrin turned into Ale the parrot. Go to Gustacio, he gives you a cage and another orb. Catch Ale with the cage, put the cage onto one of the test platforms, power it with the orb and activate that platform. Now that Edrin is back to normal (and you have talked to him), give Kane the good news, before talking to Gustacio, who gives you the Mirror of Truth and teaches you his spells free! Learn all the spells you can from him.
Through the Furnace[edit]
Now you need to go back to the mainland. So ask Captain Hawk, who tells you of a tunnel. Go to the ranger fort and bribe Julia in order to get the key. Before you do so, bribe Mosh with a fish to get a harp against the Ratmen. Also, take her word serious and take the Comb of Beauty from Columna's garden. Then go to the shack where the stairs are located and descend. See Catacombs Solution to see how to pass.
Once in Furnace, you have to talk to Lord Zhelkas. Accept his test to gain entrance. You should systematically search through the city and get what you want, only use the Chill spell when needed to keep cool. In one building, you can take the Everlasting Goblet. In a body in the bathing house (in the south) you get the fire key (do not put it onto the keyring!) and in the park in the SE – get there by getting the key in the arena a little W – the ice key. You also get the serpent tooth for Monitor. Note that to reach the park, you do need a key found in the arena next to the entrance to the park. Now go to the great temple to the NE and put both keys on the altar to get the blackrock key (can be put onto the ring!), which unlocks the door on the upper story that leads over a teleporter to the Serpent Gate.
That done, go to the building south of the temple. Touch the black pillar and you have three tests to solve:
- Shamino: push the right (top) button to free the slaves (if you push the other, you force them to have sex with you).
- Iolo: resist the temptation and watch the fake Iolo vanish through the moongate.
- Dupre: ignore his tempting and continue hammering the worms with the provided hammer until all are dead.
Once you have passed, you get the Serpent Ring from Lord Zhelkas (put it on). Find him and talk to him about leaving and he promises to free the way to Monitor. Go back where you first met and he frees the way. Now go until you reach the troll caves and you need to find the troll king. You can recognize him by the two-handed sword he's using. Take a key from his body and open their storage room. Go in (important) and take the Serpent Staff with you. (Important: step into the chamber and pull it directly into your backpack, or a bug could strike!)
Now follow the caves west until you find the exit that leads to a little east of Monitor.
Additional Actions[edit]
Swapped Items
You can get back the following items:
- Spellbook: You find your spellbook in the troll cave near the king. However, it is ruined and trying to use it is going to make it explode, hurting you.
Gorlab Swamp[edit]
Now, before you do anything, use all the training points you have built up to train your characters to the maximum in Monitor. If the Avatar has already hit the maximum in STR, DEX and CON, go back to Elissa and start mage training as well. While in Monitor, also buy winter gear for each of your characters (except the Avatar, who already has the wolf cloak and the Helm of Light and just needs fur boots), making sure you use snow leopard cloaks instead of gwani cloaks (that would offend them). Also, visit Ensorcio at the Inn of the Sleeping Bull and buy his unique spells, leaving only three gaps of story-relevant spells in your spellbook. Also buy seven buckets from Alyssand (it will make sense later).
Make sure you have the rose, the mirror and the helm in your inventory, then try to enter Gorlab Swamp and you fall asleep.
Once in the dream realm, you notice you just have these three items with you and are alone. Everything you pick up is only made of dreams (although there is a cheat to get all these items). For now, explore the place. You just start at a dream temple, where Thoxa tells you something about a Moon's Eye. Then go north to find Lord British, who pretty much tells you how the teleport storms are wrecking Britannia (there is a magic armour near him). You also find Cantra, who is having strange nightmares. Finally, Siranush can explain to you that Rabindrinath who is keeping all of them here and you need to get his dream crystal.
For now, avoid his fortress and first find every dreamer and get everything you can get (cheating here is useful to keep the stuff), then enter the keep. Entering the main room causes Rabindrinath to appear, but thanks to the Helm of Courage, his spell fizzles out. Some trouble later, go into the torture chamber, and Rabindrinath comes for round two. This time, the Crystal Rose of Love stops his spell. Finally go into his bedroom and he tries for the last time. The Mirror of Truth will reflect his lethal spell back upon him. Take the key from him and unlock the door to the crystal.
Get the crystal to Siranush and she – after a nice scene with Edrin – destroys it, freeing everyone. Once you wake up, you now have the Serpent Amulet in your possession, which you should always wear.
The Northern Forest and Shamino's Castle[edit]
Helping the Forest Master
Now that the enchantment is lifted, you can easily pass the swamp and enter the Northern Forest. Right at the western coast, you see a sight of a horrible massacre and the logbook does not sound promising. Go to the Northern Encampment and speak to the leader in charge. Turns out Draygan are responsible for all the bloodshed and alas invulnerable. Talk to Beryl when she is alone. She tells you of all his crimes and that King's Savior could get rid of him. Not to mention, that Morghrim the Forest Master should know more about all this.
Go to the Silver Tree Grove and if you notice Draygan's men spying on you, scare them away by talking to them. Morghrim informs you that Draygan had stolen his orb that made him invulnerable. He offers to help finding the Hound of Doskar if you get the orb back and tells you more about King's Savior. Get one of the plants west from his hut, then treat an arrow with it. Return to the encampment, wait until Beryl and Draygan are in the same screen, then shoot him with the arrow and beat him to death.
Taking the orb from his dead body causes the Forest Master to appear. He takes the orb, Beryl goes with him and you get the Hound Whistle, which you can call the hound to you.
Confrontation at Shamino's Castle
Now, put the wooden practice sword on the ground, call the hound and let it track Cantra with the help of the sword. It points east. Pick it up again and go east, until you see Shamino's Castle. After some shocking news from Shamino, accept his map then look for two tree stumps near the mountain that leads into a secret passage. Once inside the castle, Beatrix, who did not find Shamino leaving funny accosts you. You first need to get all levers in the NE room into down position then search the outer rooms. Beatrix appears often but is easy to dispatch.
Once you are done, enter the main keep. Batlin's goons swarm you, so fight them. However, Batlin himself gloats that you are too late, before teleporting away with his inner circle. Upstairs, you see he has not lied. Cantra is dead...Thankfully; a monk appears and takes her body to Monk Isle to return life to her. Now, pick up Batlin's Fellowship medallion and leave the castle. Provoke Shamino into getting near death (a fire field is very useful) and Beatrix saves him, apologizes and gives you his personal item (later important).
Now you need to find Batlin.
Additional Actions[edit]
In the Area
- Hazard's Lodge
In the middle of the forest, you find the lodge of Hazard the trapper. His fellow trappers will attack you, so kill them. A note by Hazard reveals that he has your glass sword, but he left for the cold north earlier.
Into the frosty North[edit]
Quest of the Gwani
Put on your winter gear before entering the passage to the north. See Northern Passage Solution on how to get past the labyrinth. Near the exit you meet Fitch who tells you of a powerful witch (actually a possessed Gwenno), before dying. In a nearby cave, you can see he did not lie, as all other trappers are horribly slaughtered.
Now, put Batlin's Fellowship amulet on the ground, call the Hound and let it track Batlin - this is absolutely needed, otherwise you'll be stuck. That done, go north into the village of the Gwani. Listening around you learn that Gwenno were killed by the trappers and now is buried in a secret tomb. Also, young Neyobi, the daughter of the chieftain, is sick. Baiyanda says that ONLY the blood of a frost dragon can cure her. Take another bucket with you for this task.
On the way to the ice raft further north, you meet Kapyundi, who tells you of a failed attack on the dragons. So enter the raft and set course for the Ice Dragon's Lair. Use the back door at the east to quickly slay the ice dragon and get its blood with the bucket. While you are at it, get your Magebane from another island. Now go back and tell Yenani of your success. In return for the blood, you get the password for Skullcrusher.
Skullcrusher
Enter Skullcrusher. To open the entrance, put the serpent runes onto the right pedestals with matching ophidian letters (turn off any translation spells). Once that is done, use them in the following order: I, S, C, G, I. As there are two I's, it means you have to use first one, then the other. Now the way should be free.
You should have little trouble to find Vasculio's home. First, put the Black Sword onto the ground and use the Flux Analyzer on it to repair it. Take the black sword with you again. Then, pick up the Philanderer's Friend, as you need it later. Next break into the prison cell to the west, and after dealing with the skeleton, take the serpent teeth for Fawn and the Northern Forest from the corpse and put them into the jawbone.
Go into the eastern room and read the scroll. Vasculio climbs out of his coffin, and will eventual attack you. Having the Magebane makes things much easier. Take the key from his corpse that unlocks the eastern door. You can now explore Skullcrusher at your own leisure and get hints from the ghosts that haunt it. Also, take a powder keg (several are found) and blow up the northern double brass doors for later.
Now that everything is done, go to the eastern exit and unlock it to reach the snow plains.
Additional Actions[edit]
Swapped Items
You can get back the following items:
- Rudyom's Wand: found in Vasculio's workshop. However, it now only makes people sneeze.
- Magebane: You find the Magebane on Penguin Island and taking it provokes a penguin attack. Having it creates a reaction from Vasculio, but you should keep it, as it is a good weapon.
In the Area
- The House of Wares
In in the tunnels, you also find the grave of a bard, who gives you a key. That key is for the House of Wares, where you find Captain Stokes, a literal software pirate. Using his computer gives you interesting and amusing results.
- Treasure Hunt
There is a stranded pirate ship in the ice sea. Make sure you quickly loot the corpses, before they re-animate and cause the loot to disappear.
Confrontation at Spinebreaker[edit]
Before you do anything, go south and enter the Temple of Emotion. After freeing Shriash by smashing the pillar, (it hurts). Put the four lodestones on the small pedestals near the water, then fill a bucket with the water of Emotion (you need that later!). Then look into the Eye to see Batlin preparing his plans. In addition, after you leave, next track down Silverpate's treasure by using the map you found in the basement of the Inn of the Sleeping Bull. You find the important Balance Blackrock Serpent; you really need that later on.
Now that this is out of the way, let us go to Spinebreaker
Right at the entrance, Batlin sends an Automaton to stop you. Kill it; get its key to proceed. Use telekinesis to open the next door and kill another automaton. Go east and soon enough there are two doors. First push the southern button and Brunt will tempt you. Ignore him and push the northern button. A secret passage in the northern chamber leads into the actual city.
Now, you need three items to proceed further:
- Abacus of Logic: you can find that on a pedestal in the SE corner of the city.
- Scroll of Ethicality: this is located in the SW corner of the city.
- Dagger of Discipline: found in the NW corner (it is a serpentine dagger).
Put it in this order: scroll, dagger, abacus on the pedestal in front of the house of the Hierophant to gain entrance. Lie to the Automaton there that you are the master to get the scepter, which you in return put on the pedestal in the main room to get teleported. Move the red book on the desk to get a key that not only unlocks the exit but also a room with an illuminated book in the west, which you HAVE to read. Are you ready? Search through the entire city and grab what is useful, until you are ready to proceed.
Once you have picked the city clean, go to the SE gate and push the button. Ignore Palos' taunts and instead use Detect Trap and Destroy Trap to clear the way. Once you have looted the next rooms, the Automaton at the eastern gates tests you allegiance, so tell him "The Structure of Order" to pass (you learned that in the book). Open the northern gate and Deadeye taunts you. Again, search for traps and then swipe the key from the body to open the door. Go north to the antechamber of the shrine.
Selina is there and seals the room before turning Deadeye, Brunt and Palos into Cyclopes! First, kill these three, as they shield her with their life force. Afterwards, kill her as well and listen to her last words. Search her body and take the Dispel Field scroll. Transcribe this now, as this is the only one you get! With her death, the fields are down.... Now, dismiss Boydon temporarily from the party, or he will not survive what is coming. Also, put the equipment of your companions in near piles onto the ground, or it will turn into a mess! Keep Dupre's Shield, Iolo's Lute and Shamino's Book for yourself, then proceed into the shrine.
Confront Batlin. Unfortunately, he will stun you and proceeds to acclaim immortality with the use of the Wall of Lights. However, Batlin did not trap the Banes of Chaos carefully enough as they kill him and take possession of your companions, before leaving. The Guardian displeased with the betrayal, does nothing to help.
Search Batlin's body and put the teeth from his Serpent Jawbone into your own. Also, take the Chaos Blackrock Serpent with you. Then ask Boydon to rejoin you. The equipment is safe here, so leave with the Serpent Gate of the city.
Aftermath of the Banes[edit]
Teleport to Skullcrusher and dispel the field in Vasculio's trophy room to get the Gwani Horn. Next visit the Gwani. Looks like Hazard caused a massacre among them. Yenani says Hazard also stole a locket. Go to his hunting lodge up north and confront him. Nothing but violence works. Take the locket from one of his chests (you also find your glass sword) and show the locket to Yenani to get the tooth for Sunrise Isle. (this better is all done now)
Use the ice raft to enter the Gwani Death Temple. With the horn, blow up all the ice (careful!) until you can get Gwenno's body. Take her with you. Return to the mainland and teleport to Monk Isle. Find Thoxa and let her revive Gwenno, but the ordeal left her insane, so look for Karnax, who tells you that Fedabiblio should know more. Also, witness the vision at the Place of Visions. Now teleport to Moonshade.
Shamino the Anarch has pretty much destroyed the place. Revive Fedabiblio in the Seminarium with the Philanderer's Friend. He tells you what happened, and then take the key and scroll from him. Read it. Next, go to Stefano's house. Columna sent a death knight to kill him. Quickly help him and in return, he gives you the key to his shed and a serpent tooth. In the tavern, search Hawk's body for another key. Unlock his chest and take the treasure map and instructions. That done, searches all mansions for golden chests, which have serpent teeth in them. After you are done, you should only miss two teeth. Also, put a bucket of ordinary water onto the altar in Gustacio's cellar to get the Water of Tolerance. Finally, unlock the shed of Stefano's old house in the forest to get the Order Blackrock Serpent.
Report to Karnax and he finally understands that the waters from the temples are the key. Read the fitting book in the library, before setting out to get all the waters. You already have Tolerance and Emotion, leaving four temples.
- Discipline: You should take this one first, as it is what Gwenno needs and gives you another party member. Teleport into the temple and search for two Y-shaped items you have to put into the altar. Also, talk to ALL automatons and read ALL books to learn about body transfers. Test out the path to discover acid, then retreat. Ask Petra in Moonshade to join you for the problem, and then use the transfer machine in the temple. Take TWO buckets with you and go through the acid, filling up the buckets at the spring with the Water of Discipline. Now return upstairs and wait until the effect wears off, but leave Petra in the party, as she's a good companion and if you tell her to leave, you never see her again! Return to Monk Isle and heal Gwenno with one of the buckets, then listen to what she has to say, before returning to the task.
- Logic: You arrive in an ice cave. Walk north and use the horn to clear the path until you reach four teleporters. Use the combination red, yellow, blue, red, white to enter the temple. Now place the runes from the pedestals in this order from left to right in front od the door: B - C - O - W and push the button so you can enter. You now have to solve two puzzles. First, question every single of the Numbered Automatons about the murder of Automaton seven. Four has no alibi, so accuse and kill him to get key number one. Then in the next puzzle, place the leftmost blue stone on top of the middle one to turn off the field and get another key (or use the spell). Unlock the door and fill one bucket with the Water of Logic, then leave.
- Enthusiasm: After entering, find your way through the labyrinth until you reach the well where you fill one bucket with the Water of Enthusiasm. Also, use the lens present to get a glimpse of the Banes of Chaos plotting. Then leave.
- Ethicality: The temple was razed, so go underground and pass the three tests. In test one; selflessly push the button in the fire (its fake) to free the man. In test, two put all valuables you have on the golden pedestal and then walk forward, ignoring all loot. In test three, fight Batlin and do not give up, regardless what happens. Once you have passed, fill a bucket on the surface well with the Water of Ethicality.
As you now have one of each, go to Moonshade. Bribe Torissio with the Philanderer's Friend and he gives us the Create Soul Prism spell which you transcribe at once. Now talk to Ducio while you have nine worm hearts in your inventory and he makes you three worm gems, which you treat with the spell to create Soul Prisms. Return to Monk Isle and Gwenno gives further instructions. Use the waters of Tolerance, Emotion and Enthusiasm to charge up the soul prisms. Next teleport into the Northern Forest and let the Hound track your companions with one of the personal items.
Once you enter the Castle of the White Dragon, you need to get into the throne room in the basement, to confront the Banes. Now beat them with the black sword and then use each soul prism with it to imprison them permanently. Take the bodies of your companions back to Monk Isle and let them revive there. Just as Gwenno was before, they are insane from this ordeal. You will have to give them the appropriate water of Order. That means: Shamino was Anarchy and gets Ethicality. Dupre was Wantonness and gets Discipline. Iolo was Insanity and gets Logic. Afterwards, Xenka suddenly returns.
To restore Balance[edit]
Re-Uniting the Chaos Serpent
Xenka is a woman of clear words and charges you with finding out how to restore the balance, giving you the serpent tooth for the Isle of Crypts.
However, you have to do some other things first before proceeding. Get your three companions back and return their gear from Spinebreaker to them. That done first visits Monitor, where the Wantonness Bane forced open the gates, allowing Goblins to sack the city and kill almost everyone. Talk to Harnna and get some information. Wilfred is the lone survivor at the Inn of the Sleeping Bull, as the Wantonness Bane did good work in killing everyone else. To get the Serpent Crown you will have to use Captain Hawk's treasure map. It is in one of the hollow trees in Knight's Forest. This is VERY important.
Now, Mad Iolo did quite a number with Fawn, as next to everyone except for Ruggs is dead and vermin runs around. Zulith's letter (found on his body near the drawbridge) hints at a last serpent treasure, so take Lady Yelinda's necklace from beside the throne and track her with the Hound at the entrance of Gorlab Swamp. You find her in the Gorlab Swamp, skinned by Mad Iolo! Quick, give her the Comb of Beauty to restore her beauty. Thankful she gives you the key to the treasury. Find the illusionary wall in the palace and downstairs, in the treasury, you find the Serpent Armour, the final serpent artifact.
You also need the Summon Shade spell. So go to the Temple of Tolerance and you find Mortegro trapped there. Offer to help and go into the basement. There, use Serpent Bond and slither through the narrow passage (kill any rats) then pull the lever. Take the found key to unlock the wrench room and free Mortegro. Transcribe the spell, then escort him outside... only to have him struck by teleport lightning and vanish.
Now go to the Isle of Crypts. Once inside, first take the southern passage and put the Blackrock Balance Serpent on the altar to get several items (take it with you again!). Far in the west is a secret door leading to a teleporter. Once teleported, search the coffins until you find a mummy that has a scroll with it. Put it on the empty pedestal besides the one with the golden snake, then read the book in the new chamber to get teleported again. Now go west and north and then dispel an energy field to get the Chaos Serpent Eye. Use the final teleporter behind it – after a fake wall – to get to the grave of the Great Hierophant. Open the coffin and use Summon Shade to talk to him. He finally tells us to re-unite the Chaos Serpent, but only the Chaos Hierophant could know, how.
So go to the Temple of Tolerance again and free Sethys from the basement, who now is willing to follow, but dies soon after due to aging several centuries. Take the glowing orb. Teleport to the Temple of Enthusiasm. Cast Summon Shade directly after leaving the gate and the Chaos Hierophant can give you clear instructions and says there is a sort of sacrifice needed. Asking Xenka on Monk Isle it turns out someone needs to burn to ashes! (Important: for her to say this, you need to have gotten the tooth from Yenani, got the Seprent Staff correctly and talked to the Chaos Hierophant) Because you picked the shortest straw, you are the one who need to do this. So go to the crematory in Monitor, climb the machine and pull the lever...
Dupre, guilt-stricken with the things of what he has done, sacrifice himself into the crematory machine! Take his ashes, and then return to Monk Isle. Gwenno is also shocked, but now very willing to join you. So return to Monitor and give her Dupre's gear, before making your way to Skullcrusher.
Do you remember the blown-up doors? They lead into the lower level. Find the stairs further down in the south. That level in turn has stairs up that lead to the shrine of Chaos. Do not be fooled by its emptiness and search for a secret door in the north that leads to the Wall of Lights. First place the Chaos Blackrock Serpent in the fitting slot. Next, place the three soul prisms on the right pedestals. Finally, put the urn with Dupre's ashes onto the final pedestal. It works! The Chaos Serpent is completely again!
Xenka appears right then and says that you have to do the final deed on Sunrise Isle, before giving you the Ophidian Sword. Take the Blackrock Serpent with you before leaving.
Sunrise Isle
Since you already got Yenani her locket back, you can now teleport to Sunrise Isle.
There are two scales north and south where you have to put a red and a blue snake on each pedestal to balance them and get altogether six items. Now you have to search for six small temples, where you have to put the item opposite to the temple's dedicated virtue on the altar:
- Torch (representing ethicality) – Tolerance
- Abacus (logic) – Emotion
- Dagger (discipline) – Enthusiasm
- Chain (tolerance) – Ethicality
- Heart (emotion) – Logic
- Rose (enthusiasm) – Discipline
Read the book that appears and tak it with you. Return to the gate and read it between the columns. Fire bridges appear to help you north to the Shrine of Balance - read the book again between the next pair of columns to reach the shrine. Be warned that it is a one-way trip. Therefore, you need all items, before walking over these bridges.
First, take a key from the west wing and unlock a chest in the east wing to get a chaos candle. Put that on the altar in the west to break the ice wall and get the order diamond. Also, get an ice block that you put onto the eastern altar to get a bridge to the chaos ruby. Put both onto the fitting pedestals in the center to gain admittance to the next chamber.
Now you have to get two cubes of order and chaos. It is impossible to describe the whole sequence here, so see instead:
Shrine of Balance room puzzle solution
Alternate putting the cubes onto the altar (dissolve the fire fields when needed) until you have created the teleporter. Inside, put the serpent armour, crown and staff onto the altar to get the Order Serpent Eye and permission to proceed. Take your stuff with you.
The Order Serpent of course tries to stop you. Now, put all three blackrock serpents into the fitting slots to activate the Wall of Lights. Next, put both Eyes of the Serpent on the altar to revive the Great Earth Serpent. Last, use the Ophidian Sword to destroy the statue and re-unite all three serpents.
Congratulations, you have saved the universe... at the cost that the Guardian kidnaps you right then.
| Walkthroughs | |
|---|---|
| Game | Ultima I ☥ Ultima II ☥ Ultima III ☥ Ultima IV ☥ Ultima V ☥ Ultima VI Savage Empire ☥ Martian Dreams ☥ Ultima Underworld ☥ Ultima VII ☥ Ultima Underworld II Ultima VII Part Two ☥ Ultima VIII ☥ Ultima IX |
| Console | Ultima III (NES) ☥ Runes of Virtue ☥ Ultima VII (SNES) |
| Fan Games | Ultima IV Part 2 ☥ Ultima V: Lazarus ☥ The Ultima 6 Project ☥ Ultima: The Dark Core |
