Ultima VII walkthrough
This Ultima VII walkthrough first deals with the main plot, and then Forge of Virtue, before describing each side-objective by location. This solution does not include general game-playing tips.
Useful Links[edit]
The Main Plot[edit]
This is the main quest of the game. Instead of chasing Elizabeth and Abraham, it will proceed in a more streamlined order. As such, the solution may omit some finer details.
Trinsic Murders[edit]
The game opens outside the Trinsic stables, where an initial conversation with Iolo informs of the recent discovery of a brutally murdered Christopher, the town blacksmith. Mayor Finnigan's request for an investigation should be accepted, albeit with an honest admission that the stables are yet to be searched. Do so and the crime scene can be examined. Take the key and show it to Finnigan by talking to him, and he will suggest inquiring about it with Christopher's son, Spark.
Any attempt to leave Trinsic through the eastern gate will be prevented, as Johnson requires a password that the mayor will only provide after the murder mystery is solved. Therefore, these steps have to be taken to gather all the information required to piece the crime together:
- Johnson at the eastern gate describes finding the unconscious night guard Gilberto, who is currently at the healer.
- Talking to Spark reveals details of a man with a hook leaving the murder scene. It is also learned that Christopher was the city's blacksmith, and investigating his smithy will provoke the first signs of the Guardian's presence. Allow Spark to join the party, as he is a useful companion. Enter the second floor of Christopher and Spark's home and open the chest with the key. Take the gold, scroll, and medallion within.
- Gilberto is found at the healer and confirms what Johnson has said, adding that the ship Crown Jewel had been in the harbour that night.
- Gargan the shipwright confirms seeing the man with a hook and that the ship left for Britain, according to his logbook.
With all necessary information acquired, speak again to the mayor. Provide him with a report stating that Christopher was the town's blacksmith and upon his body was found a key, which opened a chest containing gold, a scroll, and a medallion. Also confirm the suspect, a man with a hook who escaped by way of a ship, the Crown Jewel. Before receiving the password to exit the city gates, a geography quiz that serves as copy protection must first be answered.
Before leaving, speak with everyone in town and take all supplies that can be found. Also attend the Fellowship service at 9 o'clock in the evening to hear what Klog preaches to the masses about what has transpired. Upon exiting Trinsic, break open the chest hidden under a tree southwest of town, and watch the performance of the travelling theatre company on the northern road.
Continue travelling north to Britain.
Developments in Britain[edit]
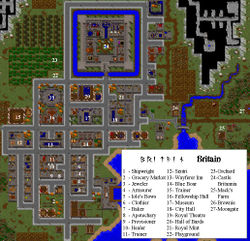
Once in the Britannian capital, seek out Lord British, who, after some pleasantries, provides his Orb of the Moons when it is mentioned one was not brought from Earth.
Afterwards, fetch the key from the study and find the hidden lever that gives free access to the roof, upon which resides a store room containing the vitally important spellbook. Reagents should thereafter be kept well stocked.
Talk to Chuckles in the great hall. Agree to his game and only answer with words containing one syllable. Upon winning, read the scroll he gives until finding his direction at the very bottom, which suggests talking to a fortune teller in Minoc for another clue.
Visit the main branch of the Fellowship to meet its founder, Batlin, who will teach more about the organization. Request to become a member; after a series of questions he will deem it necessary to join the Fellowship for enlightenment and personal improvement. Batlin will then request transportation of a sealed box to Minoc. Accept this task and take care of any other business in Britain (which should include procuring the eight Virtue Stones from the Royal Museum after-hours, as they will be required later), then proceed to the city of Sacrifice.
The box can be opened to read the scroll inside, but this has some consequences.
Bloodbath in Minoc[edit]
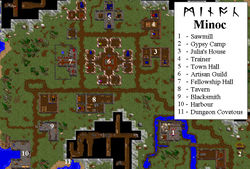
Arrival in Minoc will occur in the midst of a commotion at the local sawmill.
Talk to mayor Burnside to learn there has been a grisly double murder in the sawmill of two local gypsies. Entering the building reveals a familiar modus operandi about the murder scene. Take the serpentine dagger and look at the candelabra. Inquire around town to learn that the victims had a contentious relationship with the Fellowship, and Xanthia will recount that the candelabra was sold to the organization. The local Fellowship leader Elynor denies any knowledge of the matter.
When Batlin's box is given to Elynor, there are two possible outcomes:
- Should the seal be intact, she will give a reward.
- If it is not intact, she will be very angry.
Following this, talk to the gypsy fortune teller Margareta. Ask for a fortune-telling and in turn she reveals some foreboding information. Margareta describes a dark power that threatens all of Britannia and prevents her from discerning its whole nature. It will also be learned that in order to proceed further against this mysterious peril, aid will be required of the wisps dwelling in the Deep Forest.
Return to Britain to report to Batlin.
Entering the Fellowship[edit]
Upon returning to Britain, talk again to Batlin (if the box was prematurely opened, be honest with him about the matter or he will refuse to continue with the initiation without an apology). Pleased with the successful delivery, Batlin requests that a small amount of Fellowship funds be recovered from a chest deep in the dungeon Destard, with the assurance that the caverns are deserted.
Embarking on this quest, the Guardian will warn against proceeding inside as the entrance is approached, but do so regardless. The only objective is to find the chest, which can be recognised by the Fellowship staff beside it. Looking inside will reveal that it is completely empty.
Should it be desired to search the rest of the dungeon, consult the solution for Destard.
Return to Batlin and tell him there are monsters in Destard. He professes regret and allows for the induction ceremony to take place during the evening service. Return after 9 o'clock in the evening and talk to Batlin. The party will interject and argue against proceeding; continue regardless, and Batlin will ask a series of questions regarding the Book of Fellowship as the second part of the copy protection. Once the questions are correctly answered, a medallion and official membership will be granted.
It is important to note that, after leaving the ceremony, the medallion should be kept in the backpack, as numerous people harboring ill feelings toward the Fellowship will not react well to seeing it. It is required only one time later in the game; otherwise, avoid wearing it.
Quest for the Wisp[edit]
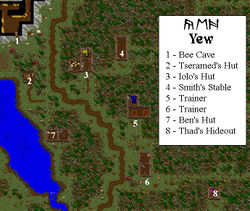
Make way to the Deep Forest and search for the abandoned fortress, wherein a wisp can always be found. However, the elusive being ignores any attempt at contact, requiring another way to attract its attention. Wander further until arriving at Yew and Empath Abbey. Within the abbey, go right to the room of the head monk Taylor, who can provide much information about the local flora and fauna. He does not believe in the existence of wisps, but notes that the emps, who live deep in the forest, are purported to be able to attract their attention. Taylor adds that the timid creatures can be bribed with honey, which is found in the Bee Cave guarded by giant bees. Therefore, go there next to retrieve as much honey as possible.
For a solution, see Bee Cave solution
With a plentiful supply of honey, go to the Emp Village. Always be polite to the emps in conversation and always give honey when they ask for it (thus why the cave's supply should be exhausted). Talk to Trellek, who admits that he can call the wisps, but is unable to help until his wife Saralek agrees to him leaving the village on a quest. She in turn will not give permission until their leader Salamon gives her consent. Salamon will only do so if the local lumberjack is stopped from cutting down any more silverleaf trees. Accept the quest and take the contract Salamon has prepared for the lumberjack. Go all the way back to Yew and find Ben the logger, who is distraught to learn the impact of his cutting and agrees to the contract.
Return the signed contract to Salamon, who now gives her permission to proceed. Saralek will ultimately decide against letting Trellek accompany the party; however, she suggests crafting a whistle that can emulate the wisp call in his stead. Ask Trellek for this and he will quickly make it.
Finally, go back to the fortress and use the wisp whistle to attract the attention of the wisp. It relays a summons from the Time Lord, but before the wisp releases information regarding his whereabouts, it proposes trading it for the notebook of the sage Alagner, who lives on the island of New Magincia.
The Answers to Life and Death[edit]
Upon arriving in New Magincia, go straight north and enter the house of Alagner to ask him for his notebook. Before lending it, however, he desires proof of an eagerness for true knowledge by learning the answers to life and death in Skara Brae from "The Tortured One." Purchase the Seance spell if it is not in the spellbook, before leaving for Skara Brae.
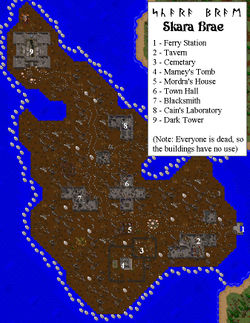
Approach the Ferry Station and cast Seance to talk to the Ferryman, who will provide passage to the island. Upon its desolate shores, seek the alchemist Caine, also known as The Tortured One. It is learned he will only reveal the answers to life and death if the city and its spiritual inhabitants are liberated from the liche Horance.
Find Mordra and talk to her for an understanding of the town's ordeal, then take the black, red, and mandrake (yellow/red) potions from her house. Also take an iron bar from the cemetery near her home, as it will be later required. Afterwards, return to Caine's laboratory and place the three potions under the three nozzles of the apparatus and an empty flask (on nearby bookshelf) under the fourth nozzle. Fire up the burner to brew the liche potion, then pick it up. Following this procedure, talk with all the people on the island, including Horance, before solving the next problem.
The Soul Cage is now required to trap Horance, but Trent the blacksmith is in a blind rage over the loss of his wife, Rowena, and is not of sound mind to finish it. Take the music box from his shop to the Dark Tower, then play it in Rowena's presence to acquire her wedding ring. After showing it to Trent, he will calm down and require the iron bar retrieved earlier to finish the cage. Only a strong party member can carry the completed article, which must be used on the Well of Souls behind the liche's throne room to imbue it with the enchantment capable of trapping Horance.
Wait until midnight for the "Black Service" to commence in the Dark Tower. When all the beds are occupied, place the cage over the sleeping Horance and, vitally, ensure the potion is poured over him as opposed to the cage. Executed correctly, the cage dissolves and Horance reverts to his former self. The restored mage beseeches that Rowena and Trent be reunited before tackling the last problem; make room in the party, if necessary, and escort her back to Trent before returning to the tower for final instructions.
The one remaining task in Skara Brae is to destroy the Well of Souls, which Horance reveals can be achieved by sacrificing a spirit. First ask mayor Forsythe, who agrees to undertake this task should no other volunteer be found. Ask everyone possible – all of whom decline – then return to him. Forsythe will specify anyone who was missed, including the Ferryman. With all options for another volunteer exhausted, he will finally be willing to step forward. Take him into the party and talk to him at the Well of Souls to commence the sacrifice, which will then liberate all spirits on the island. Talk to Horance for a reward, and finally Caine to learn his answers to life and death: "There are -no- answers. Only questions."
Destroying the first two Generators[edit]
Return to Alagner, who is pleased to hear Caine's answer and provides the key to his storehouse, where the notebook can be found (a series of puzzles must be solved to reach it; see Alagner's storehouse for a complete solution). Read the notebook to learn Alagner's theories concerning the Fellowship's sinister underpinnings.
Return to the wisp with the notebook and it will provide instructions on using the Orb of the Moons to reach the Time Lord, and also speak as to the Guardian's identity. When attempting to return the notebook to Alagner, however, he is discovered ritualistically murdered, the Guardian gloating with mock gratitude for passing on the sage's findings.
Use the orb by targeting it Northwest to enter the Shrine of Spirituality and consult with the captive Time Lord, who provides further revelations as to current events in Britannia and the Guardian's intentions. The ethereal being gives directions to destroy a generator in Dungeon Despise, which the Guardian is using to keep him imprisoned at the shrine. Following the Time Lord's counsel, travel to Lost Lake and enter the dungeon. Follow the dungeon solution for Despise in order to reach the Sphere Generator. However, its entrance is blocked by a moongate that teleports the party some way back. Use the Mark spell on a Virtue Stone to quickly return to this location later with Recall, then get back to the Time Lord.
The Time Lord suggests that the Hourglass of Nicodemus can breach this defense mechanism, but upon talking to Nicodemus near Empath Abbey, he recounts having sold it to Beverlea of Paws after it lost its enchantment. Buy it back from her and talk to him again. In his current state, Nicodemus is unable to perform the necessary enchantment without the ether first being restored. Return to the Time Lord again and he now suggests, after being made aware of the magic disruption, to seek the aid of Penumbra in Moonglow.
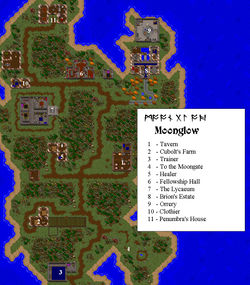
Arrival at Penumbra's house reveals it is locked in an unusual fashion. In order to gain entry, a series of objects corresponding to each of the gold plaque's clues must be placed at the doorstep. Successful placement of each item will cause the party to observe the plaque changing. The following items are required:
- A lockpick.
- A gold ring or ring, which can be bought from Sean in Britain.
- A spool of thread, one of which can be found at the docks of Spektran.
- A gold coin, nugget, or bar.
Upon completion, the plaque turns into a key that unlocks the front door. To stir the slumbering mage, use the nearby orange potion on her; subsequent attempts will only require the Awaken spell. Upon regaining consciousness, Penumbra is overcome with excruciating pain from the disturbance in the ether, and must be shielded from its effects with blackrock before she can provide guidance. Go to Cove and retrieve four pieces of the dark mineral from Rudyom's laboratory; also take Rudyom's Wand, as it will be required later. Place the blackrock on the four pedestals in Penumbra's house and she will be relieved of her pain. With a clear mind, she describes visions of the Tetrahedron Generator in Dungeon Deceit, which is warping the ether. Penumbra reveals the generator's defense must be broken with the Ethereal Ring, and requires that it be brought to her and imbued with the enchantment necessary for this task. She notes the ring was last in the possession of Lord Draxinusom.
Following Penumbra's lead to the gargoyle king in Terfin reveals that he sold the Ethereal Ring to the Sultan of Spektran. Go to the island and inquire about the ring with the Sultan, Martingo, who will say it is kept in his vault. The key to the vault is guarded by a formidable stone harpy, most effectively vanquished by wielding glass swords (or just non magic weapons, and non enchanted missiles, for the harpy is immune to magic) in combination with Mass Might to increase the chance of a successful hit. Once the harpy is finally slain, use the key found upon its corpse to open the vault and acquire the ring. Penumbra can now enchant it in preparation for destroying the Tetrahedron Generator to repair the flow of magic in Britannia.
Proceed to Dagger Isle and follow the dungeon solution for Deceit to reach the generator. After magically unlocking the door to the generator room, first cast Destroy Trap on the generator entrance to disable the lightning trap, then wear the Ethereal Ring (remove gloves if needed) before entering. Inside, the gargantuan ethereal monster immediately attacks, and killing it would normally prove to be a great challenge. However, the following methods will aid in a swift victory, presented in order of effectiveness:
- Command its death to Arcadion in the black sword.
- Use a glass sword in combination with Mass Might.
- Wield a triple crossbow loaded with magic bolts.
Once the Ethereal Monster is defeated, breaking the prism enclosure in the middle of the platform causes the generator to explode, repairing the ethereal waves and restoring Britannia's mages to their former selves. Pick up the small prism that remains (if not, the party will prompt for it to be taken) and leave Deceit.
Return to Nicodemus, who is now of a sound mind to re-enchant the hourglass, then proceed back to the Sphere Generator and walk through the moongate to enter it. The following puzzle consists of walking through the correct order of red and blue moongates, as indicated by the nearby flashing spheres. The wrong order will find the party teleported to a fire pit. Use the combination red, blue, blue, red to reach the prism and break its enclosure, destroying the generator. The Time Lord gives his congratulations on the Sphere's destruction and is gracious for his liberation, but regretfully informs that the generator was engineered by the Guardian to irreversibly disable the moongates in such an event.
For more details of how the moongate puzzle in the Sphere works, see Sphere Generator solution.
The Time Lord proceeds to describe a third and final generator that must be destroyed, and that he can be contacted hereafter by using the enchanted hourglass. Take the small prism and leave the dungeon.
Destroying the Cube Generator[edit]
Set course for the Meditation Retreat, which can be entered either by landing the magic carpet inside the walls, or asking Ian to grant passage, in which case Fellowship membership is required in conjunction with wearing the medallion. Once inside, ignore his orders and enter the caves north of the building. Following the path will find encounters with Gorn and Iriale Silvermist, who warns to either leave or face a horrible death. Silvermist must be defeated in order to reach the Cube Generator. However, the generator itself is protected by a lethally ear-piercing sound; retreat, use Mark and then contact the Time Lord through the hourglass for advice concerning this defense mechanism. He suggests the use of Caddellite helmets, and to consult with Brion in Moonglow for aid in locating a source of the rare mineral required for their crafting.
Go to Moonglow and ask Brion in the Observatory for more information. He suggests asking Jillian at the Lycaeum, who speaks of an event centuries prior in which a Caddellite meteor fell upon the island of Ambrosia, located in the north-eastern sea of Britannia (it is hidden under the compass rose on the map).
Travel to Ambrosia and enter its caves, wherein the Hydra Brothers are encountered. Passage to the chamber is via a secret door; open it and kill the beast, then continue to the meteor and take as many chunks of Caddellite as required, corresponding to the number of party members. Return to Minoc, where the blacksmith Zorn can craft the specialized helms. Finally, return to the Cube Generator and equip all party members with the helmets; this will enable entry to the generator without suffering any harm.
Inside the generator is a maze, which can be navigated by referring to the Cube Generator solution.
Once the generator is destroyed, the Time Lord warns that the Guardian will soon enter Britannia through the Black Gate upon the astronomical alignment, and that any necessary information can be gained on Buccaneer's Den with the cube prism. The small cube has the power to force honesty from certain characters, including the following Fellowship members:
- Klog in Trinsic now speaks freely about the circumstances leading to Christopher's murder, which was retribution for the blacksmith reneging on his contribution to the Black Gate's construction after having already received his payment. Klog diverted suspicion from his own involvement by ensuring he had an alibi.
- Elynor in Minoc implicates herself in the murder of the two local gypsies over their hostility towards the Fellowship. She also criticizes Hook's carelessness in leaving the distinctive candelabra at the crime scene.
- Rankin, Moonglow's Fellowship branch leader, admits his part in the murder of his clerk, Balayna, which only transpires should he be informed of her misgivings about him.
- Batlin senses the cube's presence and vanishes before he can fall under its influence.
However, the next vital objective lies on the island of Buccaneer's Den, where clues as to the Black Gate's whereabouts can be found.
Buccaneer's Den[edit]
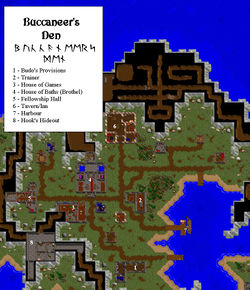
There are two main goals on this island: first, gather information about the final stages of the Fellowship's preparations for the Guardian; secondly, locate the Black Gate key, which provides access to Dungeon Hythloth on the Isle of the Avatar, wherein the eponymous blackrock portal is situated.
Mandy the tavernkeeper can provide information about Hook and his history. She also warns that Buccaneer's Den is more dangerous than ever, and under the control of dangerous elements.
Approach these people with the cube prism:
- Budo, who is associated with the Fellowship, can provide information about the Crown Jewel.
- Danag divulges substantial details of the Fellowship's sinister underpinnings and intent.
- Gordy in the House of Games admits that Hook resides in Buccaneer's Cave, which can be accessed via the rear of the very same premises.
Having obtained this information, approach Sintag while the House of Games is open. With the cube, he can be forced to hand over the key that unlocks the door leading to Hook's grotto, which is adjacent to the building. Within, retrieve the large Black Gate key that is required to enter Hythloth. Hook's hit list can also be uncovered, which contains the names "Lord British" and "the Avatar" as his final remaining targets.
With the Black Gate key in hand, depart for the Isle of the Avatar.
The Isle of the Avatar[edit]
Enter the Shrine of the Codex by either landing with the magic carpet or unlocking the entrance with the Black Gate key, then proceed to the doors west of the area. They must be unlocked with the same key to enter Dungeon Hythloth. Refer to the solution for Hythloth in order to reach the Black Gate.
Upon appearing in the chamber, the Guardian orders his inner circle – consisting of Batlin, Hook, Forskis, Elizabeth, and Abraham – to stop the party from interfering with his entrance to Britannia through the Black Gate. Batlin and his entourage collectively resolve to use lethal force and attack. Concentrate on Hook first, as his death will cause Batlin – who is effectively invulnerable – to flee. Afterwards, kill the remaining foes and place the three blackrock prisms on their corresponding pedestals around the gate, which disables the beams surrounding the dais and preventing access.
The Guardian warns that should the Black Gate be destroyed, so too will the only remaining prospect of a return to Earth. Relenting to his dissuasion and proceeding through the portal ends the game with a short passage of text, in which the Guardian is purported to have assumed control over a defenseless Britannia with ease. Instead, use Rudyom's Wand on the Black Gate to destroy it and prevent the would-be conqueror from entering.
Forge of Virtue[edit]
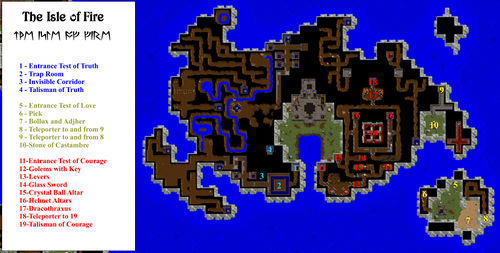
Forge of Virtue can be started at any time in the game, although it could be suggested to wait until having a large, well-equipped and trained party before doing so; otherwise, the Test of Courage with its many difficult battles could prove quickly overwhelming. Once ready, talk with Lord British about the tremor and promise him to investigate the possible re-emergence of Exodus, so that a peer crystal and a ship deed is received. Also take the lenses from the museum before leaving for the Isle of Fire.
Upon arrival, take the time to talk with Erethian. Also talk with Arcadion, a daemon trapped in a mirror and forced to serve Erethian. Promise to find the Ether Gem in order to free him, although Erethian will claim that it will not work the way the daemon imagines.
Now that this is done, it is time for the three tests of the principles.
The Test of Truth[edit]
Talk to the statue of the wise mage to get teleported into the test area.
This test deals with illusions and misleading. Just follow the path and avoid the middle of the big room that follows, as it is trapped with lightning bolts. In the western corridor you see a hood lying on the floor. Search the northern wall until you find a hidden passage and follow the invisible corridor to the chamber that holds the talisman of Truth.
Take the talisman and you've solved the test, gaining 30 INT as reward.
The Test of Love[edit]
Talk to the statue of the lovely bard, before entering the southwestern moongate to start the test.
This test requires you to use your brains. Right from the start take the bucket, then enter the western mine to take the pick you find there. Afterwards talk to the golem Bollux and promise the golem that you would help to heal his brother Adjhar, who got smashed in an accident, so that he gives you the important ritual book. Then go into the eastern caves and find a small clearing in the south that teleports you to a cave near the Stone of Castambre. Now, put the bucket on the southeastern corner of the stone and equip the pick.
- Important: you must USE the pick on the TREE on top of the stone, not the stone itself. Once done right, you get a bucket full of special blood.
Return to Bollux and put this special blood on the five stones around the broken golem, then read the book first. Some is barely readable, but you get instructions for the ritual on a scroll that falls out. Read the scroll as well. Since a golem heart is needed, Bollux rips out his own. After getting over the shock, put the heart into the body of Adjhar and read the scroll to revive him. Adjhar finally finds a solution in the book (you still need to have it), by removing some smudges to give you a hint how to make a new heart.
Return to the Stone of Castambre and once more repeat the process. The first time produces a new golem heart instead of blood, the second time the needed blood follows. Put Bollux's body in the middle of the stone circle, put the new heart into him, put blood on the stones and finally read the scroll. If you are ready, talk to Adjhar to gain the talisman of Love from the glad golem, who's happy to have his brother back.
You get teleported back and as a reward, you DEX is risen to 30.
The Test of Courage[edit]
Talk to the statue of the courageous fighter, before entering the southeastern moongate.
Right away, you have to clear out a room of mages, skeletons, golems and even a liche in order to get the key to the eastern gate (the golems have it). In the next corridor system you first have to flip two switches, while being constantly attacked by giant spiders, to open the next area. There you take a glass sword from a chest beside a dead body. This glass sword has to be put in front of a crystal ball in an area infested with drakes in order to get the key for the next area. In that area, you have to swap a normal and a magical helmet on two pedestals, while being constantly attacked by slimes and gazers.
Finally, this has lowered the northern doors and you can enter another room that is occupied by a powerful dragon. Dracothraxus the dragon is for now unkillable, but rewards you for your valiant try with the Ether Gem, which you should take. Return to the castle.
Show the gem to Arcadion, then equip it and smash the mirror as he instructs. Arcadion gets disappointed however, as instead of freeing him it just made you his new master, but you now have a portable daemon. Next go the Erethian and show your new portable daemon, before you ask for advice about the dragon. Accept the offer of creating a magical weapon and he will create a forge in the castle. First put the sword blank on the forge, then use the bucket to fill the through completely with water. Equip the hammer, then heat up the forge until the sword blank is glowing hot. Put it on the anvil and use the hammer on it. Once it has lost most of the glow, put it into the water, then repeat the process until the Avatar says that this is the best it can get without magic.
Again talk to Erethian and ask what for kind of magic should be used, then talk with Arcadion and embed the ether gem into the sword, creating the black sword.
Return to Dracothraxus and then tell Arcadion to kill her. After some dialogue, the dragon is relieved to finally find release. The key you get opens up the northern teleporter and you can get the talisman of Courage behind it.
You are teleported back and as a reward your STR is risen to 30.
The Talisman of Infinity[edit]
Now that this is done, you still need to deal with Exodus, who tries to return to Britannia with the Dark Core in order to wreck havoc.
First ask Erethian for help regarding the problem, then get the scroll from his room and ask him again. However, he realizes at the sudden that you want to banish the Dark Core into the void and will not help you. Instead, ask Arcadion and you get explicit instructions on what to do. Put the blue lens left of the core and the purple lens right of it. Then put the three talismans on it that they form an almost complete circle, causing the Talisman of Infinity to appear and start to pull the core into the void. Now, Erethian wants to stop you from banishing the core, but his spell backfires and kills himself instead, while the core vanishes into the void for good.
Now that the danger is over, take the lenses back to the museum and then finally talk to Lord British, who is very pleased with you for saving Britannia from Exodus. Final reward: getting your STR increased to 60.
Side-Quests by Location[edit]
These side-quests helps you to gain experience and sometimes good equipment. They also help to understand the state of things in Britannia and are a huge part of the atmosphere in the game.
Paws[edit]
The Serpent Venom Theft
After entering town, talk to a random citizen to learn that something had been stolen from Morfin, who runs the slaughterhouse. Talking to him, he explains that a vial of silver serpent venom had been stolen. Promise to solve the case and start to ask everyone about it. Talk to Camille and Tobias last (they run the northernmost farm) and once you return to the homeless shelter, Feridwyn comes running and tells you that his son Garritt claims to have evidence against Tobias. Garritt is not helpful, so again talk to Camille and Tobias, before going to Morfin, who does not believe the story and gives you a key that Garritt had lost.
Open Garritt's chest (you can recognise it by the panpipes) in the shelter to get the stolen venom. Confront Garritt and Feridwyn with the evidence, resulting in the confession that Garritt did it, before returning it to Morfin. At last, talk to Camille and Tobias to close the case of the stolen venom.
While you are at it, you can loot Morfin's store of silver serpent venom and gold ingots. The key to the store room is in his house, below a plant, and the chest's key is under a bucket of blood.
Lovebirds
Polly the barmaid and Thurston the miller like each other very much, but are too shy to talk about it. Transport messages back and forth to get them to act on their feelings.
Britain[edit]
Imprisoned for an Apple
As you learned from Alina in Paws, her husband Weston had vanished while looking for work in Britain. You find him in prison in the southwestern tower of Castle Britannia. Talking to him reveals, that he got imprisoned for the theft of a single apple, though the orchard keeper Figg gives them away in baskets for the Fellowship. Go to Lord British and he will set Weston free. Alina will tell you of her husband's new freedom.
The Lock Lake Law
Talking to Miranda in the castle, you learn that the council is drafting a law to stop the BMC to pollute Lock Lake and she asks you to get the scroll with the law to the mayor of Cove for signing. Agree and go to Cove to find Lord Heather, who is all too happy to finally do something about the pollution. Return the signed scroll to Miranda afterwards.
Your cheating Heart
Listening around in Britain, you get the idea that people think that mayor Patterson is a pillar of moral integrity. However, his wife Judith has some doubts about him, while the curator of the museum, Candice, reacts strange when his name is mentioned. Farmer Brownie finally tells you how he lost the elections against Patterson because the Fellowship ordered its members to vote for him and that he could have used a secret to discredit Patterson, but did not do that. He will not tell you directly what it is, but advises you to follow Patterson after Fellowship service.
That reveals that he goes to Candice's house. Talking to both of them, you can get Patterson to finally end this.
Relationships galore
There are some romances that you can try to solve. The following people are involved:
- Charles, a butler in the castle, who likes Jeanette, but fears that she is ignoring him.
- Jeanette, a barmaid who thinks Charles is an aristocrat and instead has an eye on Willy.
- Willy the baker, who cannot stand Jeanette instead favors Gaye.
- Gaye the clothier, who likes Willy but has other commitments.
After talking to Charles, talk to Jeanette next to hear her opinion about him and Willy, then tell her about Charles while fellow barmaid Lucy is in the room. Next go to Willy to hear that he would like to date Gaye but that he cannot stand the Fellowship. Talking to Gaye you hear that the attraction is mutual but she is uncertain because of the Fellowship. Sadly, nothing more can be done.
Name, Job, Bye
Raymundo at the Royal Theatre says the role of the Avatar is already taken, but still wants to humor you by seeing if you can make the replacement part. So go to Gaye and buy an Avatar costume, put it on and then talk to Raymundo again to test your acting skill by playing yourself. He will tell you that you will be the understudy, for he finds you not good enough.
The unhappy Innkeeper
Innkeeper James is unhappy with his life, explaining how he feels that his wife Cynthia seems to feel that being an innkeeper is more easy compared to her job at the Royal Mint. Talking to Cynthia, she is surprised at this revelation, having being puzzled why her husband had been so unhappy and tells you to give a reassuring message to James, that money does not mean she would love him any less. James is all too happy to hear it.
Cove[edit]
Love for Nastassia
Talk to Nastassia, the keeper of the Shrine of Compassion. She is very shy. Go to the bard De Maria and he explains Nastassia's past, how her mother died and that she thinks her father had abandoned her. So return to Nastassia and this time she is more open and talk about how her father went to Yew and was never seen again. Male Avatars now gain a girlfriend, while female Avatars gain a sister. She hopes that you can find out more about this mystery.
Go to Empath Abbey and ask Taylor. He thinks that the emps may know more about him. So go to the emps and ask Trellek about Nastassia's father. Turns out he died as a hero when rescuing emps from a certain death. Return with these news to Nastassia, who finally feels her burden go away, now that she knows that her father didn't abandon her at all.
Yew and Empath Abbey[edit]
The false Monk
In Empath abbey, a monk named Kreg wants a black invisibility potion for an experiment. However, strangely enough none of the other monks have ever heard of him. Reading the files at the High Court reveals that Kreg is an alias of the thief Kellin. So confront him and he will attack you. Kill him in self-defense.
Note: giving him the potion will allow the thief to flee.
Flowers for a Grave
Reyna the healer tells you that recently she did not get to tend to her mother's grave. Talk to the monk Aimi about this, and she gives you a bouquet of flowers. Present these to Reyna and she will give you a discount for all healing services.
Back to Nature
You meet two naked people in the Bee Cave who act as if they had lived there all their lives. Go to Tseramed, who tells you that he remembers them from living in Yew. So go back and confront them. Turns out they are Murray and Myrtle, who have decided to go back to nature after the tax council ruined them, and how they love to confuse people with their cavemen act.
Minoc[edit]
The "great" Owen
Listening around town, you get the idea that shipbuilder Owen is some sort of saint and that a statue to his honor is to be erected. However, talking to Jakher reveals quite a different story. So talk to Karl next to learn that Owen's ship have cost numerous lives, including Karl's own brother's. Karl has stolen Owen's plans but cannot read them. Get the plans from Karl's hut (outside of city limits) and bring them to Julia (if she is not in the party). She will point out the horrible design and advise you to alert the authorities. Get word of that to mayor Burnside and he will cancel the statue. Owen commits suicide once you tell him and everyone turns on him.
Vesper[edit]
Bigotry and Racism
Blorn in the tavern tells you that he does not like Gargoyles. As you pretends to agree with his views, he will claim that the gargoyle Lap-Lem attacked him and that he wants him dead. However, going to Lap-Lem, reveals the real story. Blorn stole a valuable locket from him and he was trying to get it back. Return to Blorn and force him to release the locket, which you then return to Lap-Lem.
Moonglow[edit]
The Love Triangle
Phearcy the tavernkeeper says that he is very interested in gossip concerning a possible romantic connection between Zelda, a female scholar at the Lycaeum, and Brion, the head of the Observatory. Talking to Zelda reveals that she indeed holds feelings for Brion. However, Brion openly admits that he does not have feelings for her. Talking to his twin brother Nelson in turn reveals that he fancies her. After giving Zelda the bad news about Brion, talk to her again and mention what Nelson said.
Since Zelda now goes for Nelson, return to Phearcy and tell him this juicy gossip to get your reward in form of food.
The two Brothers
As you hear in town, there is tension between the brothers Cubolt and Tolemac. Cubolt is a follower of the virtues and distrusts the Fellowship; hence his disappointment when his brother Tolemac joined. Cubolt wants you to talk to Tolemac and their friend Morz, who is yet undecided. Talking to Tolemac yields no results. However, when talking to Morz, be polite and do not make fun or even mention his stutter, then you can advise him not to join the Fellowship. Give the news to Cubolt.
A Crystal for the Orrery
If asked about crystals in his collection Brion at the Obervatory says that he would gladly make you an orrery viewer but he needs one last fitting crystal. Talk to Addom in the tavern to buy such a crystal and bring it to Brion. He then gives you the viewer, which can show you the position of the planets.
The Treasurer's Fate
Talking to Balayna gives you the idea that local Fellowship leader Rankin is stealing from the organisation. If asked about it, he will tell you to deliver a bottle to her. If you decline, he silently kills her in the night and disposes of her body. If you agree, the fumes from the bottle kill her. You can only get the truth from Rankin once you have the cube prism to force him to tell you.
Terfin[edit]
Conspiracy
Teregus, the keeper of the Shrines of the Principles, mentions the rumors that someone wants to destroy the altars and asks you to investigate. Talk to Quaeven about the Fellowship and his hope of recruiting the provisioner Betra, then talk to Betra directly. Betra will tell you that he is devoted to the old ways and that only two people have access to the equipment needed to destroy the altars: himself and Sarpling. Go to Sarpling's shop next. Search it to find a scroll that implicates him and Runeb, a gargoyle belonging to the local Fellowship. With the scroll in hand you can force Sarpling to confess his part in Runeb's plot.
Show the evidence to Teregus, who warns you that Runeb could be very violent. Confront Runeb, then defend yourself against his attacks. Afterwards, inform Teregus that the shrines are now safe.
Serpent's Hold[edit]
The defaced Statue
Lord British's statue at the entrance of the keep got defaced. Lord John-Paul offers to you to investigate the crime and hopes you find the culprit. To solve the case, first go to Sir Richter who has found stone chips with blood on them at the crime scene. Lady Leigh can analyze the blood, being surprised that it is from a gargoyle. So go to Sir Horffe, the only gargoyle on the island. He says that his blood is there because he got injured when trying to subdue the culprit.
Talk to Lady Tory, who mentions that Sir Jordan seemed to be nervous. So talk to him and he says that he had heard a woman screaming when the crime happened, and he knew it was Lady Jehanne. So question Jehanne and she admits, that Sir Pendaran did it. Confront him and he admits. Say you will reveal his crime, then talk to John-Paul and say it was Pendaran to close the case.
Lady Tory's Baby
Lady Tory's son was kidnapped by harpies. After talking to her, go to the Shrine of Honor, kill the harpies and take little Ricky back to his mother. Afterwards, put him back into his crib.
Jhelom[edit]
Duel to the Death
Sprellic the innkeeper has a huge problem, as the false Avatar had come to Jhelom and caused some troubles. At nightfall, he claimed that he was cold, so Sprellic gave him more blankets. However, he kept asking for more blankets, and in his desperation Sprellic took the honor flag from The Library of Scars, whose members now wants to duel with him. After getting the information in the tavern, go to Sprellic and promise to help.
There are two ways of playing this:
- 1. Fight for Sprellic in the duel and kill Syria, Timmons and Vokes.
- 2. Use the more subtle way and ask Kliftin the provisioner to sew a new flag. When he is done, give it to Syria while she is not on the list field (otherwise combat ensures). This method provides more experience, but prevents cashing in the bets in a normal way.
You can place bets on Sprellic (Ophelia) or against him (Daphne). The results of the bets depend on who is alive when talking to either of them. If Sprellic is dead, Daphne will pay, if any of the duelers are dead, Ophelia will pay. None will pay until someone is dead, though, even if the issue is solved the peaceful way, as their dialogues will check NPC death flags instead plot flags.
However, if you have a way to kill the duelers or Sprellic without alarming guards (e.g. Time Stop followed by Death Bolts) the bets can be collected after solving the issue peacefully, and the NPCs can be resurrected afterwards with no consequences. Resurrecting them also allows placing bets again, and the bet markers can be exchanged as long as they are dead, allowing cashing in from their continuous deaths and resurrections.
The Serpentine Dagger
After solving the trouble with Sprellic, go to De Snel, the master of the Library of Scars. Show him the dagger from Minoc and he will try to kill you. So kill him in self-defense.
New Magincia[edit]
Three stranded Pirates and a Locket
Talking to Henry you get the news that he and the girl he courted have parted ways due to him losing a locket he had intended as a gift, but he suspects theft and wants you to investigate. So start talking around. The girl, Constance, who does not believe Henry's story, developed a crush on a man named Robin, who was shipwrecked on the island with two friends. The other inhabitants think they are pirates and Russell the shipwright has seen a locket in their possession. So these pirates have to be questioned next.
Talk to the three pirates Robin, Leavell and Battles. Promise Robin to look for "his locket," then question Battles about it, who says they had lost it in the tavern. Force a confession from tavernkeeper Boris that he, in turn, had stolen the locket from the thieves, but that it is gone again. Go to his wife, mayor Magenta, who has it. Say it is stolen and she will give it back. Show it to Robin and he will reveal that he wants to kidnap Constance. Defend against their attacks.
Once that is done, wait until Henry and Constance are on the same screen, then return the locket to Henry and inform Constance of Robin's true character.
Buccaneer's Den[edit]
Two old Friends
The pirate Blacktooth tells you that Mole is no longer his friend, since joining the Fellowship. Talk to Mole and he actually regrets it now, missing Blacktooth. Mention what Blacktooth said, then give Mole's answer back to Blacktooth.
The fake Avatar
When searching around in the Buccaneer's Cave, you come across a prison and torture chamber, where you find the Avatar imposter Sullivan. It is up to you if you free him after killing the prison keep Grod. However, you should free Anton.
Dungeons[edit]
The two Sisters and the Cyclops
You discover the sisters Amanda and Eiko as well as the cyclops Iskander in the dungeon Deceit. To solve the quest, talk to Iskander first, and learn how he'd killed the women's father in self-defense. Then go to the sisters and convince them to abandon their quest for vengeance against Iskander.
Garok Al-Mat
Garok Al-Mat is found being lost in the western parts of dungeon Shame (actually Despise). Help him by describing how to get out and he gives you lots of reagents, before teleporting out of the dungeon.
A Band of Terrorists
In Despise, an invisible staircase leads to the hideout of a band of terrorists under the mage Selwyn. Kill them all and loot the place. Use the right teleporter to loot another part of the hideout. Find the teleporter that leads to Selwyn's Tower for more loot.
Unicorns and Virgins
You have learned from Ophelia in Jhelom that she has a suitor named Cosmo and that she sent him on a fool's quest to prove his virginity in order to get rid of him. You find him and his fellow adventurers in Destard as he is trying to find a unicorn to prove his virginity. Said unicorn is found near the southern entrance and is intrigued by this tale (as normally he only tests females).
| Walkthroughs | |
|---|---|
| Game | Ultima I ☥ Ultima II ☥ Ultima III ☥ Ultima IV ☥ Ultima V ☥ Ultima VI Savage Empire ☥ Martian Dreams ☥ Ultima Underworld ☥ Ultima VII ☥ Ultima Underworld II Ultima VII Part Two ☥ Ultima VIII ☥ Ultima IX |
| Console | Ultima III (NES) ☥ Runes of Virtue ☥ Ultima VII (SNES) |
| Fan Games | Ultima IV Part 2 ☥ Ultima V: Lazarus ☥ The Ultima 6 Project ☥ Ultima: The Dark Core |

