Ultima VI walkthrough
This walkthrough for Ultima VI is a fast solution without all the details.
In the Beginning[edit]
When you start out the game, you are in Lord British's throne room, beset by Gargoyles who followed your party through the moongate. Afterwards, pick up any items from them and talk to Lord British. He will explain what has been happening since your last visit to Britannia.
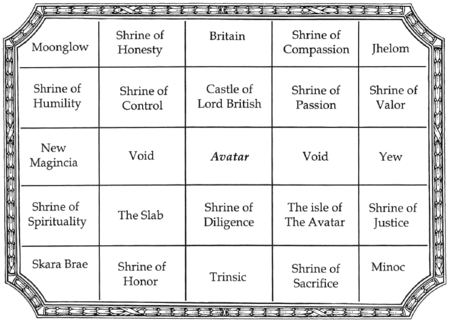
Make sure you ask him about the Orb of the Moons you're carrying. The Orb of the Moons is like carrying around a multipurpose moongate, but you can't use it until Lord British explains this to you. The chart below shows your destinations depending on where you use it.
The Gargoyle Altar is where you were almost sacrificed before Iolo, Dupre, and Shamino rescued you (as seen in the introduction). The Shrines of Control, Passion, and Diligence are Gargoyle Shrines. It is VERY important that you should NOT dare to visit them until you have entered the gargoyle lands the normal way. By using the Orb of the Moons, you can visit all the major cities and shrines without a sea-going vessel, with the exception of Buccaneer's Den. You can either take a ship or follow the sewers under the Castle.
Arms and Armor[edit]
The easiest way to get armor and armament is to buy them from the vendors through the land, but you don't have much gold to start with. Anything you kill in combat, search them. Whatever they're carrying is yours. You can eventually get a few sets of plate mail and swords like this. The best armor can be bought in Trinsic from Brandon. It's magic stuff that protects the best. Since magic weapons are pretty much non-existent, the best melee weapon is the two-handed sword.
For some reason, no matter what weapon you give Iolo, he keeps going back to his crossbow. Thus, keep him well supplied with crossbow bolts. There's a triple crossbow to be found, which is great in combat, but it uses bolts faster. Also, anyone you equip with bows, make sure they don't run out of arrows.
Magic[edit]
Finally, you will need your spellbook. You can't cast magic without it and reagents. At the start of the game, you'll find your spellbook and a bag of reagents in a room to the southwest of the throne room. You don't start with a lot of spells, but you can get more from the various mages around the country. Reagents can be bought, and there are some places where you'll find them. (Spider Cave is a good place to find spider silk, for example.) Utility magic is more useful than attack magic, which you should only use against strong enemies like dragons or daemons.
Unlike Ultima IV and Ultima V, all the spells used in the game are covered in the Compendium. Spells of the Eighth Circle will not be available to you until you prove yourself worthy by interacting with the wisps and then talk to Xiao. If you happen to come across the spell called "Armageddon" – well, save your game before you try it. :)
Freeing the Shrines[edit]
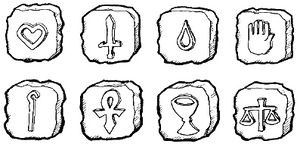
If you spoke to Lord British, he gave you your first quest – free the shrines. Nystul (Lord British's mage) will tell you to take the book that Iolo is carrying to Mariah at the Lycaeum for a translation job. The shrines however are your first priority, since without them, you can't level up, which is vital. To free a shrine, you must have the rune for that virtue, and know the mantra. By asking around various towns, you can find out the mantras. If you played Ultima IV and/or Ultima V, the mantras are the same.
- Honesty – AHM
- Compassion – MU
- Valor – RA
- Justice – BEH
- Sacrifice – CAH
- Honor – SUMM
- Spirituality – OM
- Humility – LUM
Note: ALL the shrines except the Shrine of Spirituality are guarded by gargoyles. You can either fight them or free the shrine and return later. They are NOT easy to beat, at least not early in the game. (Magic and increased strength help.) To free the shrine, use the rune in front of the shrine and say the right mantra, then take the moonstone with you.
The Rune of Honesty[edit]
The next rune is to be found in Moonglow.
After learning from the mayor who the runekeeper is, Penumbra can tell you of his fate. Next talk to Manrel to get the key to Beyvin's tomb by promising to put flowers onto the grave. There is a secret door in the Blue Bottle Tavern that leads to the underground crypts. (There's a lot of other neat stuff down there too – take a couple of Unlock Magic spells down with you.) After you've found the right tomb, take the rune and leave the flowers.
The Rune of Compassion[edit]
Ariana in Britain’s Conservatory has it, as the mayor will tell you, if questioned. You have to get permission from her mother Anya in the Blue Boar Tavern in Britain before she will give it to you.
The Rune of Valor[edit]
In The Sword and Keg tavern in Jhelom, there's a mouse hole. The inhabitants tell you that a rat pulled the rune into the hole after stealing it from the new rune-keeper Nomaan, so you need to get it out of there. Take Sherry the mouse from Lord British's castle, after bribing her with a piece of cheese, with you. Put her in solo mode (in the tavern) to get it out of the mouse hole. Note: IF you want to dismiss her, do that in the castle after getting the rune.
The Rune of Justice[edit]
As the mayor Lenora tells you, the thief Boskin stole the rune and is in prison, yet the rune has vanished. Get her permission to talk to him to get the key from the warden. Talk to Boskin. After listening to his story, talk to the mayor who dismisses it. Confront Boskin and he tells the truth. Under a plant in The Slaughtered Lamb in Yew you will find the rune. Return the prison key to the warden afterwards.
The Rune of Sacrifice[edit]
Selganor of the Artisan's Guild in Minoc has it according the mayor Isabella, but he will only give it to you if you can play "Stones" on a panpipe.
Buy a yew log from Ben Hurlsom the logger west of Yew. Take it to the sawmill in Minoc and have it cut into a board. Take the board to Julia in Minoc, who will carve it into a set of panpipes. Finally, go to Gwenno (also in Minoc) who knows the numerical notation for Stones. (If you played Ultima V, it's the same notation you used on the harpsichord.) Go back to Selganor and tell him the notation, 6789878767653, in order to get the rune finally.
The Rune of Honor[edit]
Standing on a pedastal in the middle of Trinsic, the rune sits. Mayor Whitsaber tells you, that you can take it, as long as you return it. So remember to return it after using it to free the shrine.
The Rune of Spirituality[edit]
Marney in Skara Brae has it in her Hope Chest, however, she doesn't know it, since it was placed there by her dead father, Quenton. In order to get the information, listen to a song she can give you, which mentions a basket, then ask her about it to be allowed to search the chest to get the rune.
The Rune of Humility[edit]
The mayor Antonio of New Magincia has it, but first wants the name of the humblest person in the town before he will give you the Rune.
So, talk to all the inhabitants and find out what they think about Humility. Interestingly enough, Conor at the south docks is the most humble one since he says that he clearly CAN'T be the most humble one. Tell Antonio Conor's name in order to get the rune from him.
Leveling Up[edit]
When you have enough experience to raise a level, meditate on one of the shrines. (Talk to it, and then chant the mantra.) Depending on the shrine one or more attributes will be raised.
Assuming you have enough experience to raise a level:
- Honesty – raises Intelligence by 3 points
- Compassion – raises Dexterity by 3 points
- Valor – raises Strength by 3 points
- Justice – raises Intelligence and Dexterity by 1 point each
- Sacrifice – raises Dexterity and Strength by 1 point each
- Honor – raises raises Intelligence and Strength by 1 point each
- Spirituality – Intelligence, Strength, and Dexterity by 1 point each
- Humility – No raise in attributes
The Book of Prophecy[edit]
After freeing all shrines, the next thing to follow up on is the Book. Take it to Mariah at the Lycaeum, who will tell you what she knows, but needs the other half of a silver tablet in order to translate it. She directs you to the gypsies from whom she bought her half of the tablet. There are two groups of gypsies. The group you want has a gypsy named Taynith and is led by Zoltan. The other ones are led by Arturos. In addition for being a cheap source of reagents, Zoltan will tell you that the other half of the silver tablet was taken by the pirate Hawkins. Best place to find a pirate is in Buccaneer's Den, so that's the next place to go.
Seek out Homer, who sailed with Hawkins. He knows of the tablet, but will only talk about it to a fellow member of the Thieves Guild. He will send you to Budo, who says he's a provisioner. Mention the Guild to him, and he will only accept you if you can steal a belt from a former member called Phoenix. She can be found in the sewers under Castle Britannia, which is connected with the cave behind Budo's house. Phoenix wields two glass swords, which kill with one blow. I found it easier to use an invisibility ring, and cast Pickpocket to steal the belt. May as well take the swords too. They're great in combat, and you'll need one later. (In the Commodore 64’s version of this game, you have to look for the belt under some flowers in Phoenix’s house. That's because the spell Pickpocket does not exist here.)
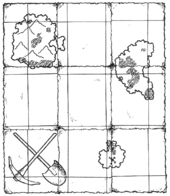
Take the belt back to Budo, who will accept you as member of the guild. Then go to Homer, who will tell you that the tablet is with Hawkin's buried treasure. The treasure map was torn into nine pieces, and you have to go find them. He will tell you the location of five of them, of which four have a map piece.
The Pirate Treasure[edit]
- The first piece is with a shipwreck at 71S, 15E at the Cape of Heroes on an island. Have to get rid of some undead first. (The location is quite different in the Commodore 64's version. It's there at 1A8, 3A8.)
- The second piece is with a pirate Old Ybarra, who is lost at the bottom of the Dungeon Shame and starved half to death. You can trade him food for the map.
- The third piece belonged to Heftimus McPry the beggar in Jhelom, only that he lost it in Dungeon Wrong as he tells you. It's on the third level beyond a secret door.
- The fourth piece is on the body of Ol' Hawknose, who was killed by giant ants and whose body is found at the bottom of the ant mound.
Sandy, the cook in Trinsic, knows the wherabouts of the last pieces. He'll trade the information for a dragon’s egg from the bottom of Dungeon Destard. Kill spells work great on dragons, but be ready – they can cast many of the same spells you can. Once you give the egg, make Sandy tell you all four names.
- The fifth piece is with Lord Whitsaber, the mayor of Trinsic. Remember him of his past (keyword that work are "Pirate", "Hawkins" or "Gordon") and agree to keep the secret in order to get the map.
- The sixth piece is with the insane pirate Bonn on Dagger Isle. He mentions his basement, so search his basement after finding the ladder down by moving his harpsichord and find it down there. (In the Commodore 64's version, you would’ve found in a barrel instead of behind the harpsichord)
- The seventh piece is in the possession of the widow of Nathaniel Moorehead near Empath Abbey, who is called Sylaina. She'll tell you a group of gypsies stole it. Find Arturos (with the other group of gypsies I mentioned) north of Trinsic, who will sell it for 50gp if you say no to his original price of 100gp.
- The eighth piece is with Morchella, who lives east of Serpent's Hold. She will trade it for a magic shield. If you take a curved heater with a serpent on it, a gold nugget, and a magic gem to Gherick at Siege Crafters, he will make a magic shield.
Return to Homer with the eight pieces, who tells you he had the ninth piece all along. He will tell you how many paces to walk, and where to dig after you promise to get him the storm cloak. Buy a shovel and powder keg at the Thieves Guild, arrange the map on the floor so the lines are lined up, and you should see an island with an X on it. (South of New Magincia)
The three rocks Homer spoke of are on the eastern shore; from there walk 3 south, 9 west, and then 12 south. Dig to the south and enter the hole. There are a lot of traps set, so be careful. When you get to a place that says "Drop to your death" you will have a few passages to choose from. Take the hole with the gold nugget next to it – all others will land you in lava.
Once you have find the treasure room on level four, you will have to blow up its locked door with the powder keg (because of the absence of the powder keg in the C64 version you have to use the Explosion spell instead). Grab the storm cloak, tablet piece, and the magic fan. (With the fan you won't need Wind Change spells.) Anything else in there is optional. Once done there, take the storm cloak to Homer.
Take the tablet piece back to Mariah. She will tell you what the Book says, which is the reason the gargoyles are attacking. You are now sent to Sin'Vraal (who, up until now, was believed to be a daemon.) Sin'Vraal will give you some more information, and send you to gargoyle world via Hythloth.
The False Prophet[edit]
Up, up and away...[edit]
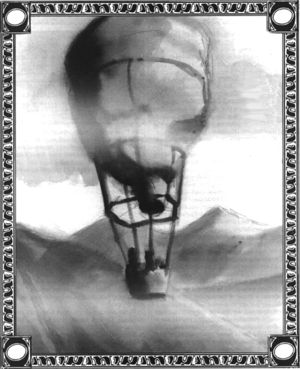
Sin'Vraal will tell you of a Gargoyle Shrine that can only be reached by air. Gargoyles can fly to it – you can't. So, you have to find a way to fly over the mountains to the Temple of Singularity. (The Gargoyles' version of The Temple of the Codex.) Through talking to various people you may have picked up information about a balloonist. Talk to Selganor in Minoc, or Isabella. You will eventually be told to find his body in the castle of Sutek the Mad, who is living in Blackthorn’s old palace. (If you've played Ultima V, you know where the palace is. Non-veterans – the palace is on an island west of the Isle of the Avatar.)
The castle is guarded by bizarre monsters like killer bunnies and two-headed beasts. You'll need either a powder keg or an Explosion spell to blast the door open, then use Telekinesis to lower the drawbridge. From there look for secret doors on walls that take you to the north, a room with switches to raise the portcullises, and eventually you'll find his laboratory.
You'll learn from Sutek that the balloonist is in the dungeons below the palace, is dead. South of the laboratory is the ladder leading down. Switches will open doors, but don't touch the levers. The southern ladder will take you to Pushme Pullyu. One head always lies, the other speaks truth. Good place to save your game, because the wrong path takes you to Buccaneer's Cave, which is a long way back.
You'll find the balloonist's body on the fourth level down, with the plans still on him. According to the plans, you'll need a large bag, a basket, a cauldron, and rope:
- The cauldron you can find in the sewers of Britain, or Dungeon Wrong.
- Show the plans to Michelle in Minoc, who can make the basket.
- For the bag, buy 40 strands of spider silk and take them to Arbeth in Paws to spin them to thread. Charlotte in New Magincia can weave it into cloth, and Marissa in Paws will make the silk bag from the cloth. Use the plans to assemble the balloon, and head for Hythloth.
Into the Depths[edit]
The Orb of the Moons can take you quickly to the Gargoyle world, but at this point, the Gargoyles still hostile so don't. You have to talk to Captain Johne first, who lives on the lower level of Hythloth, so go through that dungeon. Talk to him, who will tell you what he knows and give you a scroll. Use this scroll to be able to communicate with the Gargoyles.
Upon exiting the cave to the Gargoyle world, you will meet Beh Lem, the gargoyle child Johne mentioned. He will join you (so make room for him), and gives you directions to his father, Valkadesh. He will explain the Prophecy, and that he believes there is a way of averting it. He will send you to Lord Draxinusom to surrender to the Gargoyles so you can travel freely within the city.
Surrender to Lord Draxinusom, telling him Valkadesh sent you and agree. He will give you the Amulet of Submission, which you must wear at ALL times in the Gargoyle Realm. From there, talk to Naxatilor the Seer, and ask him of the meaning of sacrifice. He will tell you there are three meanings to sacrifice – self, others, and valuables. You must sacrifice that which is valuable. The only thing of value to the Gargoyles is the Codex, and Naxatilor will ask if you mean destroying the Codex. Answer NO. Return the Codex to the Vortex.
Naxatilor tells you to seek out the Book of Rituals in the Hall of Knowledge. It will tell of two lenses and the Vortex Lens. The Lens is in the Vortex Room, but it is cracked. The Vortex Cube was stolen. Take the lens to the Lensmaker, who will fix it. Take the lens back to Naxatilor, who will tell you what else you need. A concave lens to match the Vortex Lens, and to consult the Codex for final instructions.
Remembering what you know about the Codex, you cannot approach it without being on a Sacred Quest. Captain Bolesh at the healers will suggest you see the Temple of Singularity. This is where the balloon comes in. Go to the end of the trail north of the Gargoyle Altar, and Use the balloon. Use either Wind Change spells or the fan from Hawkin's treasure room. Go north, and exit the balloon. You'll see the Temple, with the Book of Infinity, and the stands for the Book of Prophecy (which you have) and the Book of the Codex. (Which is on the Isle of the Avatar.) Talk to the Temple and say "quest." The Temple will ask for whom do you seek the Codex. Since you're trying to save everyone, the answer is "ALL." The Temple will tell you to seek out the shrines of Control, Passion, and Diligence. Visit the Shrines, and talk to the statues of Mondain, Minax, and Exodus. Each statue will tell you a mantra; combined the mantras form the Mantra of Singularity. Go back to the Temple of Singularity, put them together, and say it to the Temple. It will send you on your way to the Codex.
The first thing upon reaching the Britannia is to find the stolen Vortex Cube. The caretaker of the Hall of Knowledge will tell you to find Stonegate. (Ultima V veterans will know where this is, and remember it as the old home of the Shadowlords.) There is a family of cyclopes living there now; the father wants fish. Take a fishing pole, catch some fish by the water, and trade it for a key. The Vortex Cube is on the fourth level behind a wall of lightning. Dispel the field and grab the Vortex Cube. You also need a second lens. Talk to Ephemerides in Moonglow and give him a glass sword in order to get the second lens.
You can use the Orb of the Moons to get to the Codex; approach the Codex and read it. It will give the final instructions:
"To return the Codex to the Vortex, place a convex lens exactly midway between the Codex and the Flame of Singularity, so that the light from the flame converges on the Codex. Place a concave lens between the Codex and the Flame of Infinity, so that its light diverges over the Codex. Then place the eight moonstones within the Vortex Cube. Set it on the ground in front of the Codex, and use it to return the Codex from whence it came."
See Also[edit]
| Walkthroughs | |
|---|---|
| Game | Ultima I ☥ Ultima II ☥ Ultima III ☥ Ultima IV ☥ Ultima V ☥ Ultima VI Savage Empire ☥ Martian Dreams ☥ Ultima Underworld ☥ Ultima VII ☥ Ultima Underworld II Ultima VII Part Two ☥ Ultima VIII ☥ Ultima IX |
| Console | Ultima III (NES) ☥ Runes of Virtue ☥ Ultima VII (SNES) |
| Fan Games | Ultima IV Part 2 ☥ Ultima V: Lazarus ☥ The Ultima 6 Project ☥ Ultima: The Dark Core |
