Dungeon solutions for Ultima VII Part Two
There are fewer dungeons in Ultima VII Part Two than in the previous games. However, they have become more complex, thus making solutions for them very useful and time-saving.
Knight's Test[edit]
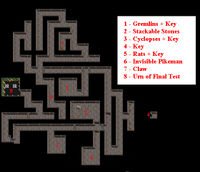
The Knight's Test is typically the first dungeon one enters on the Serpent Isle, as it is necessary to complete it in order to become a Knight of Monitor. You are only allowed to enter the dungeon with leather armour and a mace, and no companions may follow you in. You can generally evade the various traps strewn throughout the dungeon by running quickly down the corridors, and it is possible to overcome many of the enemies by luring them into trapped areas as they pursue you.
From the start, go east to 1 and defeat the gremlins to get the key by smashing open the chest. Open room 2 with it, and build stairs with the stones, to reach the key on the obelisk. Beware: when you pick up some of the stones there is a chance that a snake appear. Unlock the door to room 3 and defeat the cyclops. Now make your way to room 4 in the east through the secret corridor and get the next key.
Afterwards, backtrack, then make your way to room 5 to the north. Pull the lever, kill the giant rats and get the key. Now try to reach 7 to get the ritual claw, (beware of the cyclops who will attack you) before backtracking to 6. An invisible pikeman will attack you. Then go west to 8. Use the claw on yourself, then on the urn. Kill the wolf, take its body and the meat (do not eat it!) separately. When you try to leave, Shmed attacks. If he proves difficult, you may want to backtrack to the room containing the Urn of Gurnordir and take advantage of the healing powers of both fountains there.
Goblin Caves[edit]
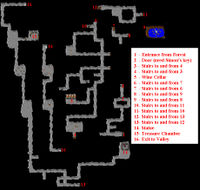
You need to enter the Goblin Caves in order to reach the Western Forest to get the Helm of Courage. The main problem here are masses of goblins.
After starting at 1, go to 2 and unlock with Simon's key. Go down stairs 3 and then follow the way north, until you reach the stairs 10. Enter it, then walk west to the stairs 12. Once upstairs, you can visit the statue at 14, but the main goal is to go west, then north, to reach the exit at 16.
After killing the goblin king, come back and unlock the door with his key, to reach the treasure chamber at 15, to get the Helm of Courage, the incriminating scrolls and lots of treasure.
Mountains of Freedom[edit]
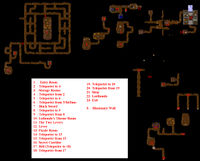
Initial Area[edit]
You begin the dungeon (1) having been transported to an enclosed cell, with your equipment having been replaced with a piece of scale mail and a wooden staff. You retain possession of your spellbook, your reagents, and the Hourglass of Fate (also the Keyring and Ring of Reagents remains if you completed Silver Seed). Upon your arrival, an automaton jailer will greet you and provide some basic information about the prison, noting that he will make an occasional sweep of the area to check if any prisoners have died. When he leaves to make his rounds, kill him and take possession of the red key he has on his person (He also has a sword of defense and some invisibility dust). It will unlock the doors on the northern and eastern walls of your cell in addition to the chest in his rooms. You will benefit from plundering his office thoroughly, as it contains a large cache of useful supplies (1 invisibility ring, 3 yellow potions, 2 red potions, 2 white potions, 2 curse potions, 1 blue potion, 1 black potion, 1 orange potion, 1 green potion, 1 invisibility dust, 11 lockpicks, 7 gold nuggets, 45 guilders). If you are interested in local lore, you may wish to investigate the stack of crates in your cell, the topmost of which contains a book by the magician Teldrono; you should also grab the 15 lockpicks in the bag nearby.
The prisoners in cell to the north will attack if awakened and carry no useful goods; walk past them and you will find a disguised passage to the north, ironically next to a sign reading "Escape is Impossible." Wandering around the area, you may find a woman who has been murdered with a pick-axe (amulet of protection, 1 curse potion, bandages), a skeleton in the midst of a nest of slimes (4 mandrakes), and an exploding chest (regeneration ring, lightning wand, 2 mana potions, 1 red potion, 5 lockpicks, bandages).
There are a number of teleport traps in the area, and the various pools of colored blood and the different signs along the walls may prove useful reference points in determining where you are. One trap is near the wooden support to the immediate southwest of the entry area and will move you to a dead-end with some black-robed n'er-do-wells, a gold nugget, and a bag containing a Create Food spell. One trap is on the westernmost support of the northernmost tunnel that teleports you to the east in a fashion that appears rather seamless. Traps in the middle of the easternmost tunnel and in front of the previously mentioned trapped chest both take you back to the vicinity of your original cell.
Eventually, you should make your way to the south where a set of bloody footprints leads into another invisible passage. To the east, you can find a room with two stone harpies and a cursed chest (magician's wand, 13 magic arrows, 2 torches). To the west you can find a few poison fields, and you will eventually be able to wander your way into the cluster of storerooms at 3, which contain 4 mandrakes, 5 nightshade, 5 spider silk, 13 bloodspawn, 6 lockpicks, and 3 gold nuggets between them in addition to a robe-wearing jerk, a wingless gargoyle, and a bunch of rats. A teleporter at 2 will transport you to 4, permanently removing you from the area. (Make sure, before you leave, that you still have the red key that you took from the automaton guard!)
Teldrono[edit]
In the area to which you teleport, you can find 5 sulfurous ash in one of the barrels to your right. Proceed northwards until you find a locked door; use the automaton's key on it. You will be accosted by Teldrono, who will turn into a bear and attack you. Upon beating the bear out of him, he will flee, declaring that you shall never have his reagents. You may then help yourself an assortment of his reagents (4 sulfurous ash, 6 ginseng, 3 bloodmoss, 5 spider silk, 2 black pearls, 2 garlic). You can also find a curse potion on the table to the right, although it is probably advisable to immediately throw it into the face of the enraged bear mage once he starts magically being a bear at you. A teleporter at 5 will move you to the next area at 6.
Stefano and Arcadion[edit]
You will immediately find yourself introduced to Stefano, who will beg to join your party and will regale you with a brief overview of his life of crime. Allow him to join you and take a moment to admire the swank little encampment he has made for himself in which to enjoy dungeon life by candelabra light. Admire, in particular, his chest of goodies (after destroying the curse trap in it). Inside you will find 2 gems, 8 monetari, 14 filari, a piece of jewelry, 2 yellow potions, and some food and torches.
Use the automaton's key on the door to the northwest and swiftly kill the enemy who comes at you with nothing but a staff. On the table there will be a bag containing a shimmering key, pick it up and head northwest again. You will encounter a fighter (7) attacking you with a rather familiar black sword. Upon dispatching him, Arcadion will greet you with his customary warmth and demand to be set free immediately. Whether you do so or not is up to you.
Continue north, using the automaton's red key to open another door. A female fighter will attack you. After dispatching her, you may search her body to discover a sword of defense and a dead baby, upon which Stefano will comment should you examine it. Enter the next teleporter at 8 to arrive at 9
Lorthondo[edit]
Use the glowing key on the door to the left, and you will proceed into the next room to witness Lorthondo transforming on of his vassals into a skeletal dragon (10). After defeating this creature, proceed to what appears to be the mage's private chambers in the south. Here, you will find a chest containing a firedoom staff, a Great Heal spell, a yellow potion, 4 lockpicks, a completely metal-looking mug made out of a human skull, and a blue-headed key.
This last article will unlock the door to the west, in which you will find the two levers that Stefano will have mentioned as needing to be pulled simultaneously. You will also find five very trapped chests (11). One is equipped with a delayed blast (1 black potion, 1 purple potion, 1 red potion), one with an explosion (great helm and magic boots), one with sleep fields (chain mail and magic gauntlets), one with a curse (16 magic crossbow bolts), and one with a paralysis spell (Create Food scroll). After dealing with this assortment as you see fit (Protip: shove all five chests into one area, and you only have to cast Destroy Trap once), proceed past the switches and take the teleporter to the next area.
The Slave Pit[edit]
Head to the north, and you will be able to scrounge together 4 spider silk after killing a few spiders. You may also find scrolls of Cold Blast and Telekinesis in the completely unsurprisingly trapped chest. There's also a music box there if you're nostalgic for the Rowena sequence from the previous game. Head to the southwest, and you will find a cloaked marauder, a cyclops, and a massive pit of bodies appropriately labelled "Wrong Way." Taking a teleporter in the center of said pit will lead you back to the room with the switches. Picking through the corpses, you can find a regeneration ring, 23 magic arrows, 5 filari, another Telekinesis scroll, and some sleeping powder in addition to an assortment of mundane weapons and armor, some food, a bandage, and a single diaper. If for some reason, a few areas back, you thought it might be a good idea to shove the dead baby into your backpack, congratulations! You may use the diaper on the dead child to soil it such that you can cause enemies to flee by hurling it at them.
To the east, you will find a raised drawbridge (12) that may be lowered by casting Telekinesis (from your spell book or from one of the scrolls) on its winch. Be careful around said winch as you cross the bridge and head further east, as it will spontaneously burst into flame. After slaughtering an old man (whose body yields a great sword), you will pass through a tunnel to the north full of sleep fields that will open onto a series of rooms containing a rather complex and surreal puzzles (13).
An array of levers in the center of the chambers controls the various doors to the rooms. The upper left corner lever opens and closes the four doors surrounding the array and is fairly useless unless you are on the run from something you let out of one of the other chambers; keep this in mind should you unleash the ice trolls (upper right corner lever), ratmen (third lever top row), or skeletons (second lever bottom row).
To solve the puzzle, flip the fourth lever of the top row to enter the chamber in which a woman (Sabrina) lies asleep. When she awakens, she will beg you to take her to her nightmare, which may be found in the chamber opened by flipping the third lever of the bottom row. The beast will kill her when she approaches it, and searching her corpse will reveal a pronged key and some carrots.
Flip the second lever of the top row to open the supply room. Here, you will find a number of empty barrels (one of which is a disguised powder keg), a box, and a locked chest. Rifling around in the box, you can find another diaper if you are so inclined. Your goal here, however, is the chest, which may be unlocked with the woman's key. Inside, you will find detailed instructions from Lorthondo to the old man who you almost certainly just murdered. You will also find a great deal more carrots.
Flip the first lever of the top row to access the rabbit enclosure and place some victuals on the golden plate of the terrible beast inside. It will transform into another woman and give you a bouquet of flowers. Flip the first lever of the bottom row, and present the flowers to the man grieving over his slain beloved. (While you are here, you can check in the trash, and you will find the corpse of a boy who was carrying 3 guilders and an invisibility ring in addition to a magic 8-ball.) In gratitude, the mourner will fix the forth lever of the bottom row, which is stuck, and will promptly disintegrate into bones and dust.
Flip the formerly stuck lever and walk onto the teleporter; you will be transported to a small glade where there will be yet another lever for you to flip. Return to the dungeon, flip the lever in the lower left corner, and the door to the south will finally open. From here, proceed until you reach the locked door, open it using the automaton's key, and walk into the giant fire therein (14). You will be teleported to 15.
The Final Stretch[edit]
Immediately after leaving the site to which you have been transported, you will come upon a corridor to the south that is seemingly without end. Carefully comb the eastern wall until you find a secret passage leading away from the illusion. You will arrive in the vicinity of an automaton-run store selling goods to prisoners. You can wrest open the two chests here for a gold nugget, throwing axe, and a great helm if you do not mind dealing with another explosion trap, but you would probably be better off as far as treasure hunting goes if you just comb through the numerous crates until you find the one that has 2 garlic, 3 stoneheart, and another gold nugget. To the west, you will find a chamber containing a hard to reach bell (17). Arrange the numerous crates into a stairway and climb towards it.
You will arrive at 18, where a sign will tell you to "Pick One or Die," referring to the three teleporters to the southwest, south, and southeast. Go to the southwest to 19; you will be teleported to 20. From here, you can go to the north and rifle through other prisoners' possessions to retrieve 5 nightshade, 1 curse potion, 1 mana potion, and 1 warmth potion, as well as another dirty diaper if so inclined.
Proceeding to the west, you will find one last automaton-rune store (21). The guard in charge of it will attack you after you speak to him, claiming that you need the key it carries to finally exit the dungeon. It is actually completely lying; all the doors remaining in the dungeon may be picked. It may be worthwhile to dispatch it, however, if you would like to possess yet another sword of defense. Its counter also has a rainbow assortment of the eight basic potions with which you may wish to abscond.
Finally, in the penultimate chamber of the dungeon, Lorthondo will confront you one final time. If you have not agreed to do so already, release Arcadion from his bondage to you, as he is the only power that can save you from the magician. After Lorthondo has been dispatched, proceed to the south where you will find the exit (23).
Catacombs[edit]
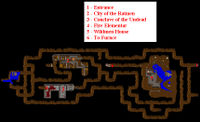
The Moonshadian catacombs are not a particularly difficult area to navigate, and one can go from the entryway (1) to Furnace (6) without enduring much by the way of combat.
By one path or another, make your way to the far western side of the map, and then loop back to the east through the corridor leading to the colony of ratmen (2). You will find that they are rather easy to dispatch, and if you have it, you may use the magic harp given to you by Mosh to lull them to sleep. A search of their encampment will yield 78 gold pieces in addition to numerous pieces of cheese.
From here, should you want to score some loot, you may proceed to the south and enter into some crypts to the west. Pushing past what appears to be a ratman-constructed barricade, you may enter into a small shrine (3) which contains a frustrating number of zombies, 25 pieces of gold, a sleeping potion, a light potion, and a sword of defense. Should you wish to go further to the west, you will encounter a fire elemental (4), which can give you nothing but the satisfaction of defeating it. (It's sparkle-studded corpse is pretty neat-looking, though.)
Should you proceed from the ratmen further to the east, you will eventually come to a large cavern with a building full of wildmen (5). There's little to see or do here save for killing a lot of wildmen and gleaning a few arrows off of the corpse of some poor soul who was used as target practice. Proceed to the west to find the stairs up to Furnace at 6.
Northern Passage[edit]
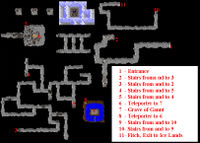
This is the only land way to reach the Northern Regions. The tunnels are filled with enemies and numerous caltrops (thankfully visible).
After starting at 1, go west to the stairs at 2 and descend to 3. First, go north, until you reach the stairs at 4, that lead to 5. Enter the portal at 6, to get to Gannt's grave at 7, to get the key to the House of Wares. Now enter the teleporter 8 and backtrack. Go to the obelisk, then east, then south to reach the stairs at 9.
Once arriving at 10, go west and then north. Close to the exit at 11, you'll meet the mortally injured Fitch, who will tell you of what had happened to him, before dying. Exit to the ice lands.
| Dungeon Solutions | |
|---|---|
| Game | Ultima II ☥ Ultima III ☥ Ultima IV ☥ Ultima V ☥ Ultima VI ☥ Ultima VII ☥ Ultima VII Part Two ☥ Ultima IX |
