Great Stygian Abyss (Ultima IV)

In Ultima IV, the Stranger, trying to complete the Quest of the Avatar, had to descend through the Abyss to find the Codex of Ultimate Wisdom, since the Abyss was connected to the Shrine of Singularity which housed the Codex.
In order to approach the part of the Isle of the Abyss where the Abyss entrance was, the Stranger had to fight past the pirate fleet stationed there. The wheel of HMS Cape was very useful for this purpose, but not technically required as the feat could be accomplished without it (even though with great difficulty).
The dungeon was situated in the middle of a huge volcano, and could only be opened using the Book of Truth, the Candle of Love and the Bell of Courage. This was also the only place the Skull of Mondain could be destroyed. In order to get from one level down to the next one, one had to use the correct Virtue Stone on the altar found inside each level, which would turn the altar into a ladder leading further down.
- Only magical weapons work in the Abyss such as Mystic Weapons, magic wands, magic bows, magic axes or magic swords. All others will not strike their targets.
- No Orbs
- Beyond the pirates on the Isle of Abyss in the volcano: O'J" O'J"
Lore[edit]
| “ | Approach not this dungeon until thou hast completed all parts of thy quest, for only one who has trodden far along the path of the Avatar has a hope of surviving here. – from The Way of the Avatar (Ultima IV)
|
|---|


Walkthrough[edit]
The Abyss is the ultimate challenge. Downward Motion and Upward Motion do not function and the dungeon has the most challenging rooms and monsters. However, there is no level-hopping required. All Virtue Stones are needed to pass.
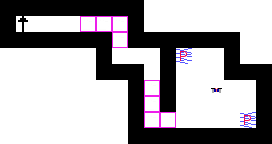
- Level 1: Easy. Follow the path, slaughter everything in your way. Use the Blue Stone at the altar.
- Level 2: Also easy. Pass through the rooms to exit at the southeast, then dispel the fields to reach the altar (the ladder is a dead end). Use the Yellow Stone.
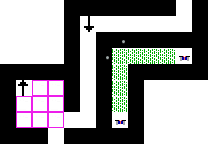
- Level 3: Enter dungeon rooms and work hard to enter the center of the level, where you use the Red Stone on the altar.
- Level 4: Go through the series of secret doors, then dispel the fire field. The door behind the field is a dead end. Instead search for secret doors to find the right dungeon room leading to the altar. Use the Green Stone.
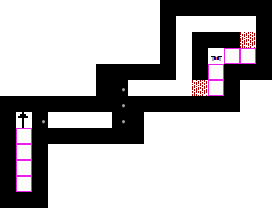
- Level 5: The first complicated room puzzle. Enter southern or eastern room wait for the Zorn to come out and kill it to get rid of the negate effect then dispel and walk through the area behind the force fields to open passage to the center room. Clear the center room and find touchplates then walk east. Avoid stepping in the middle (poison trap) and exit south. Use the Orange Stone.
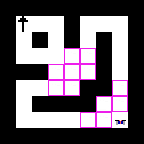
- Level 6: The meanest level of all. See here for a detailed solution: Abyss Room puzzle. Use the Purple Stone.
- Level 7: Follow the path and use the secret doors in the dungeon rooms to clear the way, until you reach the altar. Use the White Stone.
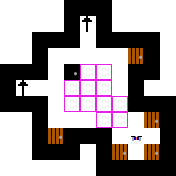
- Level 8: The first rooms are a big trap to confuse you. Take the southern entrance and walk south. In the next room, there is a secret door in the west and a touchplate to the northeast, opening the exit. In the next room puzzle, kill the mirror images, then enter the eastern room. Find the two triggers at the eastern wall to open the exit to the last altar, where you use the Black Stone.
Then comes the moment of truth. To pass, you need:
- The Key of Three Parts
- The correct password (VERAMOCOR)
- Be at level 8
- Have all 8 companions (but they don't need to be alive)
- Be a eight-part Avatar
If one of these things is missing, you are booted out of the Abyss. If all is right, then it goes to the final quiz.
| Ultima IV Dungeon Solutions | |
|---|---|
| Deceit ☥ Despise ☥ Destard ☥ Wrong ☥ Covetous ☥ Shame ☥ Hythloth ☥ The Abyss | |