Ultima Underworld Engine Quirks
Technical Details Warning |
While the encyclopedic nature of the codex means that many articles will have information that could spoil some minor aspects of the game for newer players, this article is known to contain technical information about the game, game engine, data files, logic, etc. This information is not generally useful to the typical game players.
Continue reading at your own discretion. |
This page is for demonstrating quirks of the Ultima Underworld game engine. Some of these will be exploitable for gameplay, others will be just for fun.
Miscellaneous[edit]
Cheats[edit]
To see quirks exploited as cheats see Cheating in Ultima Underworld
Color Palette[edit]
For details of the color palettes see Ultima Underworld color palettes
PSX Version[edit]
For details of PSX-port of Ultima Underworld see Technical Differences in Ultima Underworld on the PSX
Data Files[edit]
For details of the internal data files see Ultima Underworld internal formats
Doors[edit]
Secret Doors[edit]
Secret doors are just regular doors but the door model has been texture mapped with a wall texture instead of a typical door texture in order to camouflage the door with nearby walls. Just like regular doors they are automatically marked on the automap and are identified with the look action without any search skill requirement.
Hidden Doors[edit]
Hidden doors are secret or normal doors that are placed inside a wall block and that wall block must be moved by the engine in order to access the door. See the section Use GET action to find hidden doors for details on that.
Normal Doors[edit]
Components
A single door object has 4 visual components: The door itself, the door jamb on either side of the door and the jamb above the door that goes all the way to the ceiling. There is also an invisible fifth piece to a door, the lock.
Collision
If you think about a door from above, you'd have a rectangle that is wide and thin. The game engine doesn't allow for rectangular collision boxes, only square ones, so a door's collision box is just as thick as it is wide. This is why you can't get as close to a door as you can get to a wall, because the door has an invisible collison box that sticks a ways out from it. This is also why most doors aren't flush with their surrounding walls, but recessed a bit. It's to hide the fact that if they were flush their collision boxes would be sticking out into the room. There are some flush doors in the game and you can observe this effect.
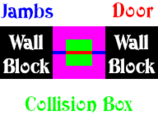
Top view: A recessed door keeps its collision box within the recession
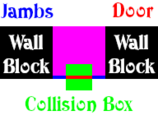
A flush door has its collision box sticking out into the room


This effect can be used to find certain secret and hidden doors. The secret door on level 1 that leads to the healing fountain can be found by walking along the north wall of the corridor between the gray goblins and the spider caves. Finding secret doors is no big deal, they can be seen on the automap anyway. But hidden doors can be found this way too. For example hidden doors on levels 3 and 5.
Of the various components of the door, only the door itself and the upper jamb have a collision box.
- The side jambs don't have a collision box, you can walk or throw items or fire missiles or cast spells right through them.
- The door only has a collision box when it is closed. When a closed door is opened it immediately loses its collision box and begins playing its opening animation. When someone or something closes a door, it plays its closing animation to the end and then tries to reinstate its collision box. If anything is colliding with that box, it goes back to playing its opening animation.
- The upper jamb has a collision box similar to a closed door, but it is always on. It sticks out past the visual representation of the jamb, which should be wide and narrow, but instead is square. This is most noticeable on level 1 when exiting the shrine and trying to jump to the platform. It may seem that the player is clear of the jamb, but they are still unable to jump until they are clear of the collision box.
Lock
A door can have a lock, and that door cannot be manually opened until its lock is unlocked. It can still be opened remotely, by a button or by an NPC, for example.
A door that is damaged, badly damaged, or broken isn't actually damaged, it can still be opened and closed like any "undamaged" door. They only thing that is broken is the lock. Massive doors cannot have their locks broken. Massive doors can be picked or unlocked with a spell, however some doors have protection. If you cast the open spell on a door and it says "The spell has no discernable effect." then you have found a protected door.
Spiking
| TODO | write a section about spiking |
Portcullises
A portcullis is functionally very similar to a swinging door. The big difference is that it has transparent areas where actions like look, get, and talk can be used on items on the other side of the door. Obviously the door model and the opening/closing animations are different, but its function, as far as the collision boxes, is identical to the swinging doors. Portculli, just like swinging doors, can be locked and unlocked by a key, remote operated by a button or NPC, picked, unlocked with a spell, etc. But unlike a swinging door they cannot be bashed open.
[edit]
Summary
Using the GET action on a wall can tell if it is a true wall or an object that may be hiding something.
Details
Hidden doors can be located by exploiting a quirk in the game engine. The levels are made of two components: The texture-mapped (or flat shaded in low detail modes) geometry of the level (ie, walls, ceilings, and floors), and the objects that exist within that geometry. When using the look action on level geometry the game will print a description of the texture map applied to that surface. When using the look action on an object the game engine will print a description of that object. When using the get action on level geometry then engine always says "Nothing to get." because no level geometry is gettable. When using the get action on an object that is fixed (not gettable) the engine will report "You cannot pick that up."
The game has secret doors which are the same as regular doors except they have a wall texture on them to blend in to nearby walls. They are shown on the automap like regular doors and can be identified with the look action. You shouldn't need any help finding these.
The game also has hidden doors. Hidden doors are actually hidden behind level geometry, are not visible on the automap, and are not seen with the look action. Hidden doors have an "invisible" reveal-trigger object attached to the geometry that hides them. When using the look action on this object, the engine does a roll against the player's search skill and if it succeeds the geometry is altered and the door is revealed, otherwise the door remains hidden. A reveal spell will also trigger this object.
| Action | Target: Wall | Target: Reveal Object | |
|---|---|---|---|
| Search Fail | Search Success | ||
| Look | description of texture | description of texture | description of texture, object removed, geometry adjusted, door revealed |
| Get | "Nothing to get." | "You cannot pick that up." | |
In the above table, note that the look action gives the same results no matter what, but the get action is different depending on if it's been used on an object or not.

Notice the bricks texture on this section of wall doesn't match the rest of the wall. This is likely a revealer object. Using the get action on the walls around it give the "Nothing to get." message but when used on that bit of wall directly it says "You cannot pick that up." which is the second indication that there is a hidden door here. Note that getting the "You cannot pick that up." message isn't proof that there is a hidden door there, it's just an indication that there is an object on that wall, which may or may not be a hidden door revealer object.
Use Reveal
The above described method works to find the revealer object on a hidden door. In the game revealer objects are only placed on one side of a hidden door. This is no big deal for doors that lead to rooms without exits, as there is only one way to approach such doors. But some doors are approachable on both sides. See for example the hidden door to the tombs on the fifth level, or several hidden doors on the seventh level. Approached from the wrong side, there is no revealer object to find, and neither the LOOK action nor the GET action will find anything. However, a reveal spell will work regardless of which side the caster is on.
Identifying Remains[edit]

This is not so much a quirk as it is just a feature that was coded into the game and then possibly forgotten because it doesn't do anything to really affect the game, other than some environmental storytelling. And none of the NPCs or notes found or anything else makes any mention of it, so it's something the player just has to discover on their own.
You can identify remains (bones, piles of bones, and skulls) by casting Name Enchantment on them. The text will say something like "You see a bone. It looks to be that of a [critter type]." Not all can be identified, some will remain as just "a bone", "a skull", etc. Remains can never be tracked to a particular individual, just a critter category. So for example when Rodrick's remains are identified, they just say "a fighter".

When bones are identified they can have unique origins but when stacked they merge and when unstacked have the same origin. For example if bones of a fighter and bones of a goblin are stacked there will be a stack of two and they will be either of goblin or of fighter depending upon how they were stacked. When they are unstacked they will either both be fighter or both be goblin, whatever the stack was. The exception to this is the bones of Garamon, which don't stack.
Notable Remains[edit]
General[edit]
- The player character, regardless of the chosen profession, is of the class adventurer. There are no other NPCs in the game of this class. However several remains found in the game, especially in the first level, are of adventurers. Perhaps the Avatar is not the first would-be hero to be sent into the Abyss by Garamon.
- Any skeleton killed that drops bones, they will be identified as being bones of a skeleton. That sure seems like useful information, I'm glad I spent a spell to learn that.
- Any bones dropped by a bandit will identify as being of a fighter.
First Level[edit]
- Most of the remains found on the first level are of adventurers, fighters, and goblins. It is not clear why so many fighters have died here, perhaps these are the guards sent in by Baron Almric? Notably absent are the remains of any outcasts. Perhaps there is some truth to the notion that outcasts are somewhat cowardly, staying huddled in their colony, and not going out exploring.
- Alfred, who left behind a red key and a rune bag, the only one to be obtained in the game, was a fighter.
- The remains near the jux and ort rune stones are of an adventurer.
- In the room directly north of the Silver Sapling room, in the Southeast corner, are the corpses of a goblin and a feral troll. What was a troll doing on this level? How did it die? Was it fighting with goblins? Had it befriended a goblin and they died together fighting something else?
- The bone in the little dip in the central hub is that of a fighter, perhaps recently killed by the nearby hostile green goblin.
- All three goblin settlements have bones in their fire pits. All of these bones are of indeterminate origin.
Second Level[edit]
None of the remains on the second level are identifiable. This includes:
- Some bones scattered throughout the mountainman mines.
- Bones throughout the pest rooms west of the orb room. Not even the individual who dropped the axe, shield, and boots.
- Bones in and around the gray goblin's camp. Not even the pile of skulls in the middle.
- Bones with the magic arrow wand in the drain leading to the third level
Third Level[edit]
- The skull on the Northeast shore is unidentified, the one behind the waterfall is a goblin, and one on the island with the plate armor is an adventurer.
- The small skulls near the rat lever are, unsurprisingly, of giant rats. The remains among the bits of armor are unidentified.
- The remains in the spider cave with the red lizard key are of a red lizardman. The remains with the thieves' key are unidentified.
- The bones found with the note to Ossikka are of a gray lizardman. Even with them identified, Ishtass doesn't accept them as evidence of Ossikka for the quest, only the note.
Fourth Level[edit]
Most of the bones on this level go unidentified.
- The bones flung at you as you first enter (or exit) through the south set of doors in the troll area belong to a cave bat and a dark ghoul.
- There are several corpses in the room with the ring of leap: The remains among the ring and the boulders, the pile of skulls just north of that, the mage along the northern wall, the corpse with a long sword in the north west, and another corpse in the south west. Disappointingly, none of these identify.
- The bones at the bottom of Sethar Strongarm's pit don't identify.
- The bones at the end of the feral troll area don't identify.
- The bones in the headless room don't identify.
Fifth Level[edit]
Nothing identifies on the fifth level. Not in the spiders and headless rooms in the north, the ghouls and undead in the southeast, or the tombs in the northeast. Not even the remains of Cabirus are identifiable.
Sixth Level[edit]
Nothing identifies on the sixth level. How boring.
Seventh Level[edit]
Nothing identifies on the seventh level. Not even the troll's princess.
Eighth Level[edit]
- Surprisingly, Garamon's bones, the most important set of bones in the entire game, don't identify
- The bones with the shield of resist blows and the ankh pendant identify as a fighter