Dungeon solutions for Ultima VI
The dungeons of Ultima VI are complicated mazes, where it is hard to find the right ladder down. Therefore here is a solution to this part of the adventure.
There's a total of 22 dungeons in Ultima VI (including two small basements), that is almost three times the number of dungeons in any Ultima game before it.
Dungeons[edit]
Destard[edit]
It is absolutely needed to enter Destard in order to get dragon eggs for Sandy in Trinsic. It is possible to use spells like Kill against dragons to survive this dungeon.
The entrance to this dungeon is in the mountains north-west from Trinsic. From Trinsic, travel west until you reach the sea, then continue north.
The Avatar must access this dungeon to obtain one or more dragon eggs, an item that will be exchanged from vital information.
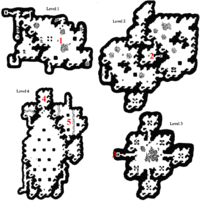
Right from the start, move east to access the ladder 1 to level two in the middle of the big hall. On level two moves west and right down the hole 2 to level three. On level three, take the ladder marked 3 that is in the west to get down to level four.
Be warned, many dragons are here. Make your way to the breeding chamber 4 to get the eggs and loot. Then proceed, if possible, to the treasure chamber at 5 to get more loot.
Item list:
- Floor 1:
- (nothing);
- Floor 2, East:
- (nothing);
- Floor 3:
- (nothing);
- Floor 2, West:
- Green potion, red potion, protection ring, regeneration ring; 148 gold coins, 5 gold nuggets, 2 powder kegs, 3 torches, 3 gems, 2 lockpicks, glass jar, thread spool, glass sword; magic bow, sword, kite shield, chain mail, chain coif; 3 wine glasses, leather boots
- Floor 4:
- 9 dragon eggs, magic shield, fire wand, regeneration ring, protection ring, invisibility ring; torch, glass sword, 9 gold nuggets; magic bow, main gauche, swamp boots, brass helm, magic helm, dagger, spiked collar, magic armor; ring (yellow), 3 hatched dragon eggs
Wrong/Covetous[edit]
The main goal is to find the lost map piece of Heftimus McPry. Wrong entrance is at 1, Covetous entrance at 2.
There are two entrances to this dungeon: one is just along the coast east from Minoc, the other one is north-west from the "Long Haul", the road that goes from Lock Lake to the bay near the Shrine of Justice.
The Avatar must access this cave in order to retrieve one map piece.
Right from the start, take one of the cauldrons at 5, since it is needed for the hot-air balloon. Descend quickly following the map, until you are in level three. Enter the upper eastern room and search for a secret door, then follow the corridor to room 3 with a swamp plant. The map piece is found there. (The switches are invisible in the C64 version.)
Also, descending the ladder at 4 goes to a cave with a bit of treasure.
Item list:
- Floor 1:
- 4 cauldrons;
- Floor 2 (North):
- Powder keg, 2 gold nuggets, 1 gem; flask of oil;
- Floor 2 (South):
- (nothing);
- Floor 3:
- Map part; lockpick, 1 gem, 28 gold coins, 2 torches; magic bow
- Floor 4:
- (nothing);
Shame[edit]
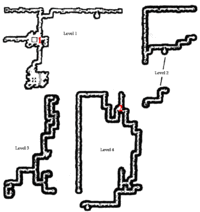
Entering Shame is needed to find Old Ybarra, who has a crucial map piece. You should know that the lay-out is of a labyrinth and consists of two independent parts, joined at level one. Also, in Shame the chance to dig up gold nuggets is the biggest in all dungeons.
The entrance to this dungeon is in the mountains. It can only be accessed by sailing the river between Skara Brae and Empath Abbey.
The Avatar must access this cave in order to retrieve one map piece.
From the start, kill the skeletons in the shed, then take the things that you find there. Afterwards, try to find the correct ladder that leads into the bigger part of level four. There find Old Ybarra at 2 and he will release the map piece for some food.
Item list:
- Floor 1:
- Shovel, pick, about 22 gold nuggets; 5 flasks of oil, 3 throwing axes; backpack, leather boots, skillet, honey jar, ladder, horseshoes, bucket, mug, candle;
- Floors 2-3, West:
- About 8 gold nuggets;
- Floor 2:
- About 3 gold nuggets;
- Floor 3:
- About 10 gold nuggets; magic bow;
- Floor 4:
- Map part; about 25 gold nuggets; skillet.
Hythloth[edit]
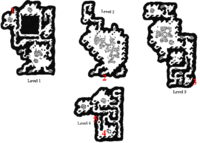
Hythloth is the only way to the Realm of the Gargoyles, thus you have to enter it. The dungeon is infested with daemons and dragons. That means you need strong spells and the storm cloak to survive this horror. Also, you have to walk through lava, which will cost health.
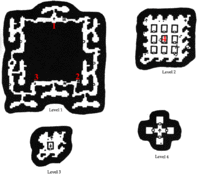
On the first level, you must reach the ladder 1 in the north-western part of the level. On level two, the ladder in the lava in the middle of the big hall is fake. Thus, take the southern ladder at 2. On level three follow the long corridor and then go the eastern corridor south to reach the ladder 3 to level four. The entrance to this dungeon is just east across the river that runs near the Shrine of Humility.
The Avatar must access this cave in order to reach the Gargoyles underworld.
Reach the south-western part of level four to find Captain Johne at 4. Talk with him and you will learn the language of the Gargoyles. Now that you have learned their language you can descend the ladder at 5 to enter the Realm of the Gargoyles.
Item list:
- Floor 1:
- 2 ashes, 55 gold coins;
- Floor 2:
- 8 ashes, (8 gold nuggets);
- Floor 3:
- (nothing);
- Floor 4:
- Gargish vocabulary; 2 glass jars, food (horse meat); spatula, bucket, ale.
Deceit (optional)[edit]
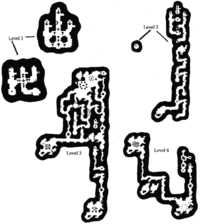
Even though is it not needed to enter Deceit, you can still find on the fourth level a dead mage with powerful loot. A fair warning: the way is long and difficult.
Dungeon Deceit is located on an isle east from the Shrine of Honesty.
- North passage:
- Ring of protection, ring of regeneration; meal, staff; flask of oil; mug, ring (yellow);
- South passage:
- 38 gold nuggets.
Despise, Heroes' Hole, Heftimus' Cave (optional)[edit]
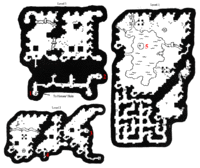
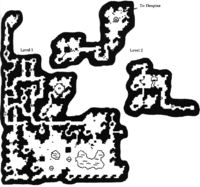
While it is not needed to enter Despise, the dungeon is not too complicated and has good loot.
The entrance to Dungeon Despise is in the middle of the Serpent's Spine mountains north from Britain.
The entrance known as Heroes' Hole is north-west from the Shrine of Honor, and it provides an easy way to reach Jhelom without a ship. The exit in Jhelom is called Heftimus' Cave.
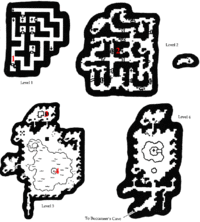
Right from the start it is possible to descend the ladder at 1 to enter Heroes' Hole, an expert dungeon. Descending the ladder 2 gives access to the rest of Despise. The ladder 3 leads to the other half of level one, while the ladder 4 leads to level three.
One level three, note the treasure locations on the map. Using a skiff to access ladder 5 in the middle of the lake enables access to the second half of level two, with lots of treasure.
The Heroes' Hole is an expert dungeon with no actual story relevance. It can be entered from Despise or from its regular entrance. Using the map it should be very easy to loot the entire place of everything worth of taking. Also, the monsters in this place are rather strong.
Item list:
- Floor 1-A:
- 5 gold nuggets;
- Floor 2-A:
- 9 gold nuggets;
- Floor 1-B:
- Green potion, fishing pole, regeneration ring; 22 gold nuggets, 3 lockpicks, 11 gems, 1 torch, 1 food, powder keg; sword, leather helm, swamp boots; mead, wooden shield, honey jar, pliers, mug;
- Floor 3:
- Invisibility ring, regeneration ring, protection ring, 3 orange potions, 2 purple potions, 4 yellow potions, 4 red potions, 3 white potions, 3 black potions, 1 blue potion; gem, 3 torches, 35 gold coins, 1 food, powder keg; bow, 36 arrows; mug;
- Floor 2-B:
- Invisibility ring, regeneration ring, 2 protection rings;
- Floor 2-C:
- (nothing);
- Heroes' Hole / Heftimus' Cave:
- (nothing).
Other dungeons[edit]
Moonglow Catacombs[edit]
The Moonglow Catacombs have to be entered in order to get the Rune of Honesty from Beyvin's grave. In order to do so, also get the key from Manrel.
You can enter the catacombs either from Xiao's house at 1 or from the Blue Bottle Tavern at 2. The first level has crypts filled with loot, so better check them all, before descending the ladder at 3 to the second level. There, the middle crypt is, where Beyvin is buried and you can unlock it with Manrel's key to get the rune. You can also leave the flowers next to the door.
You are now free to explore the remaining two levels, although they don't hold much treasure.
- Floor 1:
- Shovel, fire wand, glass sword; 8 gold nuggets, 2 garlic bulbs, torch, 36 gold coins, 1 nightshade fungus, 1 sulphurous ash; dagger, club, two-handed sword, flask of oil, swamp boots, 2 spears, heater shield, wooden shield, mace, chain coif, main gauche; leather boots, butter, ring (yellow).
- Floor 2:
- Ring of invisibility, ring of protection, Rune of Honesty; 2 gold nuggets, 2 gold coins, torch, gem; flask of oil; bucket;
- Floor 3:
- Ring of invisibility; mug, horseshoes;
- Floor 4:
- Ring of invisibility, fire wand, ring of regeneration, ring of protection; 314 gold coins, bread, 3 torches; plate, mug, 2 knives
Bonn's Basement[edit]
This small basement can be accessed from Bonn's home on Dagger Isle.
The Avatar must access this mini-dungeon in order to retrieve one map piece.
Item list:
- Rare items: map part, orange potion, purple potion, black potion, blue potion
- Useful items: pick, shovel, 2 honey jars, 12 torches, 1 gold coin, 65 gold nuggets
- Weapons and armor: throwing axe, 32 arrows, bow, cloth armor, leather armor, spiked shield, leather helm
- Useless items: hoe, wooden shield
Sutek's Dungeon[edit]
Sutek's island is located east from Serpent's Hold. The entrance to the dungeon is in a secret room inside the castle.
The Avatar must access this cave in order to retrieve the plans to build the hot-air balloon.
Item list:
- Floor 1:
- Silver snake venom; ladle, pliers;
- Floor 2:
- (nothing);
- Floor 3:
- (nothing);
- Floor 4:
- Balloon plans; torch, shovel; dagger.
Stonegate Dungeon[edit]
Stonegate is located in the gulf south from Minoc.
The Avatar must access this cave in order to retrieve the Vortex Cube.
The only item in the dungeon is the Vortex Cube.
Stivius' Cellar (optional)[edit]
This small basement can be accessed from Stivius' building in Skara Brae.
There are some wine bottle in the cellar.
Lycaeum Library (optional)[edit]
The underground library can be accessed by dispelling one magic field in the central room of the Lycaeum.
Book list:
- Quest items:
- Snilwit's Big Book of Boardgame Strategy – Descent, f1, E – Quest item: bring it to Dr. Cat in Paws
- Ye Lost Art of Ballooning – Descent, f3, SW – Hints about the hot-air balloon
- The Lost Book of Mantras – Descent, f1, W – Quest item: bring it to any wisp in Deep Forest
- The Wizard of Oz by L. Frank Baum – Corner, f1, NE – Quest item: bring it to Lord British in Britain Castle; emphasis on Truth, Love and Courage
- The First Age of Darkness – Core, f2 – Summary of 1981 game Ultima I: The First Age of Darkness; emphasis on Mondain's Control
- The Second Age of Darkness – Core, f2 – Summary of 1982 game Ultima II: The Revenge of the Enchantress; emphasis on Minax's Passion
- The Third Age of Darkness – Core, f2 – Summary of 1983 game Ultima III: Exodus; emphasis on Exodus' Diligence
- The Quest of the Avatar – Core, f2 – Summary of 1985 game Ultima IV: Quest of the Avatar
- Warriors of Destiny – Core, f4 – Summary of 1988 game Ultima V: Warriors of Destiny; hints about the Vortex Cube in Stonegate
- Origin Systems advertisements:
- Knights of Legend, volume I – Descent, f3, SE – Summary of 1989 game Knights of Legend; background story of Seggallion (Serpent's Hold)
- The Caverns of Freitag – Descent, f1, W – Summary of 1982 game The Caverns of Freitag by Dr. Cat; background story of Gertan (Cove)
- Tangled Tales – Descent, f3, NE – Summary of 1989 game Tangled Tales
- Windwalker – Corner, f1, SW – Summary of 1989 game Windwalker (sequel to Moebius)
- Other books:
- Of Dreams and Visions – Descent, f1, N
- Crossbow Marksmanship by Iolo Fitzowen – Descent, f1, S
- A Treatise on the Lore of Gargoyles by Norlick the Elder – Descent, f3, NW
- Plant Lore – Corner, f1, NW
- Dilzal's Almanac of Good Advice – Corner, f1, SE
- Alice in Wonderland by Lewis Carroll – Corner, f1, SW
Caves[edit]
Ant Mound[edit]

It is needed to enter the ant mound in order to find the map piece of Ol' Hawknose. Needless to say, the cave is infested with giant ants.
The ant mound can be accessed from the Dry Land, the area around the Shrine of Sacrifice.
The Avatar must access this cave in order to retrieve one map piece.
On the first level, go north-west to the hole at 1 in the big hall, to descend to level two. There, go north-east to the hole at 2 to descend to level three. On this level, go to the south-west to find the hole at 3 to enter the final level. Go to the chamber of the ant queen at 4 but do not kill her (karma loss otherwise). Only kill the guards and then find Ol' Hawknose's body with the map on it.
Item list:
- Floor 1:
- (nothing);
- Floor 2:
- 26 nightshade fungi, 7 meals (grapes and meat);
- Floor 3:
- Zu-Ylem; glass jar, cloth, 4 gold nuggets, 6 torches, 1 black pearl, 2 nightshade fungi, 1 meal (grapes), 1 lockpick; 3 clubs, swamp boots, wooden helm, 2 leather armors, 2 throwing axes, 2 cloth armors; leather boots, 3 mugs, 2 plates, gavel, candle, lute, spatula, ring (yellow);
- Floor 4:
- Map part; 1 gem, 5 gold coins; throwing axe, leather helm, dagger; wooden shield, mug, wine.
Britain Sewers & Buccaneer's Cave[edit]
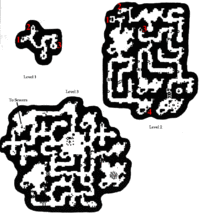
You need to enter the sewers in order to find Phoenix and take her belt. Also, the sewers connect to the Buccaneer's Cave.
There is no reason to actually enter this cave, apart from loot and a way to the sewers.
Once you are on level one, you can find Daros at 1 and have a chat with him. Once this is done, take any of the ladders down to level two. There, find the ladder 2 which leads to level three. You find Phoenix in the northern part at 3. but first remove the traps with Vanish, then steal her belt with Pickpocket. (In the Commodore version you have to look under some flowers in Phoenix's house.)
Also, finding the ladder on the island at 4 leads to the Buccaneer's Cave.
Buccaneer's Cave. On the first level, the ladders 1, 2 and 3 lead to different parts of level two. 3 leads to loot, while 1 leads to the ladder 4 that leads to level three. On level three, find the ladder in the north-west to enter the sewers.
Item list:
- Sewers, floor 1 :
- Cauldron; rubber ducky, (plus many useless items);
- Sewers, floor 2:
- (nothing);
- Sewers, floor 3:
- Invisibility ring, lightning wand, fire wand; 30 gold nuggets, 32 gold coins, 12 gems; 20 flasks of oil;
- Sewers, floor 2-B:
- Protection ring, blue potion; Shovel, 5 lockpicks; Bow, 24 arrows;
- Buccaneers Cave, floor 4
- (nothing);
- Buccaneers Cave, floor 3:
- Lightning wand; 5 gold nuggets, 3 torches, 12 gold coins, 1 gem; Swamp boots, 5 flasks of oil, magic armor, club, chain mail; Ring (yellow);
- Buccaneers Cave, floor 2:
- Protection ring, 3 food
- Buccaneers Cave, floor 1:
- (nothing);
- Buccaneers Cave, floor 2-B:
- Glass sword, magic bow;
- Buccaneers Cave, floor 2-C:
- 2 green potions, white potion, purple potion.
Pirate Cave[edit]
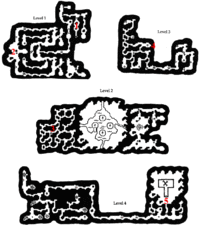
The location of the Pirate Cave can be learned after collecting all the nine pieces of the pirate map.
The Avatar must access this dungeon to obtain one storm cloak, an item that will be exchanged from vital information.
You need to enter the Pirate Cave in order to reach the treasure of Captain Hawkins and the second half of the silver tablet. The main problem are traps.
Right of the start, dig up Captain Hawkins' grave at 1 to get good loot. Then go to the westernmost ladder at 2, which leads to level two. On level two, ignore all the signs in the western labyrinth and find the ladder at 3, which leads to level three. There, take the hole marked 4, as it is the only safe one (you can recognize it by a gold nugget lying beside it).
On level four, go all the way to the east to the treasure chamber at 5 and blow up the door with a powder keg. (In the Commodore 64's version, you need the Explosion spell to open the locked door.) Take the silver tablet half, the storm cloak and the magic fan. The rest is optional.
Item list:
- Floor 1:
- Green potion; pick, sextant, 2 meals (cheese, bread), 5 torches, 3 gems; main gauche, black shield, swamp boots; knife, ale, plate, mug;
- Floor 2:
- (nothing);
- Floor 2/1-B
- Invisibility ring;
- Floor 3:
- 1 Gold nugget;
- Floor 4:
- Silver tablet, storm cloak, lightning wand, fire wand, 2 invisibility rings, magic fan; 5 powder kegs, 3 gems, 3 torches, 6 lockpicks, meals (1 meat, 2 bread), 203 gold coins, 7 gold nuggets, 2 honey jars, 1 sextant, 1 pick, 1 cloth; dagger, sword, 2 leather armors, spiked collar, magic bow, swamp boots, black shield, plate mail, 5 flasks of oil, magic helm, iron helm, curved heater; bucket, wooden shield, 5 bottles, plate, leather boots, bucket, pliers, hammer, candle, 3 candelabra.
Cyclops Cave (optional)[edit]
This cave is located north-east from Skara Brae.
- Floor 1:
- chest (8 torches), torch, gold nugget, backpack (10 gems), 65 gold coins;
- ladder, ring (yellow), pick, backpack (empty), rake.
- Floor 2: 3 meals (1 cheese, 2 honey jars), rope.
- Floor 3: 15 meals (6 ribs, 6 fish, 3 meat), 18 powder keg.
Cave of Spiders (optional)[edit]
This cave is located south-west from Empath Abbey.
Item list:
- about 40 spider silk strands (exact amount may vary);
- spiked collar;
- dead body (blue): sword, spear, leather armor, wooden shield, leather helm;
- dead body (brown): swamp boots, sling, club;
- dead body (red-green): chain mail, crossbow, main gauche;
- dead body (red cloak): halberd;
- dead body (mage): spiked collar, magic helm, 6 gems.
Swamp Cave (optional)[edit]
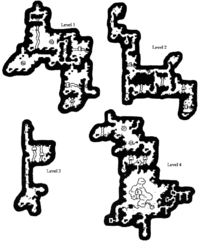
The Swamp Cave is not needed for the main quest. However, a mage named Tirnoth has died here with valuable belongings, including a storm cloak.
This cave can be more easily accessed by ship. It is located east from Britain.
Item list:
- Floor 1
- 101 gold coins, 1 gem, 10 gold nuggets;
- Floor 2
- Leather armor, gargoyle helm, swamp boots, two-handed axe, bow, mace, leather helm, dagger, club; 2 wooden shields;
- Floor 3
- (nothing);
- Floor 4
- Lightning wand, fire wand, storm cloak, regeneration ring, protection ring, invisibility ring; staff; flask of oil, 3 spears; ring (yellow).
Gargish Dungeons[edit]
Tomb of Kings (optional)[edit]
Item list:
- Rare items:
- 3 silver snake venoms, boomerang, 2 yellow potions, 2 red potions, 2 blue potions;
- Useful items:
- Glass jar, food (horse meat), 6 gold nuggets, 262 gold coins, 1 gem, 1 black pearl;
- Useless items:
- Mead, ring (yellow), hammer.
Shrine of Control[edit]
Located in the mountains to the west of the Temple, northwest from the fields of farmer Nash.
The Avatar must access this dungeon to obtain one Gargish mantra. There are no items in this shrine.
Shrine of Passion[edit]
Located in the mountains to the east of the Temple, northeast from the fields of farmer Krill.
The Avatar must access this dungeon to obtain one Gargish mantra. There are no items in this shrine.
Shrine of Diligence[edit]
Located in the mountains to the south of the Hall of Knowledge, west from the house of the Snake Charmer.
The Avatar must access this dungeon to obtain one Gargish mantra. There are no items in this shrine.
| Dungeon Solutions | |
|---|---|
| Game | Ultima II ☥ Ultima III ☥ Ultima IV ☥ Ultima V ☥ Ultima VI ☥ Ultima VII ☥ Ultima VII Part Two ☥ Ultima IX |

