Dungeon solutions for Ultima IV
The dungeons of Ultima IV are quite complicated. The reasons to enter them are fourfold:
- Gold.
- Virtue Stones.
- Magic orbs, which raise stats (they do regenerate!)
- The Key of Three Parts.
These solutions describe the best way to do so, with a section for the Abyss at the end for completeness, since that one is the most difficult dungeon. Also note that unless otherwise stated, this solution assumes that one will not use the spells Y (Up), Z (Down) nor Xit.
Deceit[edit]
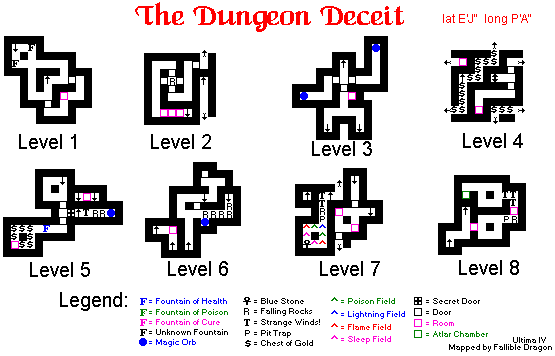
Deceit is, despite its name, a straightforward dungeon with no real puzzles. The Blue Stone is found on level 7 and the orbs on levels 3, 5 and 6.
On level 1, move directly to the ladder going down. On level 2 follow the path through the doors and the stone trap and then navigate through the three dungeon rooms to find the ladder. Take the orbs on level 3, then the western ladder to collect the gold on level 4. That done, return to take the eastern ladder, which leads right to level 5.
On level 5 first get all the gold and the orb (the fountain |heals the damage from the traps), then take the northern ladder. Now follow the path and walk through the two dungeon rooms until you reach the other half of level 6. Take the orb and go through the traps to reach the ladder to level 7.
On level 7, cross the final dungeon room, then go through the traps and dispel the fields to get the Blue Stone.
Detailed solution: Deceit (Ultima IV)
Despise[edit]
- Magic orbs: +5DEX; 200 damage
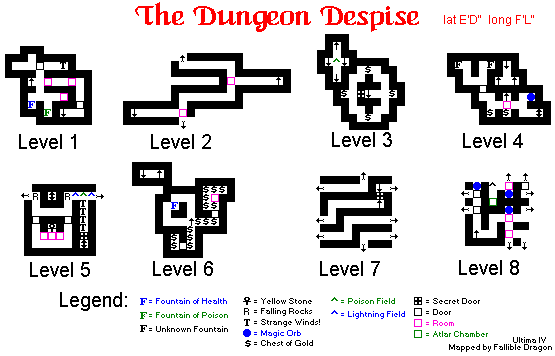
The dungeon Despise can be a little confusing. The most difficult task is getting the orbs on level 8, with one on level 4. The Yellow Stone in found on level 5.
On level 1, cross two dungeon rooms to reach the ladder going down. On level 2, follow the path and exit the first room to the north or south, the second to the west to reach the ladder to level 3. On level 3, dispel the field and take the southern ladder. Exit the dungeon room on level 4 to the east, take the orb, then descend.
On level 5, walk through the winds, dispel the fields and then go south until you reach the three-room configuration. Enter the middle room, kill the monsters and enter the secret door to go north and take the Yellow Stone.
Now backtrack to level 3 and take a different ladder down. Follow the ladders until you reach level 7. Go through the northern secret door and descend to level 8. Take the northern orb first, then navigate through the rooms to get the other two.
Detailed solution: Despise (Ultima IV)
Destard[edit]
- Magic orbs: +5STR; 200 damage
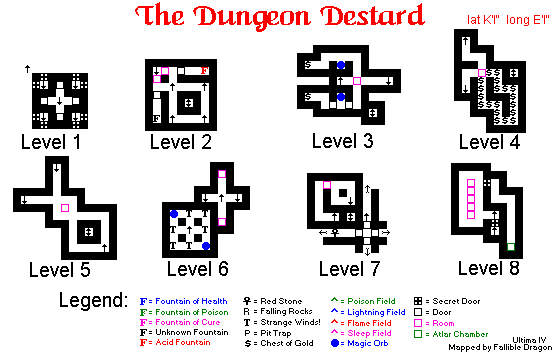
Destard can be a little confusing since it is necessary to backtrack at one point. The Red Stone is on level 7 and the orbs on levels 3 and 6.
On level 1, take a secret door and descend. On level 2 walk through the dungeon room to reach the ladder and go to level 3. Here you must cross a dungeon room three times to get two orbs and then reach the ladder to level 4.
You have no choice but to climb all the way down to level 8. Go through the secret door in the north and ascend to level 7. There, follow the way to the dungeon room to level 6. On level 6, first take the eastern ladder down to get the Red Stone, then ascend to level 5 and take the western ladder down.
In this chamber are the final two orbs, protected by strange winds.
Detailed solution: Destard (Ultima IV)
Wrong[edit]
- Magic orbs: +5INT +5DEX; 400 damage
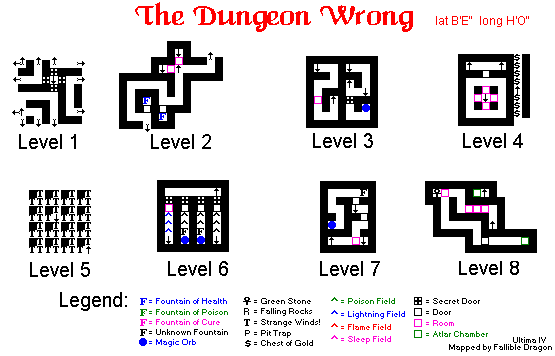
Wrong is the a difficult dungeon with numerous puzzles. The Green Stone is on level 8 and orbs are found on the levels 3, 6 and 7.
Go through the secret door on level 1 to find the ladder down. On level 2, go through the dungeon room, then take the northern ladder down to reach the first orb. Again take the northernmost ladder, then pass one of the dungeon rooms on level 4 to reach the ladder to level 5.
The magic winds on this level will extinguish your torches, so navigate with peer gems, if opting out of dead reckoning, to reach the ladder down. On level 6, first get the two orbs by dispelling the fields, then take the western ladder (behind dungeon room) to reach level 7. On level 7, first go north to get another orb, before solving the dungeon room by stepping in front of a fake wall in the east.
On level 8, pass through the series of dungeon rooms. In the last one, step into the northwestern corner to open the walls to the west. Behind it is the altar with the Green Stone.
Detailed solution: Wrong (Ultima IV)
Covetous[edit]
- Magic orbs: +5DEX +5STR; 400 damage
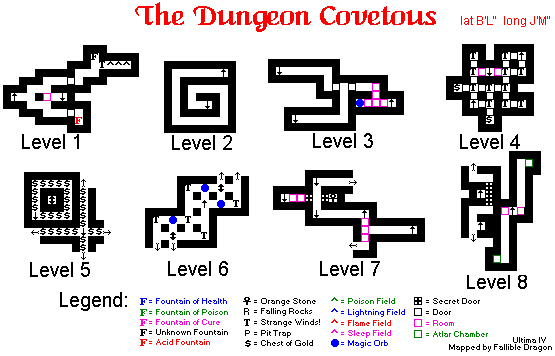
Covetous is trickier than others. The Orange Stone is located on level 7, while there are orbs on the levels 3 and 6.
On level 1, exit the dungeon room in the east, then follow the path on level 2 to the ladder to level 3. Go through the rooms first to reach the orb, then backtrack to exit to the northwest. Take a ladder of your choice to level 4. There are strange winds on that level. Enter the eastern dungeon room and enter one of the smaller chambers to reveal tunnel to the ladder.
On level 5, go directly to level 6. You will encounter more winds. First take the three orbs, then ascend the two other ladders to get the gold on level 5. Next, take the ladder that deposits you north of the level 7 dungeon rooms. Find the secret wall in the east and behind it the Orange Stone.
Detailed solution: Covetous (Ultima IV)
Shame[edit]
- Magic orbs: +5STR +5INT; 400 damage
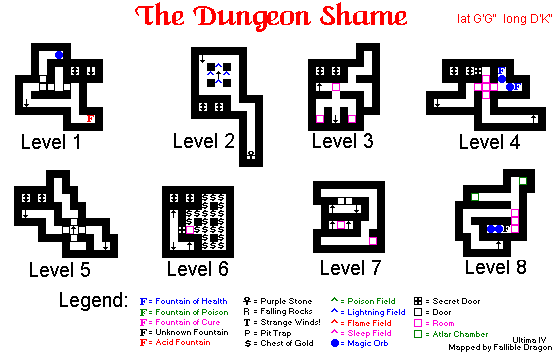
Shame is a challenging maze with many false leads. The Purple Stone is located on level 2 and the orbs are on the levels 1, 4 and 8.
First, you have no choice but to descent right down to level 7. Go into the dungeon room and close in on the eastern wall, then step into the now open coffin to open the wall so that you can exit. Ascend the other ladder to level 4, then walk through the secret door.
Now, first exit the series of dungeon rooms to the east to get two orbs, then to the south to reach the ladder up. Navigate through the dungeon room on level three to reach the western ladder, then get the Purple Stone on level 2. Ascend to get the orb on level 1.
Now backtrack back to level 4 and take the western exit to follow the ladders down to level 8. The rooms are packed with secret doors and monsters, and at the end are two more orbs.
Detailed solution: Shame (Ultima IV)
Hythloth[edit]
- Magic orbs: +5STR +5DEX +5INT; 800 damage
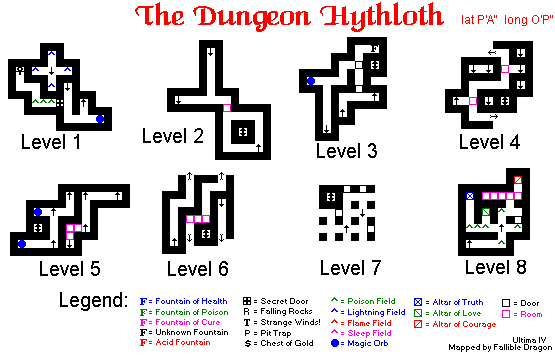
The White Stone is missing from Hythloth. However, the balloon at the entrance is necessary to get the the mountain range where it may be found. However, Hythloth has the most advantageous (as well as most dangerous) magic orbs, which raise three stats. They are found on the levels 1, 3 and 5. Also, it connects to all three dungeon rooms.
Hythloth is the most challenging dungeon next to the Abyss.
Entering Hythloth is not possible the normal way because of shallow waters surrounding the shore to the main entrance. Entering it from Castle Britannia forces you to descend right down to level 8. Dispel the southern field to find the up ladder. It is pretty straight forward, although you have to use the spell Up in order to skip level 6, until leaving the level 5 dungeon rooms. Take the northern ladder up, then the western ladder down, to get two orbs. Backtrack, then take the eastern ladder up.
Pass two dungeon rooms on level and take the ladder to level 3. Take the orb, than ascend to level 2. Pass the dungeon room, then climb up to level 1. Get the final orb. For kicks, you can find the empty altar as well.
Later, return to Hythloth via Castle Britannia to have easy entrance to the altar rooms. Know, however, that if you enter via the castle's entrance, you cannot go back the way you came even if you use the Xit or Up spell.
Detailed solution: Hythloth (Ultima IV)
The Abyss[edit]
- No orbs
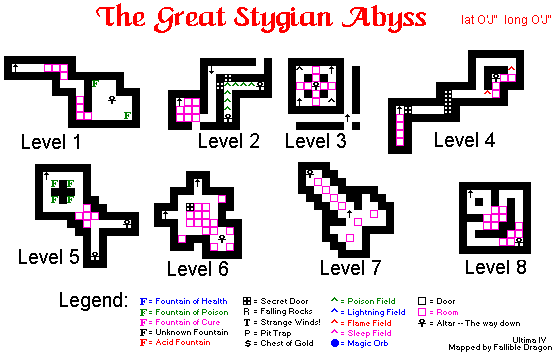
The Abyss is the ultimate challenge. Magically bypassing challenges is impossible and the dungeon has the more difficult rooms and monsters. However, there is no level-hopping required. All Virtue Stones are needed to pass.
- Level 1: Easy. Follow the path, slaughter everything in your way. Use the Blue Stone at the altar.
- Level 2: Also easy. Pass through the rooms to exit at the southeast, then dispel the fields to reach the altar (the ladder is fake). Use the Yellow Stone.
- Level 3: Enter dungeon rooms and work hard to enter the center of the level, where you use the Red Stone on the altar.
- Level 4: Go through the series of secret doors, then dispel the fire field. The door behind the field is a dead end. Instead search for secret doors to find the right dungeon room leading to the altar. Use the Green Stone.
- Level 5: The first complicated room puzzle. Enter southern or eastern room and walk through the area behind the force fields to open passage to the center room. Clear the center room and find touchplates then walk east. Avoid stepping in the middle (poison trap) and exit south. Use the Orange Stone. Or take some poison, it will prevent you from falling asleep on the next levels making it a lot easier.
- Level 6: The meanest level of all. See here for a detailed solution: Abyss room puzzle.
- Level 7: Follow the path and use the secret doors in the dungeon rooms to clear the way, until you reach the altar. Use the White Stone.
- Level 8: The first rooms are a big trap to confuse you. Take the southern entrance and walk south. In the next room, there is a secret door in the northeast and a touchplate to the southwest, opening the exit. In the next room puzzle, kill the mirror images, then enter the eastern room. Find the two triggers at the eastern wall to open the exit to the last altar, where you use the Black Stone.
Then comes the moment of truth. To pass, you need:
- The Key of Three Parts
- The correct password (VERAMOCOR)
- Be at level 8
- Have all 8 companions
- Be a eight-part Avatar
If one of these things is missing, you are booted out of the Abyss. If all is right, then it then goes to the final quiz.
Detailed solution: Great Stygian Abyss (Ultima IV)
| Dungeon Solutions | |
|---|---|
| Game | Ultima II ☥ Ultima III ☥ Ultima IV ☥ Ultima V ☥ Ultima VI ☥ Ultima VII ☥ Ultima VII Part Two ☥ Ultima IX |
| Ultima IV Dungeon Solutions | |
|---|---|
| Deceit ☥ Despise ☥ Destard ☥ Wrong ☥ Covetous ☥ Shame ☥ Hythloth ☥ The Abyss | |
