The Ultima 6 Project dungeon solutions
This page contains maps and detailed instructions for the many dungeons in The Ultima 6 Project.
Moonglow Crypts[edit]
The Moonglow Crypts are where the citizens of the magical city bury their dead. The easiest way to access this dungeon is through a small cellar door behind the bar of the Blue Bottle Tavern. Make sure to talk to Manrel to receive Beyvin's tomb key and daffodils to place on his grave before entering the dungeon, or you will not be able to proceed beyond level 2 to reach the Rune of Honesty on the 3rd level.
The crypts are filled with generations of deceased mages who have been buried with their magical possessions, so be on the look out for considerable treasure, reagents, and other magical items. Search all the bodies and tombs. The undead are quite easy at this point, but the crypts are crawling with slimes and acid slugs, so kill them from a distance, and make sure to stock up on Cure spells before delving into here.
Level 1
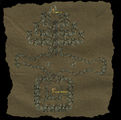
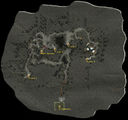
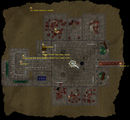
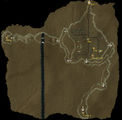
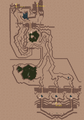
Level 1 is a large circle, so you can choose to proceed clockwise or counterclockwise. Watch out for traps, some of them can hit pretty hard. The map for level 1 is in the room directly to the north of the Blue Bottle Tavern entrance. The door to the 2nd level is in the northeast corner (it is hard to see), but to open it you require the key from the crypt just north of the stairs descending to level 2. There is a Ring of Protection and a fountain that grants invisibility in the far west if you need those.
Level 2
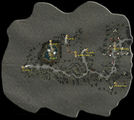
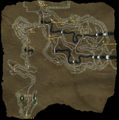
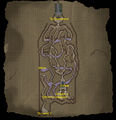
This level is more straightforward than the last. There are a lot of slimes on this level, especially near Beyvin's tomb, so proceed with caution there. One may prefer distanced weapons to kill acid slimes to avoid harming one's armour. A second Ring of Protection can be found in the tomb marked on the map, and a Ring of Invisibility can be found by Beyvin's tomb. Most of the tombs are empty, and are not worth the lockpicks or reagents to open them. Use Manrel's key to unlock Beyvin's tomb, and use the pressure plate on the tomb to place the daffodils.
Level 3
No map is available, but it is quite straight forward. There is a small fountain when you first enter this level, and as you proceed down the stairs beware of the three powerful traps that guard the first door on this level. They will kill your party quickly. After passing these, considerable treasure is available. A magic shield is sitting in the open, so take that. A third Ring of Protection can be found in a room to the right. The magical fountain in this room casts Protection, and can be used to fill empty potion bottles. In the final room, there is the Rune of Honesty, another magical ring, and in the chests you can find the map to level 2 of the Moonglow Crypts, as well as a map to Level 2 of Deceit.
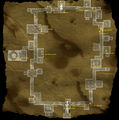
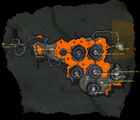
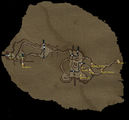
Moonglow Crypts – level 1
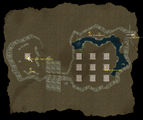
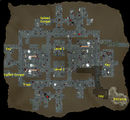
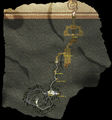
Moonglow Crypts – level 2


Despise[edit]
Dungeon Despise is not connected to the main quest. Instead, Hermione, Terri and Efram task you with entering Despise to find the miner Adan, his gold delivery for the Royal Mint, and his journal. Once you have located the cave entrance to Despise in the Serpent's Spine mountains, descend the entrance stairs.
Level 1
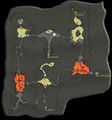
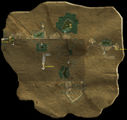
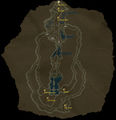
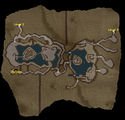
On the first level, go forward to enter the mining complex, since the route to the right takes you to Heroes' Hole, a place were your survival chances early in the game are slim. Once inside the mine, first search Adan's storehouse, which gives you some more information about what had happened. You can search the mine as you please, and also mine the gold you find with a pick, but to advance you have to find the underground river in the west. Once down the ramp, you should start following a trail of gold nuggets to the west (always pick them up), until you reach a small crate with lots of gold and the journal of Sadon. Sadon writes that he has killed Adan. That is bad news for you, so you need to find his body now.
Level 2
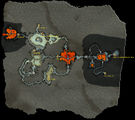
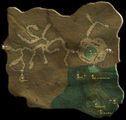
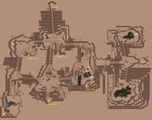
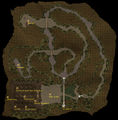
Level 2 is more straightforward than the first one. Ignore all the side-caves, since they all are dead ends. Kill the ghosts that try to stop you, and go forward to the west until you reach a shallow, misty lake. Be careful, this lake is filled with slimes, which will take some time to get rid of. Alternatively, you can use one or two powder kegs from the first level here. Once you have cleared that problem, ring the bell to call Grimm Roeper the ferryman from the other side of the big lake. Pay two gold to cross. Once across, take the northern path and then further to the west to find the entrance to level 3 of Despise.
Level 3
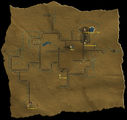
Level 3 is big, but holds large rewards. Once there, stay on the right side of the river and descend the ramp to find Adan's body under a lit torch near the river. Take his journal and read it to the end to get all maps and the quest entry. Also, take all of the nuggets and gold bars in his crates. If you have taken all nuggets and gold bars so far in the dungeon, you should have the needed gold for the mint. Now that the main quest is finished, additional treasure can be found before leaving.
Cross the river behind the waterfall and quickly pass the lake (be careful, rotworms and zombies abound!) to reach the cave entrance in the west. Inside the winding, narrow cave, go the the right, past a cavern filled with a daemon and many skeletons. Past this cavern there is a set of traps. Be careful. Further down the winding corridor past multiple enemies is a small cave containing a magic shield and a magic sword.
Level 4
Level 4 can be accessed through a hole in the middle of the lake you just passed. It holds nothing but minimal treasure and three silver serpents.
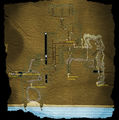
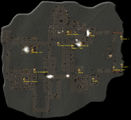
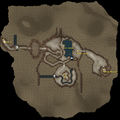
Despise – level 1
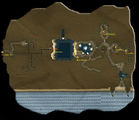
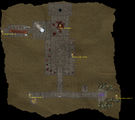
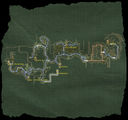
Despise – level 2

Despise – level 3
Despise – level 4


Sewers[edit]
The sewers are located below Castle Britannia and you need to enter them in order to find Phoenix and steal her belt, so that Budo allows you entry into his guild. The sewers have only medium-strong monsters, but they are many, so preparation is needed. Besides the main objective, a huge amount of loot can be found on the third level, and an exit to the Buccaneer's Cave.
Level 1
You start this level, entering from the sewers under the castle. Right away you read a book from guards that speak of a great evil in this level. Still, move on and search every cell and container on your way. Your only opposition will be low-level monsters like rats and gremlins. In the northern part, you finally get to a door that you can't open normally. You need the black gem from the tree stump outside the castle. Behind it is the "Evil Old Man". Be warned that he is immune to all physical attacks, has tons of hit points and can kill you with a touch of his little finger. However, he is vulnerable to magic, so use attack spells until he is dead, then loot his room. You can only open his chests with the seemingly useless keys from dungeons – they work here. The loot is impressive.
Going on, you should find the exit to the next level soon, but first take a detour into the lair of the Nether Abomination. It is a liche and if you have the storm cloak, you can waste him easily. His room contains lots of good loot – among other things a protection ring and magic armour. Now exit to level 2.
Level 2
Go straight forward, until you enter cell block 2. You should raid it the same way you raided the first cell block. When you are done, exit to the caves and follow the path until you reach water and its unfriendly inhabitants. Follow the river – with a short interruption on land, until you reach land and the exit to level 3.
Level 3
This level is the big payoff. First go through the narrow caves until you reach the big lake. Enter the lake and go to its southern shore, where you find a way further south. This leads to Phoenix's house. You can chat with her, but important is to steal her belt with Pickpocket. She also has other neat stuff with her. Once that is done you could leave, but there is much more loot to get.
Make your way to the other southern exit of the lake and follow the land path north, over the waterfall. At the northern shore, there is a bridge to a big pirate fort. Of course there are countless pirates, but slaughtering this armada is worth it, as the fort is filled to the brim with good loot. Among other things, you find Captain Johne's hat – keep it for him. After finally getting everything, you can either orb out, or take the stairs to the Buccaneer's Cave.
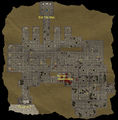
Britain's sewers – level 1
Britain's sewers – level 2
Britain's sewers – level 3


Buccaneer's Cave[edit]
Located on Buccaneer's Den, it is possible to enter the Buccaneer's Cave from the town above or the Britain sewers. There are several magical items available from the pirates within, as well a group of dragons have set up a nest within these tunnels. The pirates within are not too strong, and should be easily defeated by a level 5 or 6 party with decent equipment.
Level 1
The entrance of Buccaneer's Cave can be reached through the cellar door beneath Budo's home. From Budo's cellar, continue north, and go down a large staircase to enter the Buccaneer's Cave. Head down the stairs, and turn to the west. To the north of here down a staircase is a large pirate encampment. Several reagents and minor treasure can be found here. To exit to the Britain sewers, turn to the east from the pirate camp. The first exit to the east takes you down to a small spider cave on the second level. Further to the east, another exit takes you to level 2, and straight down to the Britain sewers.
Level 2
Down on the second level, far to the east, is another pirate camp. In here is a magical helm, and a number of other small treasure. In the far southeast corner, there is a tiny entrance to behind an outcropping to a cave further to the south. Travel past a number of dragon eggs, and enter into a room with four red drakes. It's a tough fight, but if you get through there you can find a ring of protection and a magic shield. Continuing through the dragon cave takes you to a large lava lake with an island in the middle. The island is empty, so don't waste your health running through the lava.
Buccaneer's Cave – level 1
Buccaneer's Cave – level 2


Destard[edit]
The hellish dungeon Destard west of Trinsic is the home to many dragons and drakes and therefore a very dangerous place to be. As well, the dungeon has numerous twists, turns, and dead ends, making it very easy to become lost. You need to enter to get some dragon eggs for Sandy, so that he will tell you the names of the remaining pirates that hold on map pieces. Also, if you plan on joining the Knights of the Crux Ansata, there is a dead fighter whose shield you have to get to mayor Zellivan of Jhelom. The dungeon also contains several elder white wyrms. They are tough, but can be fairly easily defeated if you have the storm cloak and engage them in melee. There are also green drakes, which breathe poison breath, and poison your entire party, so bring lots of curing and healing reagents.
Level 1
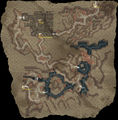
Head down the main stairs into the dungeon, and turn to the west. There's a small staircase which leads to a large misty lake. Beware the many acid slugs and slimes down here. Search the backpack by the body near the northern edge of the lake for the level 1 dungeon map. Take the southern exit through a small corridor. You want to take the exit to the right until you get to a bridge through a lava tunnel. Take the eastern bridge. Beware the many drakes through here. When you get to the next acid slug filled lake head south to exit to the next level. There is some treasure and a few gems in the far southeast corner of this level, but maybe not north fighting the dragon that guards it.
Level 2
Level 2 is tough, and there are a lot of dead ends with no treasure. When you go down the stairs, head to the east and search the body with the Shield of Courage for the map to the second level. There's a tough fight with a dragon and a green drake in here. Exit through the east into another small lake. Continue east until until you loop around to a lava filled chamber with fours exits. The exits to the south and west are long dead ends, and best avoided. Exit to the east. If you continue all the way to the east past another lava lake, there's a cave with two dragons in the far east. It contains a ring of regeneration and a magic bow. Backtrack, and keep your eyes open for a small passageway to the north. It is hard to see. Take it and wind your way south across a bridge. At the end of the corridor is your first fight with an elder white wyrm.
Level 3
Level 3 has a large central lava pit, with multiple dragons that fortunately cannot reach you. In the center, is a small island with remains and a snake standard shield. The level 3 dungeon map can be found right at the entrance to this level. A magic bow can be found in the room to the southeast. A large number of gems can be found in the room just to the south of where you enter. The exit to level 4 can be found in the far east. To get there from the start of the level, head east to the first intersection, head south one intersection, and then keep heading straight to the east. The exit to level 4 is in the far eastern corner of the room.
Level 4
Level 4 has multiple elder white wyrms. There is a large lava pit in the center of the level, with multiple stone towers rising out of the flames. Dragons have built their roosts on the pinnacles of these towers, and small stone bridge connect them. When you first enter the level, there is a large staircase to the north. This is actually a long dead end, that takes you to a dragon roost containing 3 or 4 dragons. There is no treasure up here, but a special named dragon called 'Peep' drops dragon tartar. Instead of taking these stairs, head to the east. Just before the lava lake is a ring of regeneration and the level 4 treasure map. In the southeast corner of the lava pit, there's an elder white wyrm surrounded by four blue drakes that does not seem to be effected by the storm cloak. This makes for a tough fight because they cast some incredibly powerful magic. In the northeastern corner of the lava lake, there is a small passageway that leads into a room with a massive white wyrm. You can kill him if you wish, and then take the stairs to the north. Follow the passageway up to a series of dragon roosts. There is huge treasure up here, including a magic helm, magic shield, magic sword, magic armour, rings of protection, multiple dragon eggs, magic staves, glass swords, and spiked gorgets. Grab more than one dragon egg. Use the Orb of the Moons to return to Trinsic.
Destard – level 1
Destard – level 2

Destard – level 3
Destard – level 4


Wrong and Covetous[edit]
Dungeon Wrong and dungeon Covetous on the shores of Lost Hope Bay are connected to each other on the third level. The dungeon can be conquered from either entrance, and Covetous is likely the easier of the two. In order to get past the third level of Wrong, you also need to explore the second level of Covetous. anyway. In the fourth level of Wrong, you can find the part of the treasure map that rats stole from Heftimus McPry. Wrong is filled with powerful foes and therefore should only be entered with full reagent stocks. There are also a number of hostile children who cannot be saved. Covetous has many slimes. There are many magically locked doors and chests in Wrong which will require significant use of reagents, and a number of keys need to be located, too.
Covetous Level 1
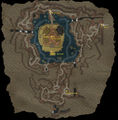
The map for this level can be found in the abandoned lighthouse in Minoc. Very little treasure on this level. There are a few gold nuggets far to the east, and a key that will help later with Wrong in the cave to the north. Another key can be found to the south, behind a boarded-up passage that you have to smash open (the key is well hidden in the niche behind that). Upon entering this level, head left following the mine cart track. Follow the track again to the left, and continue all the way until the east, where there is a staircase down to level 2. Watch out for all the slimes.
Covetous Level 2
Small level, but lots of treasure. When you first enter the level, there are a bunch of snakes. Kill them all. In the center of the swampy area is a bucket. You cannot reach it, so shoot it with an arrow and use Fetch to retrieve the key. From the barrel, head south through small door into a larger swampy area. Watch out for corpsers. The first floating barrel you come across in the swamp contains the Level 2 Covetous map. Explore further south. There is a magic sword in the chest on the island. Another key can be found in a barrel floating in the water south of the chest. A final key can be found in a small passageway to the east of the swampy corridors. You will need these keys to access Wrong level 3. The access to level 3 Wrong can be found far to the west.
Wrong Level 1
This level is a large loop, with many small corridors projecting outwards, and a few small chambers inside of the main loop. When you first enter the dungeon, there is a key hanging at the entrance. Grab it, and head further into the dungeon. Two spiked gorgets can be found on this level, one in the far southwest corner inside some sleeping quarters. The other spiked gorget can be found in the northern part of the map in a library. There are 2 staircases to level 2 in the center of the map. You can also grab keys from a table in a room to the center east, and a key from the center west.
Wrong Level 2
This level is also confusing, and has several dragons about. Watch out for the deadly trap if you take the southern exit to level 2. It is between 2 statues, and will kill your party very quickly. There are 3 daemons and a room full of children just to the southwest of the northern exit to level 2. The map for level 2 of Wrong can be found on a spider web covered corpse in a small jail cell just to the east of the central north-south running corridor. You have to keep your eyes peeled. To exit to level 3, enter the room to the far west with a large statue. Inside are many dragons, so defeat them all. A ring of invisibility can also be found in this room. Proceed east from this room all the way, and turn north. Follow the corridor to the east again. In here, there is a locked room which spawns a dragon. Kill the dragon, and loot the chest, and a key can be yours. Continue east of here. To the north, there is a locked door to level 3 of Wrong, and you will need to search Covetous to find the keys.
Wrong Level 3
Head north into the main room of level 3. There are multiple small cells coming off this room, and the central cell to the east contains the map to level 3 of Wrong. Grab it, and proceed to the north into a room full of children. Head to the west of there to proceed to level 4.
Wrong Level 4
You enter into another large room with a statue in the center. There are 4 silver serpents in this room to take care of. There are some barracks in the far eastern corner of this area, with multiple footlockers. Clockwise from the entrance, the first locker has a magic shield. The second locker has the level 4 Wrong map. The 7th locker has another spiked gorget. The room in the far northwest has a key buried in the refuse pit. Now, head to the west through several rooms. They will loop around to the north, and then back to the west. Within are 2 liches, easy if you have the storm cloak. Grab the map piece from the floor. Loot the chest for a magic sword, and ring of regeneration, and invisibility.
Wrong – level 1
Wrong – level 2
Wrong – level 3
Wrong – level 4
Covetous – level 1
Covetous – level 2


Shame[edit]
Dungeon Shame can be found at the shores of Lost Lake. It is full of headless, rogues, trolls and a few dragons and drakes. The dungeon consists of numerous large caverns with long connecting tunnels, with the first two level designed as a mine. You have to find the lost pirate Old Ybarra in order to get his part of the map, so it is advisable to talk to Homer about the Hawkins map before entering. Also, Shame is the place where you can find the LAIM scroll for Mr. Blip and Miss Blip in a secret chamber on the 4th level.
Level 1
Take the elevator down to the first level. Make sure to carefully position all characters on the platform before pulling the switch. This first level has nothing tougher than headless and orcs, so carefully follow the map to make your way to the second floor elevator. The level map can be found in the shack at the bottom of the entrance elevator.
Level 2
Do not proceed straight ahead into the mines. It is just a bunch of confusing dead ends. Instead, circle around to the right of the minecart tracks. There is no need to go into the long cavern with the drakes. They are tough, and there is no treasure. Continue circling around until you reach the cyclops camp. Kill them all, and go down the hill for 3 barrels. Search them for the level 2 map. Continue south from the cyclops caves until you reach another elevator going down.
Level 3
Things start getting a little more difficult on this level. Proceed to the bridge going across the large chasm. If you proceed straight across the bridge, you follow a long convoluted tunnel counter-clockwise around the main chamber. This eventually takes you into a fight with a gazer. One of the corpses has a magic bow. If you do not want to take this long detour for a magic bow, head left instead of taking the bridge. This sends you clockwise around the main chamber. Smash the boulder that is in your way, and proceed to a small rogue camp. Kill the rogues, and search for the level 3 Shame map. Proceed west until you get down into the main chamber. From here, keep heading west through the main chamber until you are on the other side of the river across from the gazer. Proceed through the small gap in the rocks, and follow the trail until you reach level 4.

Level 4
There are several things to do on this level. Head south, and defeat the dragon. He is hard to see, since he is way above you. Take the level 4 map. Continue heading south unto you reach a four-way intersection. Take the route to the west. Travel through this small passage, until you see a small passage heading to the left. Follow the path to the southeast until you reach a room with a magic fountain. Use it, to wish for food. Ybarra needs this. In the south of this room is a large rock blocking a passage. Use a powder keg to blow it up. Go inside. Here you can find the LAIM scroll for Mr. Blip and Miss Blip. You can also find the decapitated heads of The Ultima 6 Project team. Head back to the fountain room, and head back to the four way intersection. This time head east, and take the first small passage to the right. Follow through here until you meet Ybarra. Trade him food for the map piece, and tell him where to find the magic food fountain. Note: make sure you are finished with everything on this level, because if you use the Orb of the Moons to exit, you will not be able to get back down here because the elevators will be stuck down below.
Shame – level 1
Shame – level 2
Shame – level 3
Shame – level 4


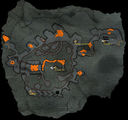
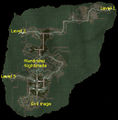
Ant Mound[edit]
The ant mound is home to the giant ants of Britannia. The cavern entrance can be found deep within the Drylands. It consists of a multitude of twisting sand tunnels and caverns, with the occasional pool of water. Treasure is sparse, since the ants have little interest in gold or other treasure. The Ant Queen and the body of Ol' Hawknose with a piece of the treasure map of Hawkins can be found on the bottom level.
Beware the giant ants, for they are tough, they are fast, and they will poison unwary adventurers. They can be fairly easily dispatched by using ranged weapons, but care must be taken not to allow them to gang up on you. Also, beware of rooms with larvae, they have a nasty tendency of hatching and attacking your party from behind. You will want several thousand arrows, and enough reagents for at least a hundred Cure and Heal spells.
Level 1
There is very little of interest in this level, therefore just going to the exit to the next lower level is needed. Entering from the hole near Sin'Vraal's hut is advised, since from there, one has to just go forward and then after the narrow canyon, turn right in order to find the ramp to the next level, avoiding unneeded confrontations.
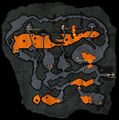
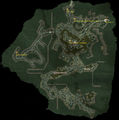
Level 2
This level can be somewhat confusing without a map. After entering, go south to the lake, then take the eastern exit. Follow the corridor and then take the eastern way again. Once the corridor turns eastward, take the first southern tunnel to enter the middle of the three chambers, which holds the ramp down to level three.
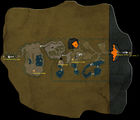
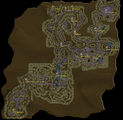
Level 3
This level is a bad labyrinth and without a map, not beatable in a reasonable time, as it also is infested with giant ants. After entering, take the first, western way and follow it, until it is bisected by a plateau. The plateau is a red herring. Follow the southern way and ignore the first way south. Take the second, where you find some treasure. Go through the arch and enter the food chamber for more treasure, before making your way north to the vineyard, where the exit to level four is found.
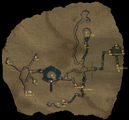
Level 4
This level is straightforward. Take the southern way and go straight westwards, ignoring all side paths. After crossing a shallow lake and beneath a stone bridge, you should see the Ant Queen. Do not harm her, since this would be genocide and hurt your karma badly. Instead, ignore her and go around her. West of her are two chambers. In the northern one, you find the body of Ol' Hawknose and his piece of the map, beside some loot. You then can orb out.
Ant mound – level 1
Ant mound – level 2

Ant mound – level 3

Ant mound – level 4


Pirate Cave[edit]

After finally getting the parts of the treasure map of Hawkins and the exact orders from Homer, you have to enter the Pirate Cave on Spektran to get the other half of the silver tablet from the pirate treasure. Make sure you bring 3 powder kegs with you. The cave itself is a huge maze that is filled with many dangers including dragons, many trolls, and a nigh infinite number of slimes and acid slugs. Ranged weapons are a must for these. The fourth level contains Captain Hawkins' treasure.
Level 1
This level has lots of trolls. Look in the starting area for the map to level 1. Take the exit to the far left behind the sign that says danger. Just a short ways into this passageway, there is an exit to the right. Then immediately take the next exit to the left. It is very short. Follow down this passageway until you see another sign and an exit to the left. Take that passageway for awhile. You will cross a landbridge, and fine several branching chambers. Keep heading to the west, avoiding the passages to the north and south. You will eventually loop around to a troll camp. Defeat them all, and continue through the cavern until you reach level 2.
Level 2
If you head straight south into the lake, you can find the map to level 2. Head back out of the lake, and this time take the passageway to the east of the lake. Head south, and ignore the first passage to the right (east). Take the second passageway to the right (east), which will take you across 2 land bridges, and you will fight a mimic. Take the small cliff to the right, and loop around off tower into the cavern below. There are many slimes down there. Try to kill them all from afar with your bow. When you reach the bottom, you will see an exit to the west. Do not take that. Instead explore the cavern for an exit to the south. That will take you to level 3.
Level 3
Level 3 has a large lake full of sea serpents. Try to avoid them all. Instead, as you enter the level take the exit to the right into a large cavern. Head to the southern part of the cavern. Do not take the land bridge. Do not enter this lake. In the south, you will see an invisible passage. Do not head south through that, but instead loop along the cliff on the southern edge of the lake. Follow this east, until you reach a smaller lake. Enter it, and then take the exit to the east. This will take you across a land bridge to the top of a tower. Walk down the little ledge into the lake. From there, go north, looking for a walkway out of the lake, and then further north for a walkway up onto the northern cliff. Follow that out of the cavern, and take the path to the left, which will lead you to level 4.
Level 4
Almost there. As you cross a huge land bridge, you will see dozens of slimes below. You will have to kill them all, eventually. Kill as many now as you can. As you head north across the land bridge, you will see three passageways exiting from a central room. The far eastern passageway takes you to a room with dragons. The north (central) passageway takes you to a room with 2 daemons and a strange animated corpse. The exit to the left (west), will take you to the room with all the slimes. Kill them all. On the far end of this room, there is a huge metal door. Stack 3 powder kegs in front, and fire an arrow to blow them all up. Enter Hawkins' treasure room. Search every box, there is a lot of good stuff here. You will absolutely want Zoltan's earring, the silver tablet, the storm cloak, and the
magic fan. Look for a magic helm, glass sword, protection ring, invisibility ring, magic bow, and the level 4 map. You can now backtrack all the way to your ship, or you can walk to the west through a large magical wall. There are many swashbucklers here, so kill them all as you work up, up, up. Eventually, you'll return to the surface. Grab the vessel sitting there. You don't need the deed, but if it makes you feel better, it's in the cargo hold.
Pirate Cave – level 1

Pirate Cave – level 2
Pirate Cave – level 3
Pirate Cave – level 4


Hythloth[edit]
Located on the southeastern coast of the Isle of the Avatar, Hythloth is a series of large magma filled caverns interconnected by small passageways. The dungeon is a hellhole filled with dragons, daemons, and mongbats. It is necessary to enter this dungeon to reach the Realm of the Gargoyles. Captain Johne can be found living in a small house on the fourth level. The long lost quicksword Enilno, used to slay the enchantress Minax can be found deep within a lava lake on level 3. This is the most dangerous of all dungeons, and it is advised to only enter after having full stocks of reagents and the best equipment possible. All dungeon maps are located on level 4 in a small backpack in Captain Johne's house.
Level 1
There is no treasure on this level, just a number of giant magma filled rooms. Head down the stairs, and north past two storerooms. Exit the next cavern to the east, and cross the giant land bridge. You are now in Hythloth proper. Take the long corridor southeast into a huge room filled with many dragons and drakes. Head straight east across this the cavern, to the north of the lava lake. Exit the cavern to the east. Follow the passageway as far as you can north, and then turn east again. This will take you to another lava lake. The stairs down to level 2 are on the southeastern edge of this second lake.
Level 2
Still no treasure, just a lot of tough fights. Continue along the main corridor east, north, west, and finally to a small exit into the main part of level 2. You can eventually reach level 3 by looping north or south in a large circle. The passageway to level 3 is on the far western side of the loop. I personally prefer north, and there is a food wishing fountain along this route. Head to the north, and follow the left handed wall. You will come across 3 small passages to the left (south) in quick succession. They are all dead ends, so avoid them. Continue following the left hand wall far to the west. You will reach a room with a large pillar in the center. From here you want to take the exit to the northeast, where there is a large lava lake completely blocking your passage. You have to wade across, and directly on the other side, there are several dragons and drakes waiting for you. After you heal up, you will see another lava filled passageway to the northeast. Dive in again, and you will soon reach level 3.
Level 3
Finally we have reached Enilno. Head east, and the path splits north and south. Take the northern route to avoid wading through another lava lake. You will see several passageways leading off to the north. The first passageway is filled with lava, and should be avoided. The second passageway takes you to level 4 and a fight with 2 ancient wyrms and multiple dragons. We want to to go that way eventually, but we want Enilno, too. The third passageway to the north is a deadend. Finally you reach a small exit to the west. Take that, and proceed north. The trail splits east and west. East takes you to another wishing fountain. West takes you to Enilno. As you proceed through here, there is several small pillars on the left hand side. Walk through those, and look for an arrow leading down into the lava. When you get down there, use Dispel Field to retrieve the sword. Be careful, as soon as you retrieve Enilno, multiple dragons appear, fight them all, or run. Backtrack, and proceed to level 4.
Level 4
Finally things start to ease up. Keep proceeding west. There is a lake full of sea serpents to the south. Avoid it. Continue to the west, and you will see a a small stairway. Take that. If you explore more, you will have to deal with a gargoyle encampment, which should be easy at this point. Head across the land bridge. Take the small passageway around this cavern to the north. This will finally take you to another large cavern. In the southern part of this area, you can find Captain Johne. Talk to him, grab the Hythloth maps. The exit to the Realm of the Gargoyles is in the northwest corner.

Hythloth – level 1
Hythloth – level 2
Hythloth – level 3
Hythloth – level 4


Deceit[edit]
Dungeon Deceit on Janus Island is home to an unnamed mage on level 4, who possesses a medallion made from the bones of Mondain. This important artifact is required by Lorcan to help summon Mondain back to Britannia. The dungeon has numerous magic traps, that cannot be detected by your party, and have a tendency to poison or put your characters to sleep. Keep your party at full health at all times. There are numerous branching corridors and dead ends for your party to get lost in. Watch out for secret passages. There are a number of slimes, gremlins, mimics, and even a whole horde of zombies on level 4.
Level 1
Head down the stairs and go to the west. The doors to the north and east are dead ends with mimics. Head through here into a cavern with four more corridors branching off. Head to the east. The two passages to the north and the passage to the south are long dead ends with many traps, gremlins, and mongbats. Avoid these and continue east. Head through the lake and take the small passage further to the west. This next area is a circle with four spokes radiating out of the circle. The second exit clockwise leads to level 2. The other three exits contain traps and monsters.
Level 2

The map for this level is found in the 3rd level of the Moonglow crypts. Head to the west, and walk through the secret passage to the south. If you continue to the west, there is an impassable invisible barrier. Continue further to the west to the next split in the passage. The passage to the north has many gremlins and traps, which eventually leads to a dead end. The south leads through some boulders into a large cavern. There is a giant gazer in this area which is an illusion. It cannot hurt you, and you cannot hurt it, but it is so big it is nearly impossible to maneuver around. Try not to aggravate the gazer too much because they are fast and you cannot outrun them. Invisibility can be your friend here. If you absolutely have to, leave one party member behind to engage the gazer and finish the dungeon with your remaining three party members. Anyway, head into the main cavern, head to the far north. From there, take the passage through to the west. Do not take the southwestern passage, as this sends you back to the beginning of the level. Head through the corridor into another lake. There are two passages to the west out of here. The southern passage takes you to a dead end with multiple traps. If you get trapped in a small room, you have to kill the two evil mages to escape. The northern passage loops you around eventually to level 3.
Level 3

Head into a room with a number of chests and buttons. These do nothing. Head to the east or west, and loop around. There are 3 levers you need to pull. Watch out for them. This opens a passage to the south from the original room. Head south. This takes you to another set of jails which contain children. The second jail on the west has a small button on the western wall. Press that and continue further to the west. Go south from here, and fight the giant mimic. It has 1000 hps, but is easily defeated. Continue south through the secret passage, and investigate the corpse to the east for the level 3 Deceit map. Continue south and take the passage to the west which will take you to level 4.
Level 4
Head east across a land bridge into a large chamber. Do not take the exit to the south, it is a trap, instead head to the north down into the lake. Head east across the lake fighting the zombies. They are not so strong. Further to the east is a corpse, search it for the Deceit level 4 map. Continue further to the east through a small exit into another large chamber. In the far eastern end is an evil mage. Kill him and take the key from his body. Use it to unlock the two chests. One of the chests has Mondain's medallion, which was your goal.
Deceit – level 1
Deceit – level 2
Deceit – level 3
Deceit – level 4


Swamp Cave[edit]
The entrance to the Swamp Cave can be found southeast of Cove in a small swampy peninsula. The stairway leading down into this dungeon is located just behind Grendel's hut, left over from Ultima V. A powerful mage has taken up residence on the third level, and there are numerous gems, gold nuggets, and other magical treasure hidden through these caverns. More importantly, there is a storm cloak located on the 3rd level, which may be extremely useful if you haven't yet visited Mariah in the Lycaeum.
Level 1
Head down the stairs into the swamp cave. When you reach the first intersection, head west. When you first get the opportunity to turn south, look for a small wooden crate which contains the level 1 Swamp Cave map. Head further to the west as far as you can for a ring of protection. Head back to the entrance and head east. There's some minor treasure to the far east, but you can head north instead for the exit to level 2.
Level 2
Head east to a bridge, and take the bridge to the south. Right across the bridge to the right is a large field of nightshade and mandrake root. Continue south across a stone bridge into the camp of an evil mage. Nothing too interesting here, so continue to the southwest around some stairs into the swamp below. Work across the bridges into the west and head down to level 3.
Level 3
Head west. There's a small passage leading out into the swamp to the south. There is an altar here with many gems, but be careful, there are several very large and very powerful corpsers hiding in the swamp just around the altar. Continue further to the west, an you will see a force field. Dispel that, and head into the cave. There are several undead, and a powerful mage. Kill them all, and look for a small magically locked wooden crate. Look in there for a storm cloak, the level 3 Swamp Cave map, the map to the Spider Cave, several magic rings, and a magical staff.
Swamp – level 1
Swamp – level 2
Swamp – level 3


Cyclops Cave[edit]

The Cyclops Cave can be found just to the east of the road from Empath Abbey to Skara Brae in a small forest. Within are hundreds of the aforementioned cyclopes. These creatures are slow, but hit hard, so having a way of destroying them from afar before they can engage in melee combat is essential. Beware, some cyclops throw rocks at the party.
Upon first entering the cave, there are three cyclops encampments. The one to the southwest contains a map of the cave. Some gold can be found in the camp to the east, and a ring of regeneration is located in the north.
Further east lies the cyclops banquet hall. In here are dozens of cyclops, several empty cauldrons (needed for making the hot air balloon), and dozens of powder kegs. The cyclops use the powder to season their food, but be careful, one misplaced arrow can wipe out your entire party in a colossal explosion. The banquet hall and the storeroom to the north contain enough food to feed your party for months. Also in the storeroom, the party can find a spoiled dragon egg. To the south of the banquet hall lies the cyclops bedroom. In the various barrels and chests here, can be found cyclops loincloths. These powerful magics item will cause fear in all nearby enemies.
Spider Cave[edit]

First mentioned by the bard Nan in Britain, the Spider Cave is a small cave found in a mountain south of Empath Abbey. The Spider Cave contains numerous arachnids and a few poisonous slimes. Spider webs abound, and these can be used to gather spider silk. The map for this dungeon can be found on the 3rd level of the Swamp Cave A small gargoyle encampment that had been overrun by spiders can also be found in the depths. Make sure to check out the web-covered bodies and barrels for treasure. The dreaded Spider Queen can be found on the lowest level and slaying her nets the party 500 spider silk.
The news of the death of the beast can also be brought to Nan, in order to close the quest, which is the only quest relevance this cave has.
Heroes' Hole[edit]
Heroes' Hole, located south of Trinsic, holds nothing of plot relevance. However, it offers experience through many fights and some loot. The second level of this dungeon can be accessed through Despise or Heftimus Cave. There is a number of very tough fighters with plate mail. Do not allow them to gang up on you.
Level 1
Enter through the cave south of Trinsic. Head north from the entrance to reach a camp of evil fighters. There in the chest, you can find the map to level 1 of Hero's Hole. Continue from here east to a room with about ten reapers. Reapers are tough, and the best way to clean this out is with ranged weapons and the storm cloak if you have it available. Lots of gold here. Continue north until you reach a room with a basket in the center. Use this as a marker for your explorations. To the north of here are exits down to the second level of Hero's Hole. To the east of here, there's several rooms with nightshade and further to the east is a room with about twenty acid slugs. There's nothing of value, and the fight is tough. North of the room with acid slugs, is a room with several snakes. Further north of that is an evil altar surrounded by about a dozen evil fighters and half a dozen evil mages.
Level 2
Level 2 can be directly accessed from Despise to the east or Heftimus' Cave to the west. You can also reach it from level 1 above. There's not much to see on this level, other than several elevated platforms connected by bridges. To the north, you can take a path down to the chasms below, but there is nothing down there other than dozens of slimes and other poisonous creatures.
Heroes' Hole – level 1

Heroes' Hole – level 2


Heftimus Cave[edit]
Heftimus Cave, is located north of Jhelom. It is a long straight tunnel that holds numerous evil fighters. The fights are tough, but most of the warriors drop plate mail, which can be sold to a blacksmith for substantial gold. The cavern eventually joins up with Hero's Hole.
See Also[edit]
| Dungeon Solutions | |
|---|---|
| Game | Ultima II ☥ Ultima III ☥ Ultima IV ☥ Ultima V ☥ Ultima VI ☥ Ultima VII ☥ Ultima VII Part Two ☥ Ultima IX |